
Windows 11 is running much slower with data increased? This issue usually happens when your Windows 11 is installed in a HHD (hard drive) with little space left. One of the effective ways to improve the OS performance is to migrate your Windows 11 system from HHD to m.2 SSD. Here this article will show you why you need to move Windows OS to m.2 SSD and how to migrate windows 11 to new m.2 SSD without reinstalling and losing data.

M.2, previously known as the Next Generation Form Factor (NGFF), is a new design for SSDs, which connects motherboard on Computer using connector slot instead of cables. Compared with old SSDs, M.2 SSD has smaller size, faster boot speeds and higher running performance for notably larger operating system such as Windows 11. That's the reason why many users want to move Windows 11 to m.2 SSD. Now let's learn about how to migrate Windows 11 to m.2 SSD without reinstalling in 2 ways.
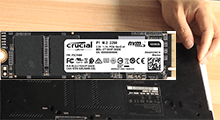
1. Shut down your Computer and install a new m.2 SSD to Computer. Then restart your Computer.
2. Visit https://wimlib.net/ web and click wimlib v1.13.5 Windows binaries (64-bit) to download wimlib-imagex file to D drive.
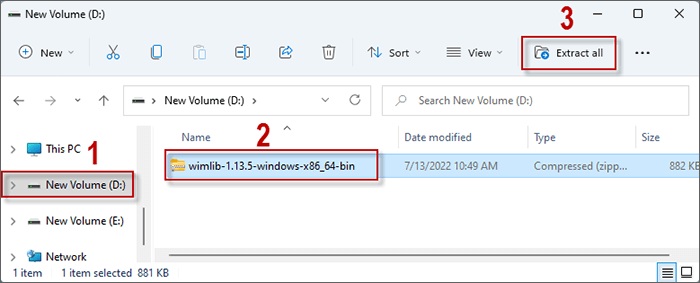
3. Left-click wimlib-1.13.5-windows-x86_64-bin.zip file and click Extract all on the right top.
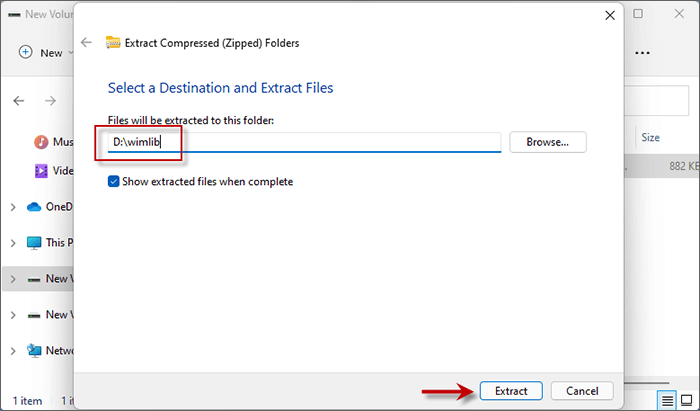
4. Set the extracted file path as D:\ wimlib and click Extract. After extracting, the path of wimlib-imagex.exe is D:\wimlib\wimlib-imagex.exe.
Create EFI partition, boot partition and recovery partition on newly added m.2 SSD using diskpart command.
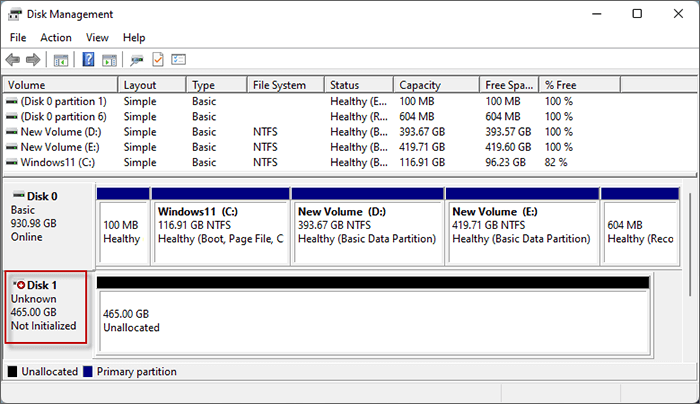
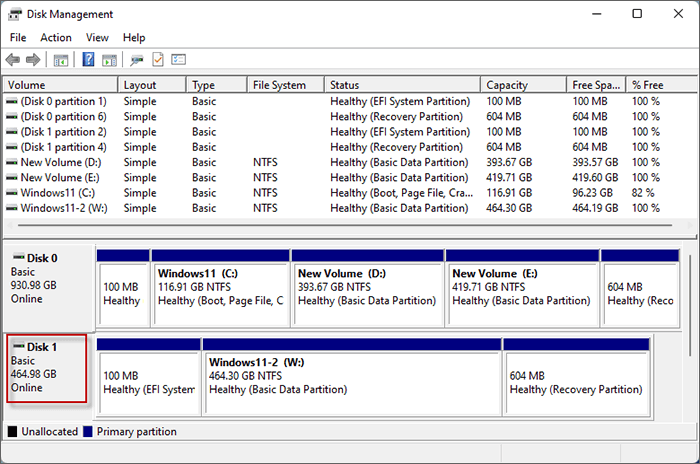
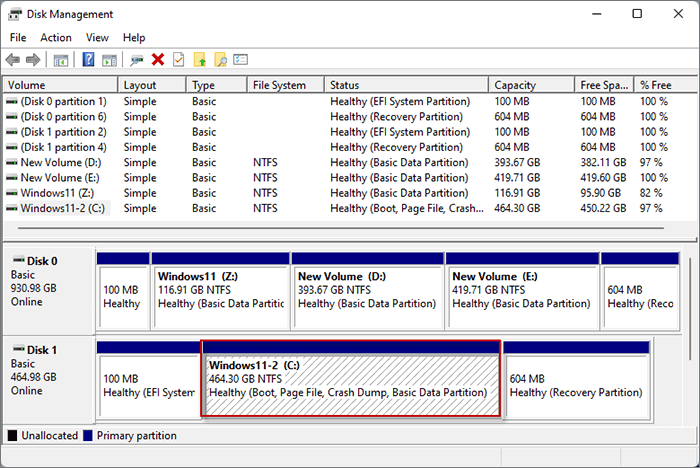
1. Right-click on Start menu to open Disk Management. You will find the newly added m.2 SSD as disk 1 shown on the picture.
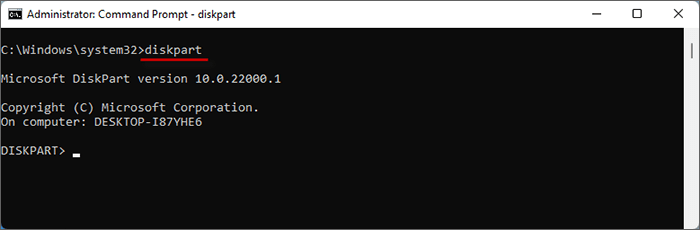
2. Press Win + R and enter cmd in the Run window. Then press Ctrl + Alt + Enter to run Command Prompt as administrator.
3. Enter diskpart and press Enter button.
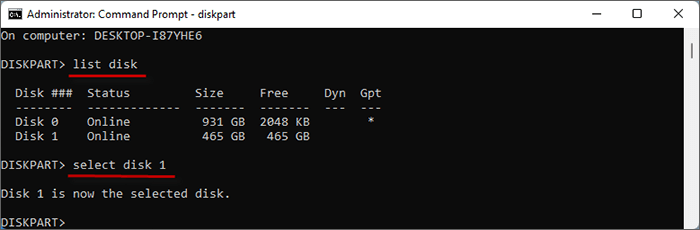
4. Enter list disk and press Enter button to view all the disk information.
5. Enter select disk 1 and press Enter button.
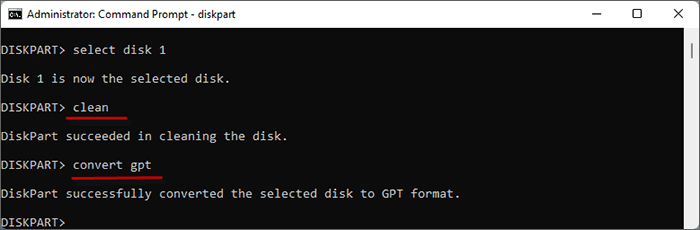
6. Enter clean and press Enter button to clear all data in disk 1.
7. Enter convert gpt and press Enter button to turn disk 1 into GPT format.
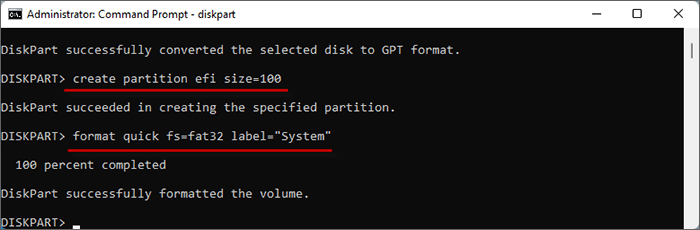
8. Enter create partition efi size=100 and press Enter button to set the size of efi partition as 100M.
9. Enter format quick fs=fat32 label="System" and press Enter. This will format the efi partition as fat32 file system and label it as "System".
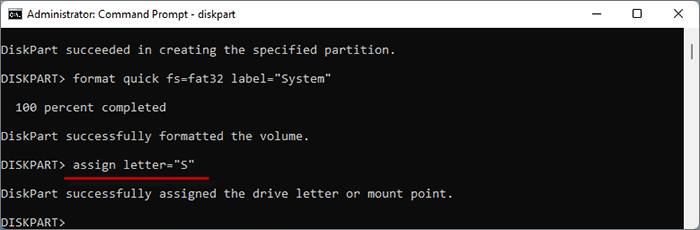
10. Enter assign letter="S" and press Enter button to set it as S drive.
11. Enter create partition primary and press Enter button. This will create the primary partition with unallocated volume.
12. Enter format quick fs=ntfs label="Windows11-2" and press Enter button. This will format the partition as ntfs file system and label it as "Windows11-2".
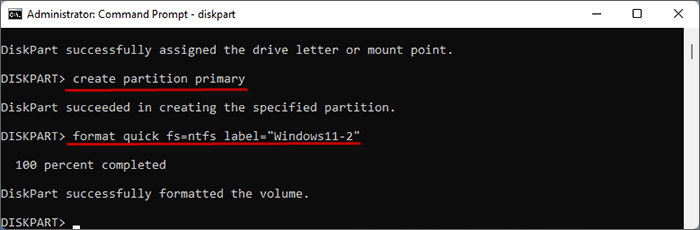
13. Enter assign letter="W" and press Enter button to set it as W drive.
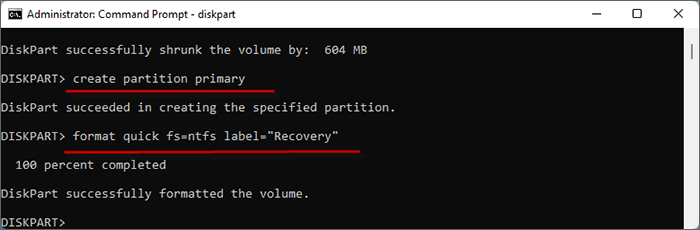
14. Enter shrink minimum=604 and press Enter button to shrink the volume of W drive into 604MB.

15. Enter create partition primary and press Enter button. This will create the primary partition with unallocated volume.
16. Enter format quick fs=ntfs label="Recovery" and press Enter button. This will format the partition as ntfs and label it as Recovery.
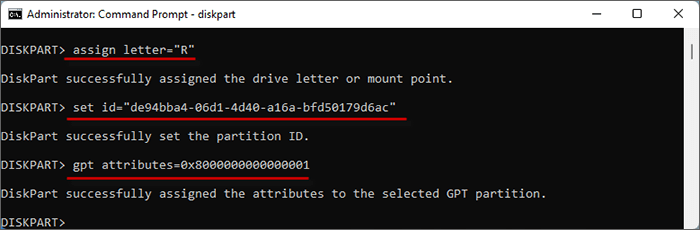
17. Enter assign letter="R" and press Enter button to set it as R drive.
18. Enter set id="de94bba4-06d1-4d40-a16a-bfd50179d6ac" and press Enter button. This will set the partiton as Recovery partition and set its partition Type ID as de94bba4-06d1-4d40-a16a-bfd50179d6ac.
19. Enter gpt attributes=0x8000000000000001 and press Enter. This will hide the drive letters and mark them as required.
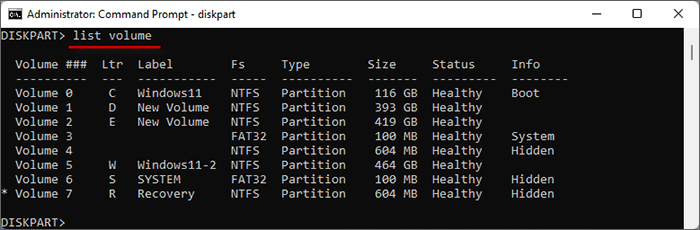
20. Enter list volume and press Enter button to view disk information.
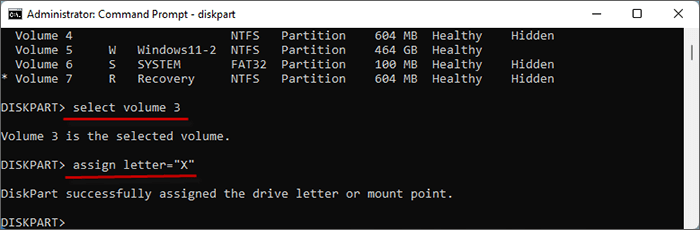
21. Enter select volume 3 and press Enter button to choose the EFI partition of current system.
22. Enter assign letter="X" and press Enter to set the current System EFI partition as X drive.
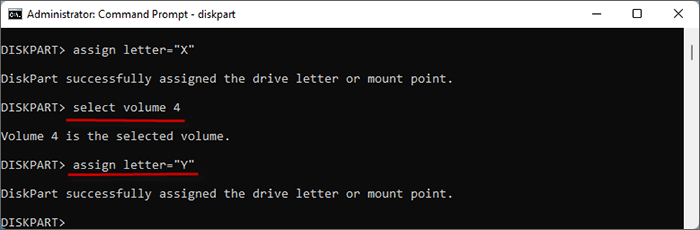
23. Enter select volume 4 and then press Enter to select the recovery partition of the current system.
24. Enter assign letter="Y" and press Enter to set the current Recovery partition as Y drive.
25. Enter list volume and press Enter to view the allocated partition information. Then enter exit and press Enter button to quit diskpart window.

26. Open Disk Manager again and you will find the EFI System partition, Boot partition and the Recovery partition have been created on the new m.2 SSD.
Back up the EFI partition, boot partition and recovery partition of the current system to the EFI partition, boot partition and recovery partition of the newly added m.2 SSD hard disk respectively using wimlib-imagex.
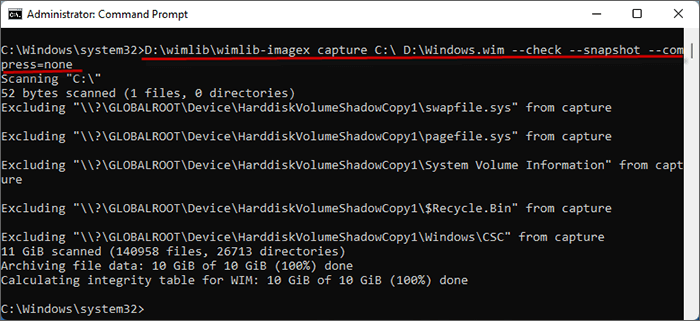
1. Enter D:\wimlib\wimlib-imagex capture C:\ D:\Windows.wim --check --snapshot --compress=none and press Enter button. This will back up the Windows.wim file from C drive (current System boot partition) to D drive. Wait until it is 100% done.
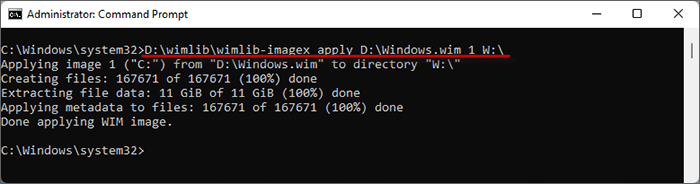
2. Enter D:\wimlib\wimlib-imagex apply D:\Windows.wim 1 W:\ and press Enter. This will apply Windows.wim file to W drive (boot partition) of the m.2 SSD. Wait until it is 100% done and you will successfully back up the boot partition of current system to the boot partition of the new m.2 SSD.
3. Enter D:\wimlib\wimlib-imagex capture X:\ D:\System.wim --check --snapshot --compress=none and press Enter. This will back up System.wim file from EFI partition to D drive. Then wait until it is 100% done.
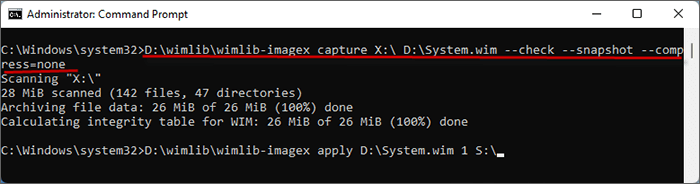
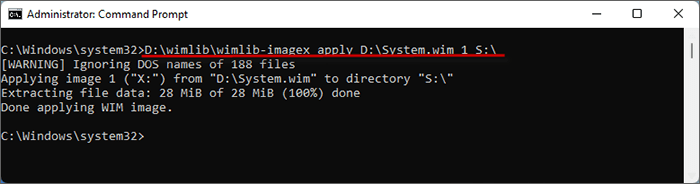
4. Enter D:\wimlib\wimlib-imagex apply D:\System.wim 1 S:\ and press Enter. This will apply the System.wim to the S drive (EFI partition) of the m.2 SSD.
5. Wait until it is 100% done and you will successfully back up the EFI partition of current system to the EFI partition of the new m.2 SSD.
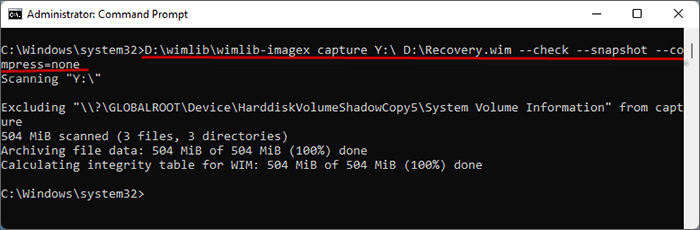
6. Enter D:\wimlib\wimlib-imagex capture Y:\ D:\Recovery.wim --check --snapshot --compress=none and press Enter. This will back up Recovery.wim from Y drive (current recovery partition) to D drive. Then wait until it is 100% done.
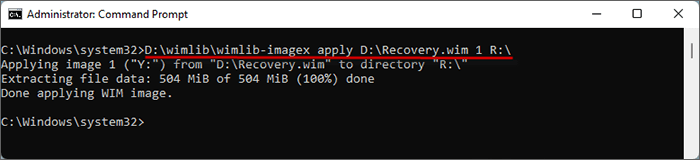
7. Enter D:\wimlib\wimlib-imagex apply D:\Recovery.wim 1 R:\ and press Enter button. This will apply Recovery.wim file to the R drive (Recovery partition) of the new m.2 SSD.
8. Wait until it is 100% done and you will successfully back up the Recovery partition of current system to the Recovery partition of the new m.2 SSD.
Modify the drive letter of the mounted EFI partition for the new m.2 SSD and delete the letter of the R drive in Registry Editor.
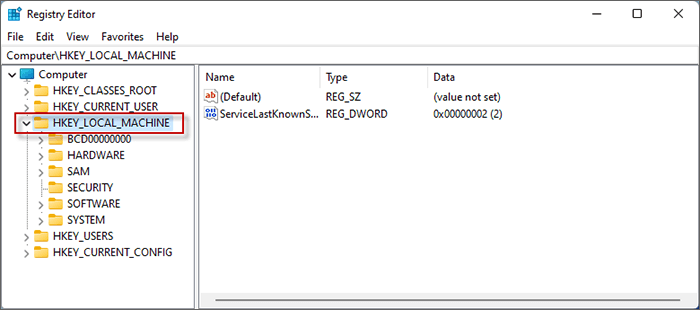
1. Enter regedit in the search bar and open Registry Editor. Then click Yes to allow this app to make changes to your device.
2. Choose and expand HKEY_LOCAL_MACHINE folder.
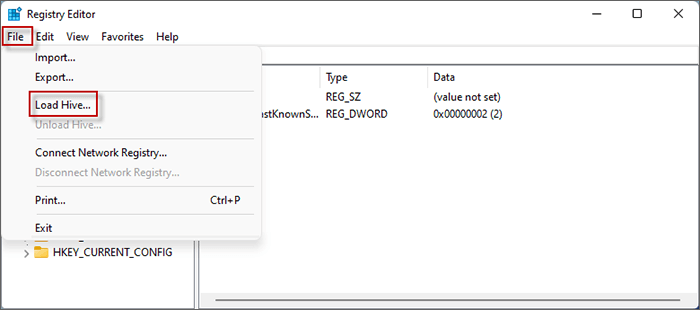
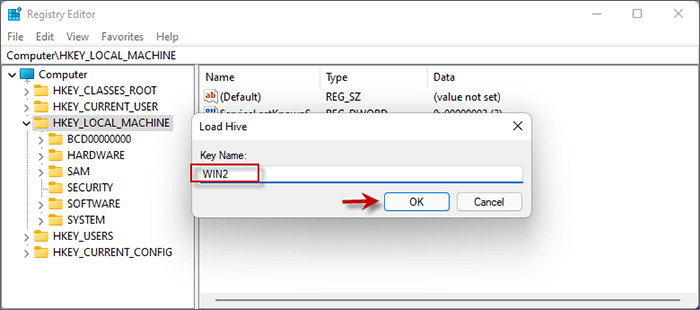
3. Click File and select Load Hive.
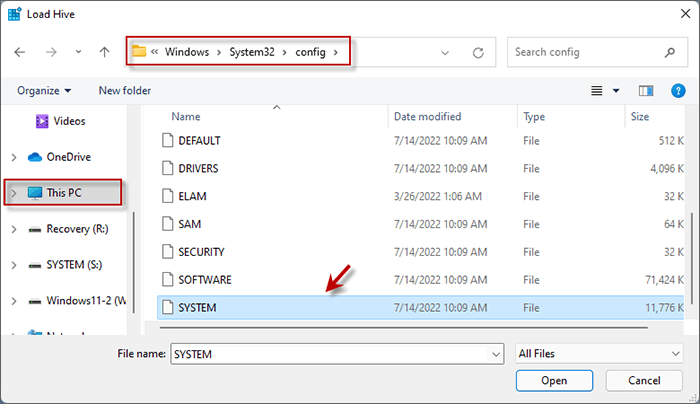
4. Open This PC and double-click to enter W disk > Windows > System32 > config. Then Double-click SYSTEM to load hive.
5. Set the Key Name as you like such as WIN2. Then click OK.
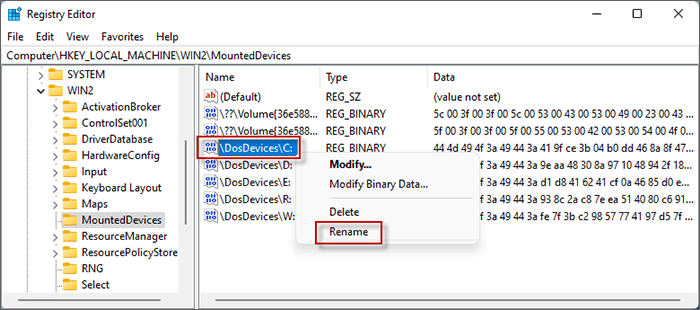
6. When finished, expand the WIN2 folder and choose MountedDevices. Then right-click on \DosDevices\C: and choose Rename.
7. Rename \DosDevices\C: as \DosDevices\Z:
8. Rename \DosDevices\W: as \DosDevices\C: in the same way.
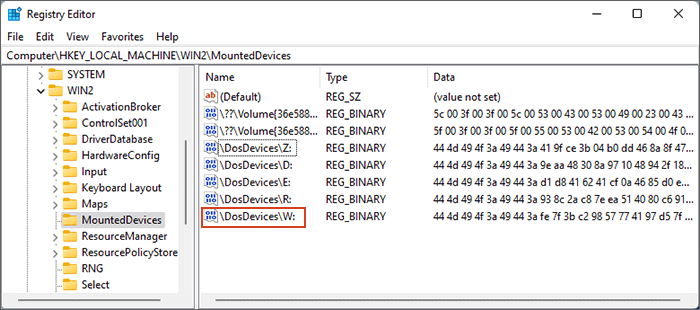
9. Right-click on \DosDevices\R: and choose Delete. Then click Yes to confirm Value Delete on the pop-up window.

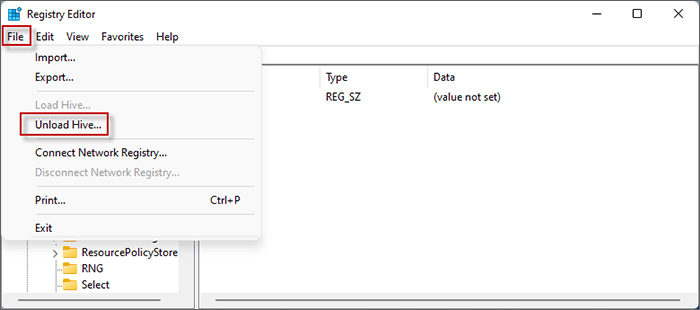
10. Left-click WIN2. Next, click File and choose Unload Hive. Then click Yes to confirm to unload the current key and all of its subkeys.
Modify original path of Boot Configuration Data (BCD) file into the partition path of the new m.2 SSD using bcdedit Command.
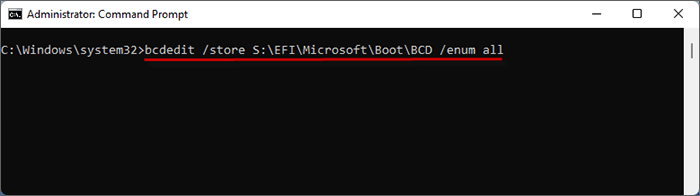
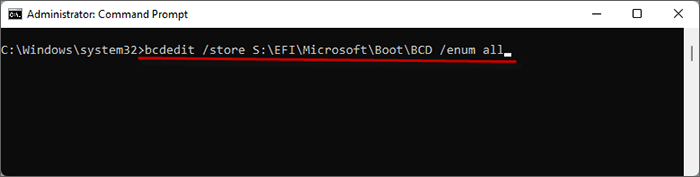
1、Enter bcdedit /store S:\EFI\Microsoft\Boot\BCD /enum all and hit Enter button to check the original configuration path of S:\EFI\Microsoft\Boot\BCD file.
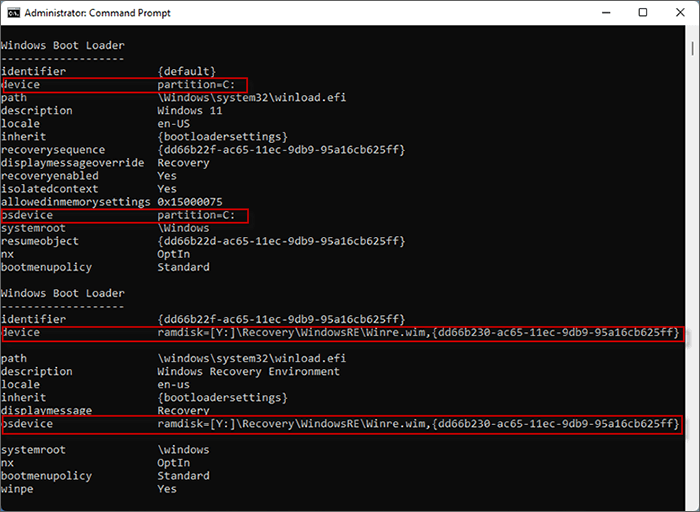
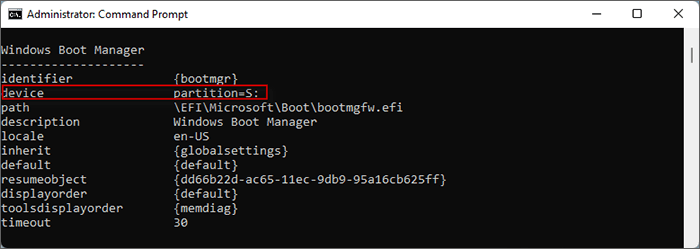
The original configuration path of S:\EFI\Microsoft\Boot\BCD file.

2. Enter bcdedit command to modify the configuration path of S:\EFI\Microsoft\Boot\BCD file.
Enter bcdedit /store S:\EFI\Microsoft\Boot\BCD /set {bootmgr} device partition=S: and press Enter. This will set the device of {bootmgr} identifier as partition=S:
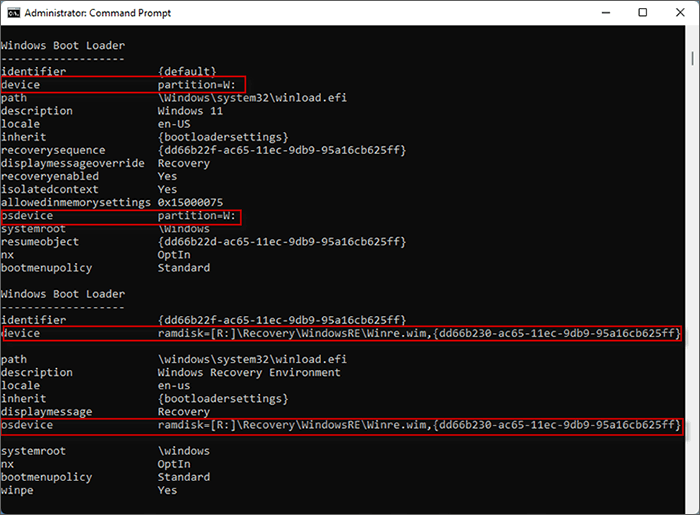
Enter bcdedit /store S:\EFI\Microsoft\Boot\BCD /set {default} device partition=W: and press Enter. This will set the device of {default} identifier as partition=W:
Enter bcdedit /store S:\EFI\Microsoft\Boot\BCD /set {default} osdevice partition=W: and press Enter. This will set the osdevice of {default} identifier as partition=W:
Enter bcdedit /store S:\EFI\Microsoft\Boot\BCD /set {dd66b22f-ac65-11ec-9db9-95a16cb625ff} device ramdisk=[R:]\Recovery\WindowsRE\Winre.wim,{dd66b230-ac65-11ec-9db9-95a16cb625ff} and press Enter. This will set the device of {dd66b22f-ac65-11ec-9db9-95a16cb625ff} identifier as ramdisk=[R:]\Recovery\WindowsRE\Winre.wim,{dd66b230-ac65-11ec-9db9-95a16cb625ff}.
Enter bcdedit /store S:\EFI\Microsoft\Boot\BCD /set {dd66b22f-ac65-11ec-9db9-95a16cb625ff} osdevice ramdisk=[R:]\Recovery\WindowsRE\Winre.wim,{dd66b230-ac65-11ec-9db9-95a16cb625ff} and press Enter. This will set the osdevice of {dd66b22f-ac65-11ec-9db9-95a16cb625ff} identifier as ramdisk=[R:]\Recovery\WindowsRE\Winre.wim,{dd66b230-ac65-11ec-9db9-95a16cb625ff}
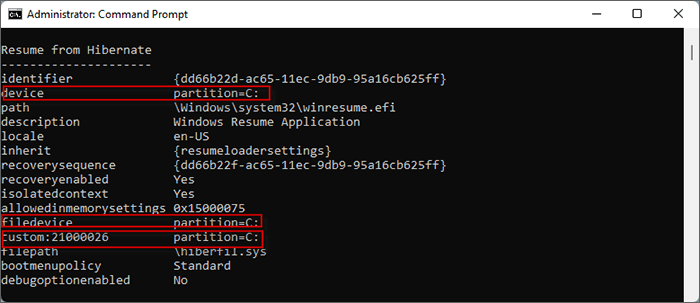
Enter bcdedit /store S:\EFI\Microsoft\Boot\BCD /set {dd66b22d-ac65-11ec-9db9-95a16cb625ff} device partition=W: and press Enter. This will set the device of {dd66b22d-ac65-11ec-9db9-95a16cb625ff} identifier as partition=W:
Enter bcdedit /store S:\EFI\Microsoft\Boot\BCD /set {dd66b22d-ac65-11ec-9db9-95a16cb625ff} filedevice partition=W: and press Enter. This will set the filedevice of {dd66b22d-ac65-11ec-9db9-95a16cb625ff} identifier as partition=W:
Enter bcdedit /store S:\EFI\Microsoft\Boot\BCD /set {dd66b22d-ac65-11ec-9db9-95a16cb625ff} custom:21000026 partition=W: and press Enter. This will set the custom:21000026 of {dd66b22d-ac65-11ec-9db9-95a16cb625ff} identifier as partition=W:
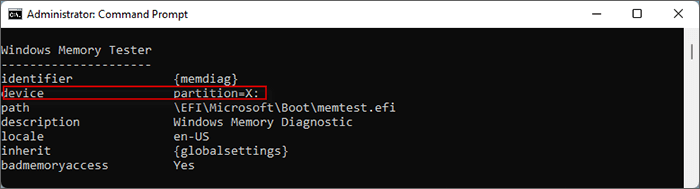
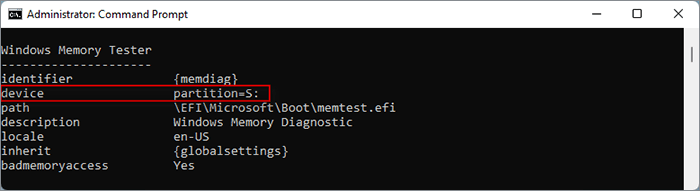
Enter bcdedit /store S:\EFI\Microsoft\Boot\BCD /set {memdiag} device partition=S: and press Enter. This will set the device of {memdiag} identifier as partition=S:
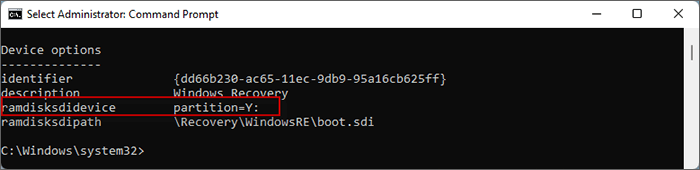
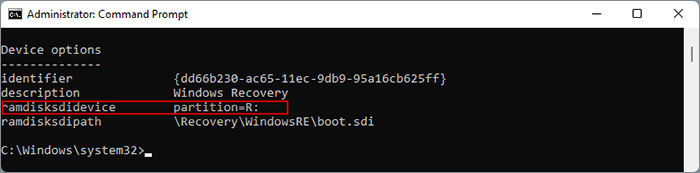
Enter bcdedit /store S:\EFI\Microsoft\Boot\BCD /set {dd66b230-ac65-11ec-9db9-95a16cb625ff} ramdisksdidevice partition=R: and press Enter. This will set the ramdisksdidevice of {dd66b230-ac65-11ec-9db9-95a16cb625ff} identifier as partition=R:

3. After modifying, enter bcdedit /store S:\EFI\Microsoft\Boot\BCD /enum all to view all the configuration information of S:\EFI\Microsoft\Boot\BCD file.
The modified configuration path of S:\EFI\Microsoft\Boot\BCD file.

Open Advance options to enter current winre system. Then enter UEFI Firmware Settings to set the new m.2 as the first option in the boot order.
1. Press Win + I to go to Settings > Recovery. Then click Restart now and choose Restart now on the popping up hint.
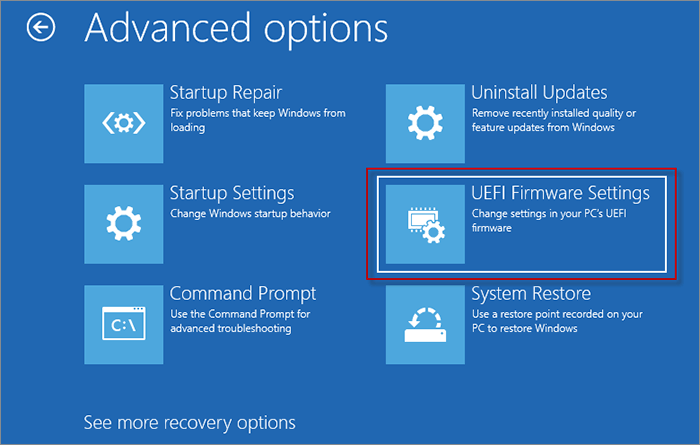
2. When the system boots up, click Troubleshoot > Advanced options > UEFI Firmware Settings
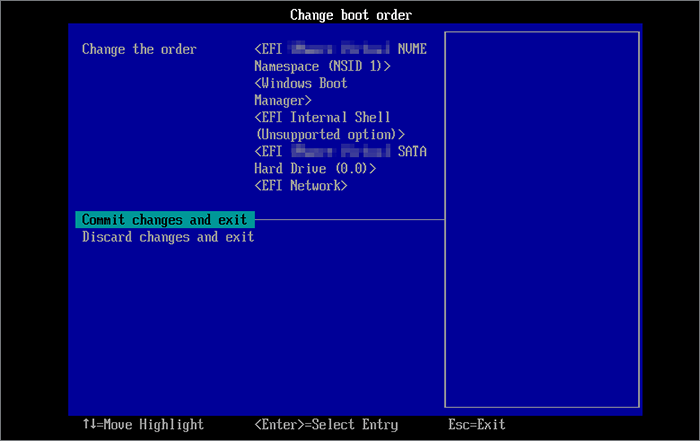
3. In UEFI Firmware Settings, choose Configure boot options. Then select Change boot order using up and down arrow button. Finally press Enter button.

4. Use up and down arrow keys to select the new m.2 SSD drive. Then use the + or - keys to move the new m.2 SSD drive to the first boot entry. Finally press Enter.
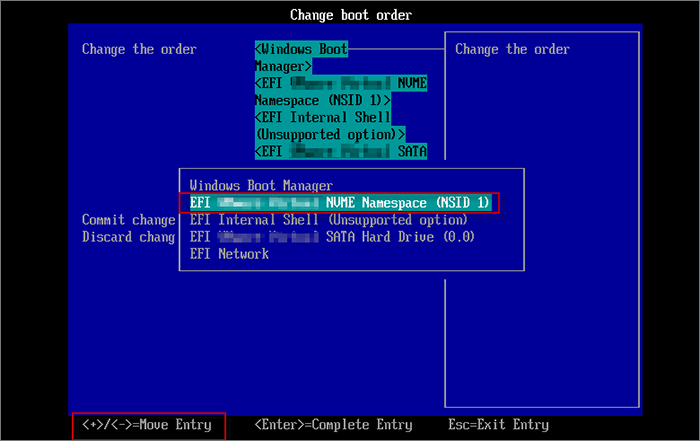
5. When it is done, select commit the changes and exit.
6. After rebooting your computer, open Disk Manager and the Windows 11 system drive has been moved to the new m.2 SSD.
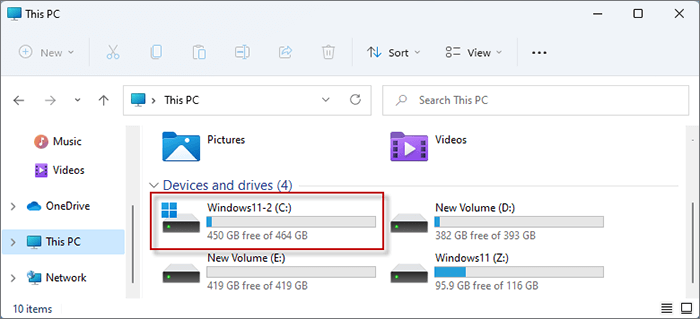
7. Enter this PC and you can see the Windows 11 is migrated to the new m.2 SSD.
An easier way to move Windows to a new m.2 SSD is using a professional system/disk cloning tool such as iSumsoft Cloner. It is a reliable and powerful cloning software that enables you to copy only the system partition where stores Windows 11 from HDD to SSD and boot from SSD. Follow these steps to clone Windows 11 to new m.2 SSD without reinstalling.
Before begin, download and install iSumsoft Cloner on your Computer.
Step 1: Choose Copy option to migrate only OS to SSD.
Step 2: Next to "Select a Source Partition", choose the partition installing your Windows 11.
Step 3: Next to "Select a Target Partition", choose the m.2 SSD in the drop-down menu.
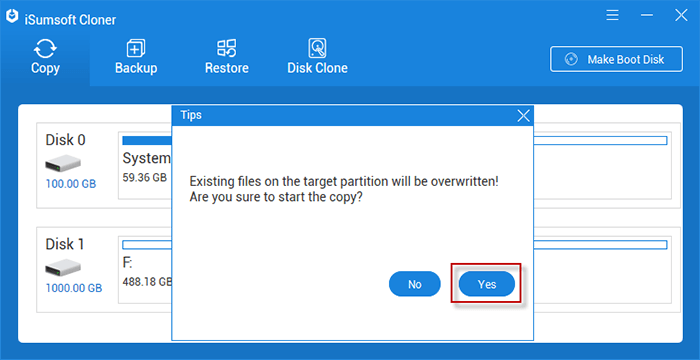
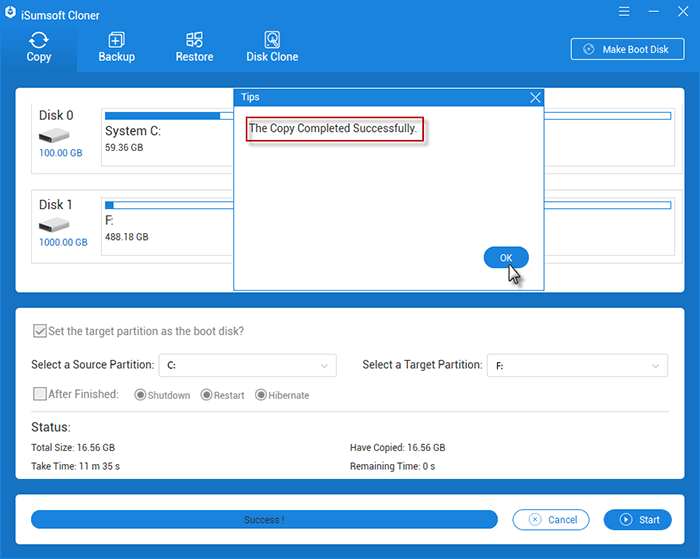
Step 4: Click Start to begin copying your Windows 11 to m.2 SSD.

Step 5: When a hints popping up, click Yes to confirm the cloning.
Step 6: The cloning may takes about 10 minutes. Wait until it is complete, you will clone Windows 11 to m.2 SSD successfully. Then you can boot from SSD after cloning and enjoy faster system running speed.
Usually, the migrated Windows will keep the same activation status as it before migrating. That means if your Windows 11 is activated before migrating, your migrated Windows 11 will also keep activated. If your Windows 11 have not ever been activated, you can use a professional software such iSumsoft Product Key Finder to back up Windows serial numbers and activate your Windows 11.
That’s all about how to migrate Windows 11 to a new m.2 SSD without reinstalling OS and losing data. You can migrate Windows 11 to the new SSD manually using wimlib-imagex or choose an easier way to move your OS with a system clone tool.
 How to Clone Windows 10 OS from HDD to M.2 SSD
 How to Clone SATA SSD to M.2 NVMe SSD in Windows 10
 How to Upgrade Laptop Hard Drive to SSD without Reinstalling Windows
 How to Clone Windows 10 System Boot Drive from HDD to a New SSD
 How to Create a Windows 11 Bootable USB Flash
Drive
How to Create a Windows 11 Bootable USB Flash
Drive
 How to Try Windows 11 without Installing It on PC