
Microsoft offers robust data protection capabilities through encrypt hard drives with BitLocker across various Windows editions such as Professional, Education, Server, and Enterprise, spanning from Windows 7 to Windows 11. However, BitLocker is not supported in Windows Home Edition.
If you are looking to turn on BitLocker for Windows Home Editions, this article will provide you with a step-by-step tutorial on how to enable BitLocker in Windows 11 Home. These methods are also applicable to Windows 10 Home, so don't hesitate to give them a try.

Unfortunately, Windows 11 Home, along with other Home Editions, does not include BitLocker support. This limitation means you cannot activate BitLocker in Windows Home. However, Microsoft offers an alternative for Home users through the Device Encryption feature, which is similar to BitLocker but only encrypts the system drive, presenting some limitations.
Specifically designed for Windows 11 Home Edition users, Device Encryption focuses on encrypting the system disk rather than providing full disk encryption capabilities like BitLocker. While not as comprehensive as BitLocker, Device Encryption offers a basic level of security for Windows 11 Home users to safeguard their system and minimize potential security threats.
Some Windows Home users may be eager to activate BitLocker for their drives due to its exceptional data encryption capabilities. This section provides solutions to enable BitLocker for Windows 11 Home. Let's explore them below.
Using a third-party tool like iSumsoft BitLocker Reader, is the easiest and most convenient way to turn on BitLocker for Windows Home Edition. In addition to Windows 11 Home, it is also compatible with Windows 10/7 Home, Windows 8/8.1 Core, and Windows 7 Pro Editions, giving you full access to the BitLocker, including turning on & off BitLocker and unlocking & locking BitLocker encrypted drive.

Learn how to use BitLocker in Windows 11 Home:
Step 1 Download the software and then install it.


Step 2 After the installation, start the program. On the interface, right-click the drive you want to enable BitLocker and then select Turn on BitLocker.

Step 3 You will then be prompted to set a password for the drive. Enter the password and then click Save to file to save your BitLocker Recovery Key.

Step 4 After saving the recovery key, the Encrypt button will be activated. Click on it to start encrypting your drive.

Step 5 Wait for the process to complete until you are prompted "Encrypt successfully".

Step 6 When you return to the Home page, you'll find that the encrypted drive is marked with a gray lock icon. Similarly, if you open File Explorer, you'll find the same indication.

One way to gain access to the BitLocker feature is to upgrade your Windows operating system. By upgrading to a version of Windows that supports BitLocker, such as Windows Professional, Education, or Enterprise editions, you unlock the ability to use this powerful encryption tool.
Upgrading your operating system not only gives you access to BitLocker, but also provides several additional features and enhancements that improve security, performance, and functionality.
Here are several articles with detailed steps to upgrade your Windows OS:
Although Windows Home does not support BitLocker encryption for drives, it does support unlocking and reading BitLocker-encrypted drives. So, if you want to encrypt drives with BitLocker, you can connect the drive to a computer running Windows Pro, Education, or Enterprise, and then turn on BitLocker for the drive. Here are the detailed steps:
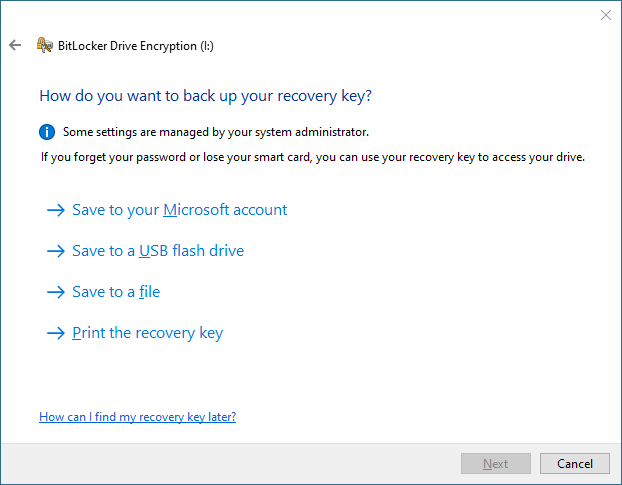
Step 1 After connecting the drive to a computer available for BitLocker, go to Control Panel > All Control Panel Items > BitLocker Drive Encryption. Then locate the connected drive and click Turn on BitLocker.

Step 2 You are asked to enter your password for unlocking the drive.

Step 3 Choose a way to save your recovery key, and then follow the onscreen instructions to complete the encryption.
To enable this feature, click Start > Settings > Privacy & Security > Device encryption, and then turn it on.
Notes:

Yes, while BitLocker encryption isn't available in Windows 11 Home, you still have options for encrypting your files and folders. One easy method is to use the built-in encryption feature called "EFS" (Encrypting File System). With EFS, you can encrypt individual files and folders on your Windows system. Follow these steps:
Step 1 Right-click on the file or folder and select Properties.

Step 2 On the window, click Advanced.

Step 3 Select Encrypt contents to secure data task and then click OK.
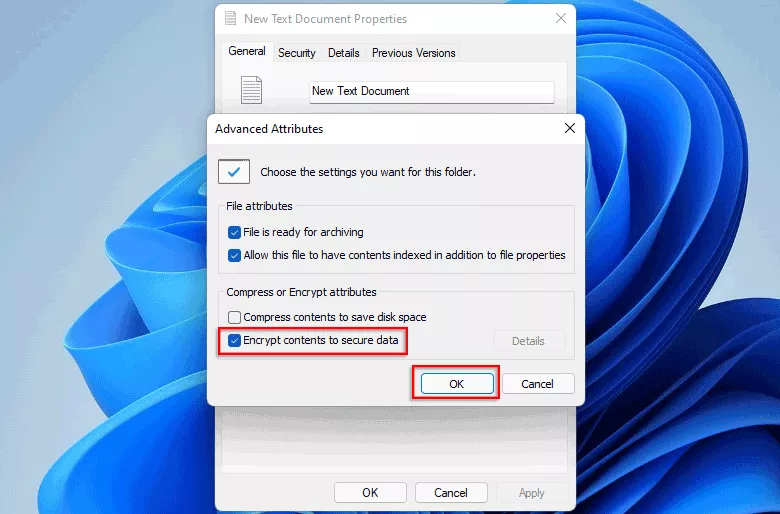
Step 4 Click OK to complete the encryption.

Step 5 Now the file has been protected with a golden lock.

 How to Enable Full Disk
Encryption Windows 10 Home
How to Enable Full Disk
Encryption Windows 10 Home
 How
to Access/Read BitLocker Protected USB Flash Drive on Mac
How
to Access/Read BitLocker Protected USB Flash Drive on Mac 2 Ways
to Open BitLocker Encrypted External Hard Drive on MacBook
2 Ways
to Open BitLocker Encrypted External Hard Drive on MacBook How to Easily
Copy/Backup BitLocker Encrypted Hard Drive on Windows 10/11
How to Easily
Copy/Backup BitLocker Encrypted Hard Drive on Windows 10/11 Difference
between HDD Password and Bitlocker Pros & Cons
Difference
between HDD Password and Bitlocker Pros & Cons Suggestions for
Using BitLocker Efficiently
Suggestions for
Using BitLocker Efficiently

