
Is it possible to boot a new operating system but keep the old one on the same Computer? Definitely. Here you can learn to install Windows 11 on Windows 7 Computer and switch operating system on boot manager as you want. Besides, you can also choose to create a Wins To Go USB which enables you to boot Windows 11 on Windows 7 Computer without installing. Now, let’s learn about how to dual boot Windows 7 and Windows 11 on the same Computer.

If you have a Computer running with Windows 7 system, you can install Windows 11 on separate disks or partitions with an installation USB. Or you can just boot Windows 11 with a Win To Go USB without installing it on your Computer. Follow these steps to dual boot Windows 7 and Windows 11 on the same Computer using USB.
In the beginning, download Windows 11 ISO and Rufus on your Computer.
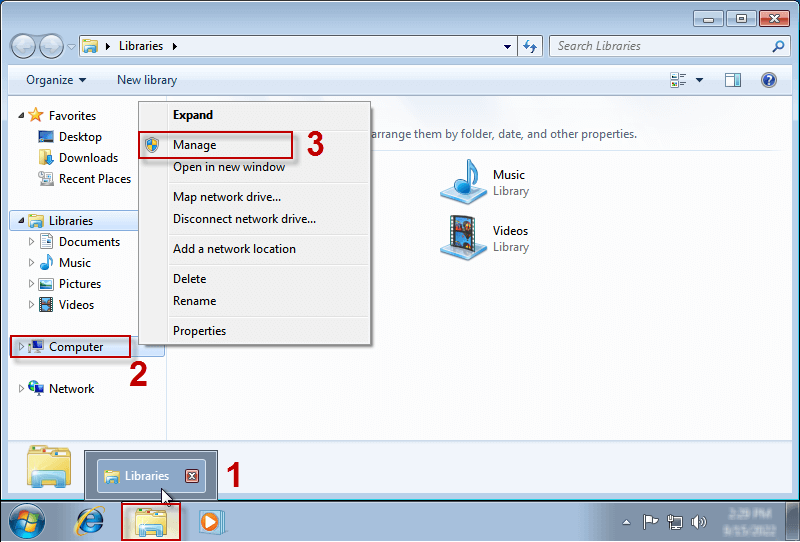
1. Open Windows Explorer and right-click Computer icon. Then choose Manage option.
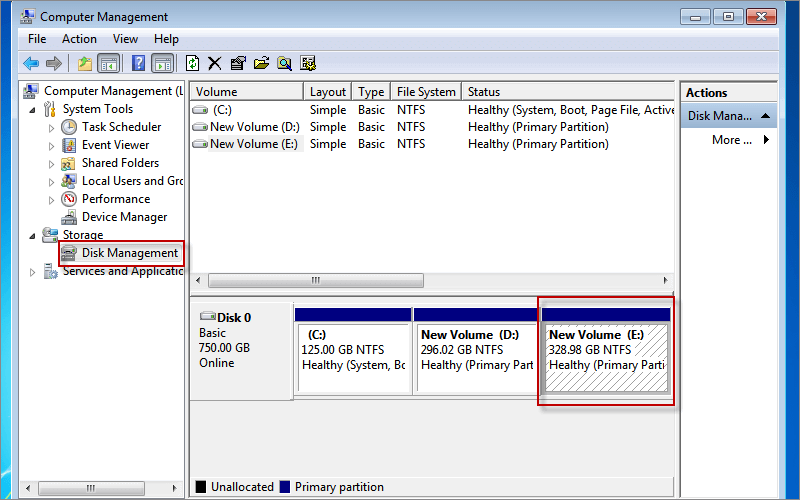
2. Click Disk Management and then the disk and partition will be shown on the list. Then right-click any drive with large space and choose Shrink Volume.
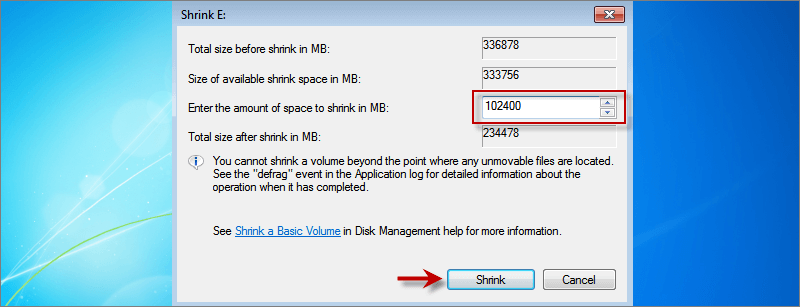
3. For Windows 11 installation, enter 102400 and click Shrink button. Then a new 100 G partition will be created.
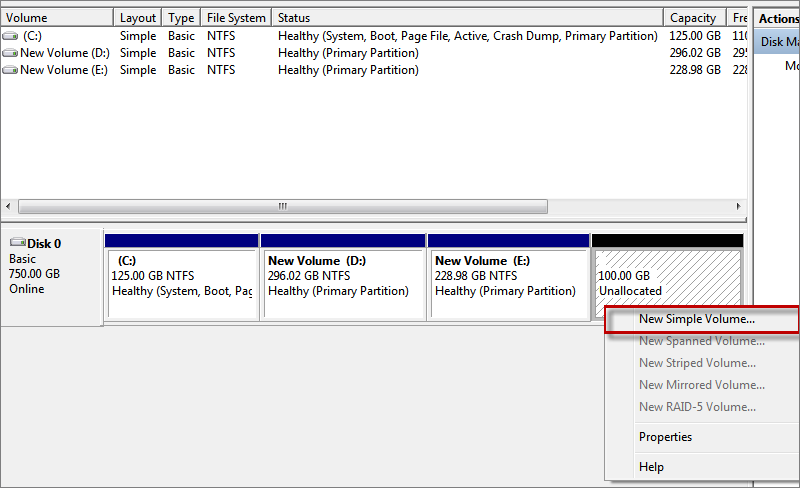
4. Right-click the newly created partition and choose New Simple Volume.
5. Just set up your new partition by default and finally click Finish.

In Disk Management, the new partition for Windows 11 installation has been set up successfully.

Before begin, connect a USB to your Computer. Then right-click rufus-3.17.exe and click Open. When a warning window pops up, click Yes to allow Rufus to run on your Computer.
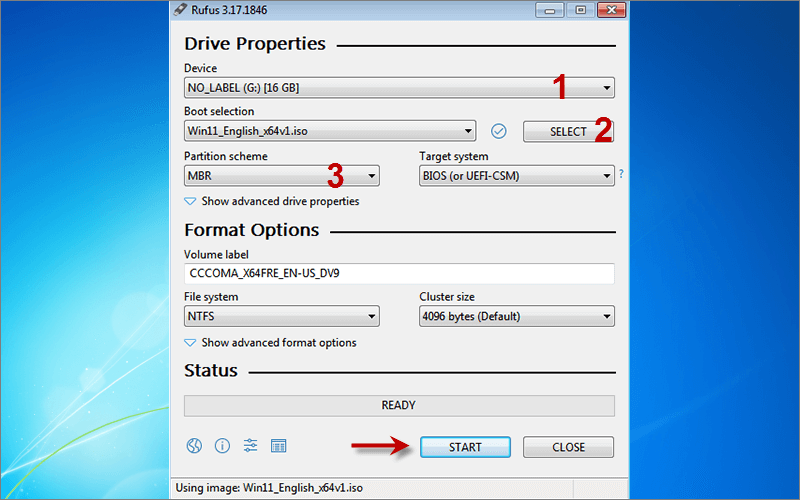
1. In Rufus, choose the connected USB as the device when it is detected. Then click SELECT button to choose Windows 11 ISO.
2. Choose MBR as the Partition scheme in the draw-down menu.
3. Keep the rest settings by default and click START button.
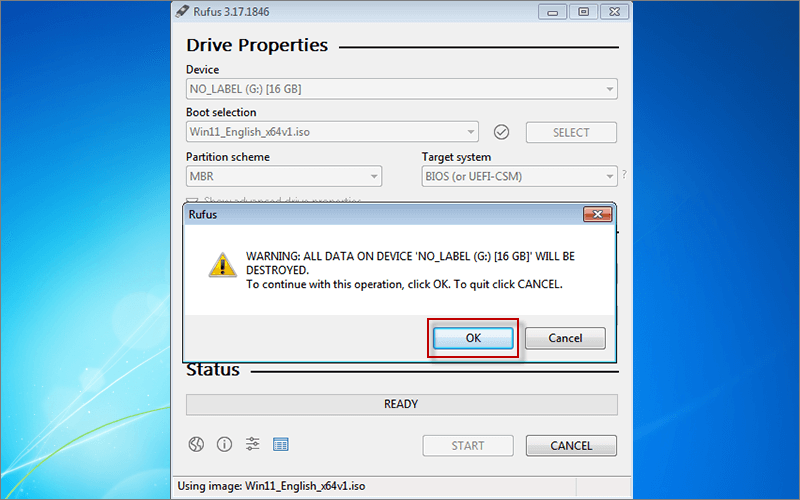
4. Click OK button to format the USB and start burning Windows 11 ISO image to the USB.
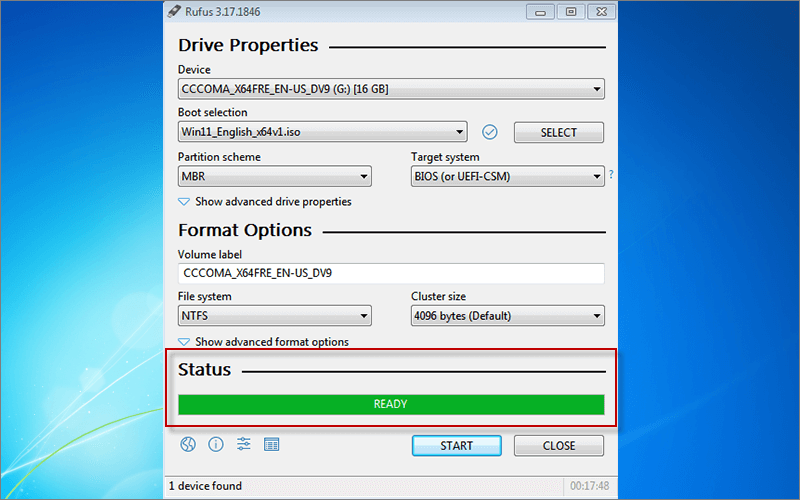
5. Wait until the Status is READY, the Windows 11 installation USB has already been created.
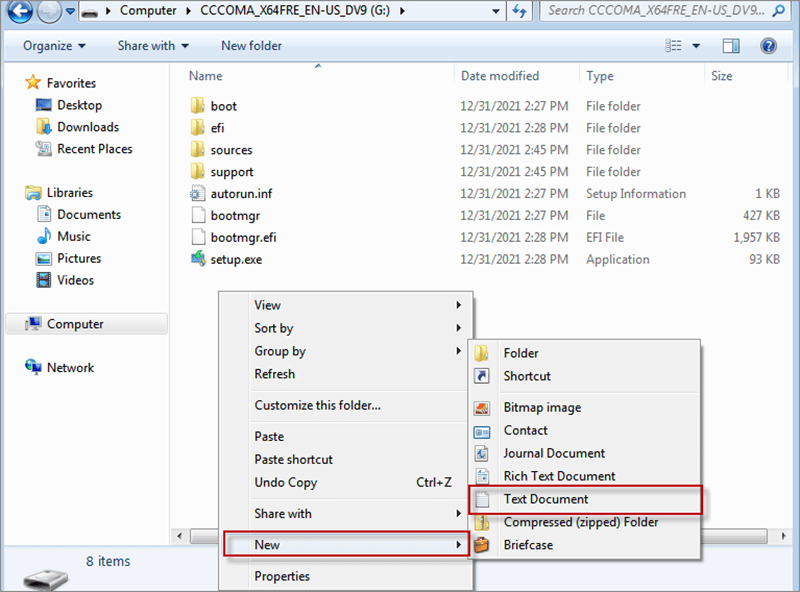
1、Double-click on the Windows 11 installation USB to open it.
2. Right-click on the blank and choose New to create a Text Document.
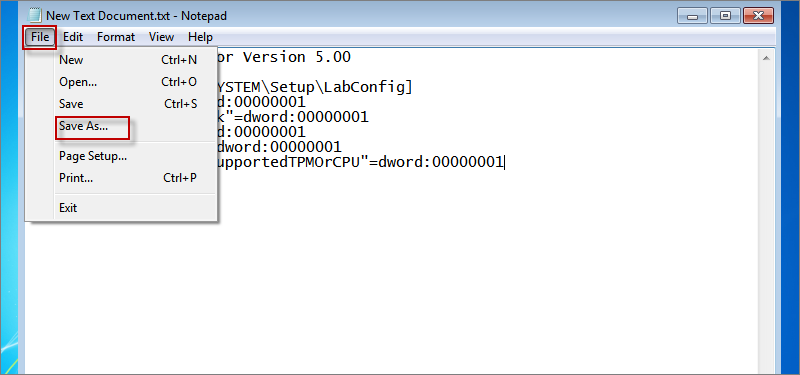
3. Open the newly created text document and copy the following command to it.
Windows Registry Editor Version 5.00
[HKEY_LOCAL_MACHINE\SYSTEM\Setup\LabConfig]
"BypassTPMCheck"=dword:00000001
"BypassSecureBootCheck"=dword:00000001
"BypassRAMCheck"=dword:00000001
"BypassStorageCheck"=dword:00000001
"AllowUpgradesWithUnsupportedTPMOrCPU"=dword:00000001
4. Click File tab and choose Save As...
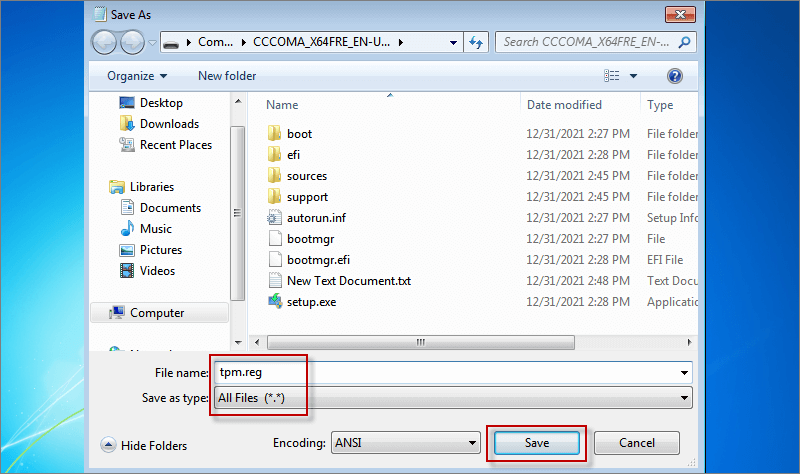
5. Set the file name as tpm.reg and select All Files as the save type. Then click Save. Then the Registration Entries will be successfully created in Windows installation USB.
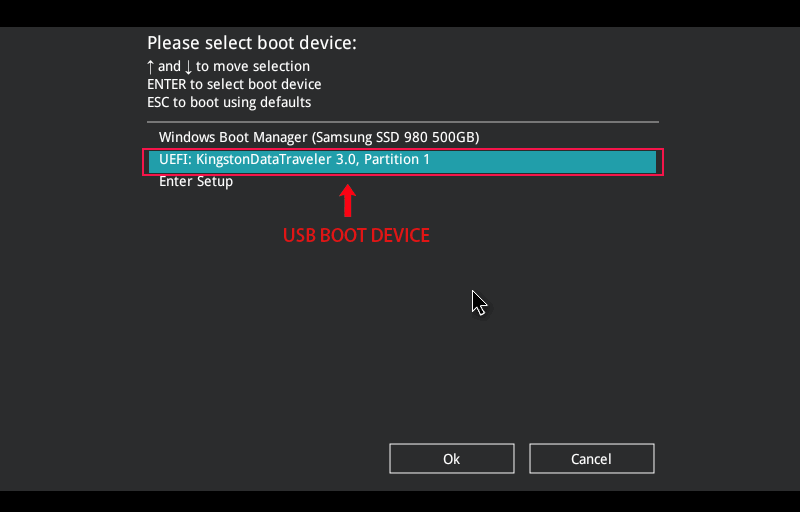
1. Restart your Computer and press F12 to boot Computer from USB.
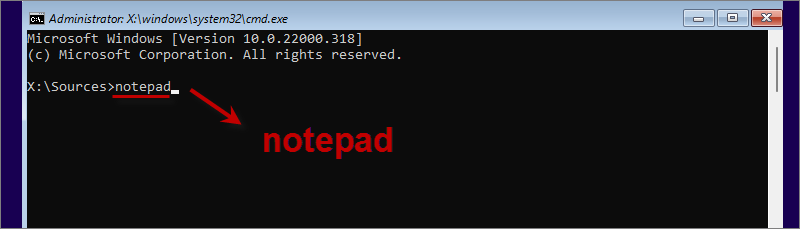
2. When it comes to Windows setup, do not click Next. Then press Shift+F10 key to open cmd window.
3. Type notepad and press Enter button.
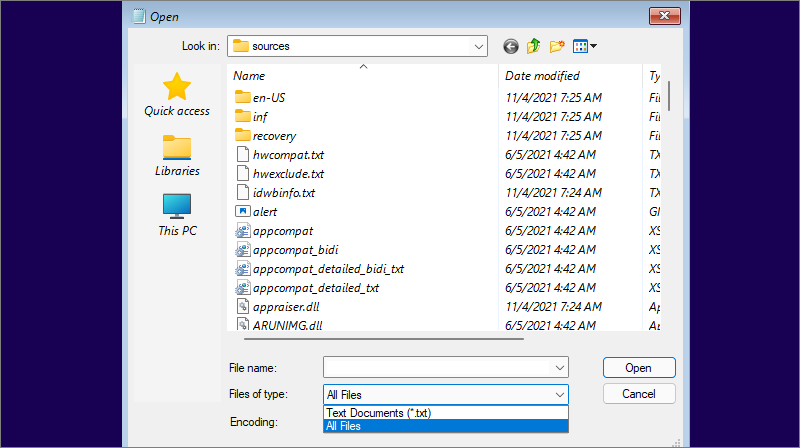
4. When notepad window appears, click File tab and select Open...

5. In Files of type option, select All File.
6. Locate and right-click tpm.reg in the installation USB. Then choose Merge.
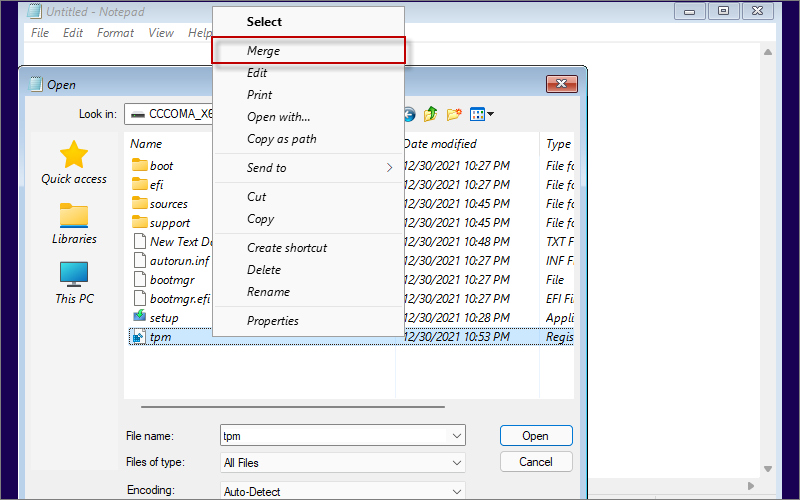
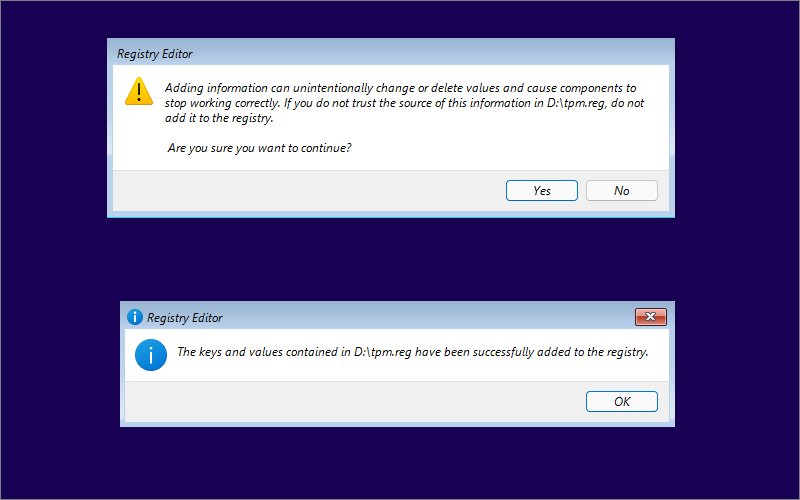
7. Click Yes and OK to continue adding tpm.reg to the registry.
8. When finished, continue to set up your windows 11. Now you can click Next.
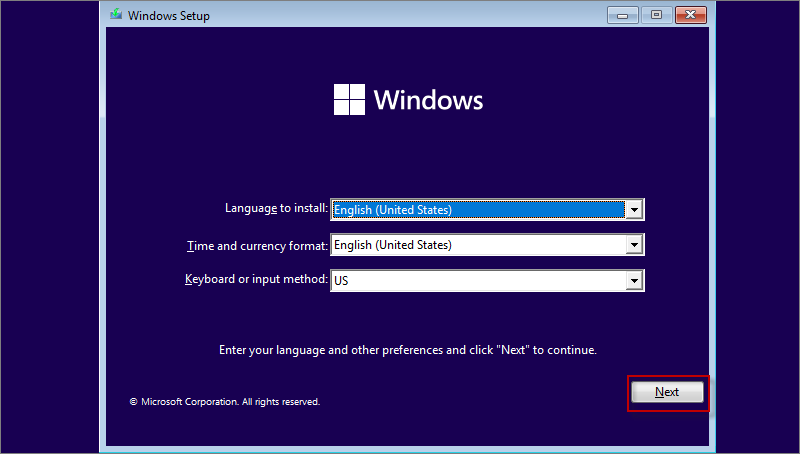
9. During setup, click Install now. Next, choose I don’t have product key. Then you can choose the Windows 11 version desired to install and click Next.
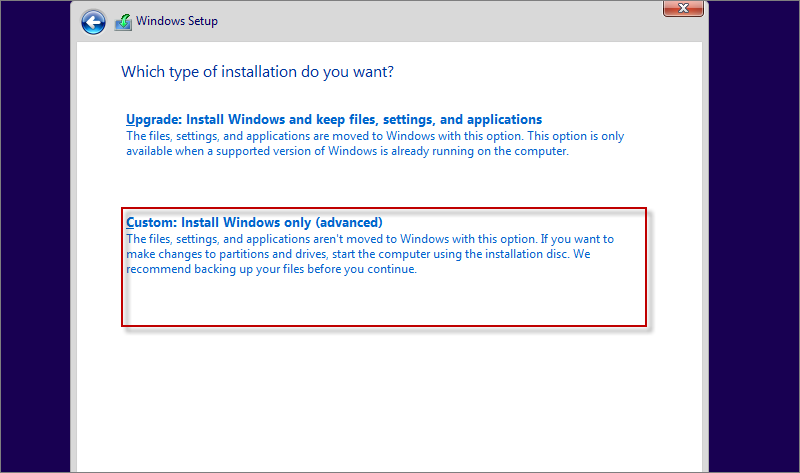
10. Accept the Microsoft and click Next. Then you can choose Custom: Install Windows only (advanced).
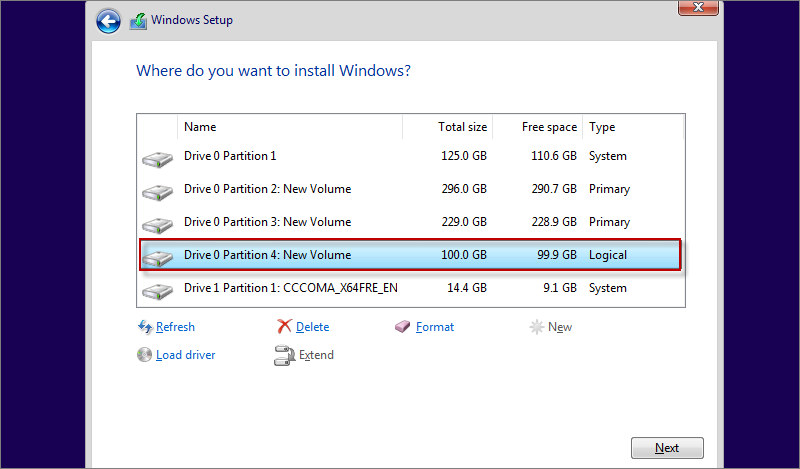
11. Choose the newly created partition (100 G) as the location to install your Windows 11. Then click Next to start installing Windows 11.
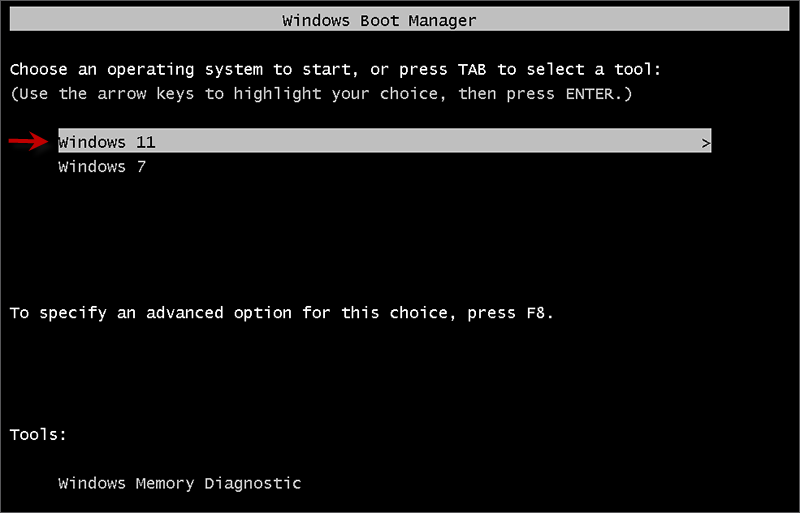
12. When the installation is complete, your Computer will automatically restart and you are able to choose Windows 11 boot option. If you want to boot your Windows 7, restart your Windows 11 and choose Windows 7 boot option.
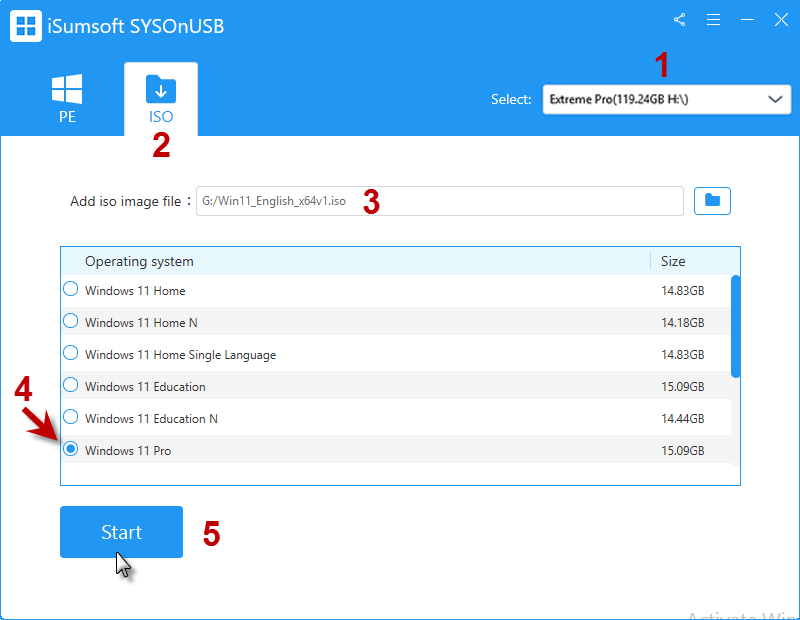
If there is not enough space for you to install Windows 11 on Windows 7, you can choose to create a Windows 11 To Go USB. With such a Win To Go USB, you are able to boot Windows 11 on any Computer without installing. All you need is iSumsoft SYSOnUSB and a USB which can store Windows 11.
Step 1: Select the inserted USB as the location to install Windows 11.
Step 2: Choose ISO option.
Step 3: Click the file icon to add Windows ISO file to iSumsoft SYSOnUSB.
Step 4: Choose the Windows 11 version you want to install on USB.
Step 5: Click Start button to start creating an Windows 11 To Go USB.
Wait until the Win To Go USB is created, you can plug it into your Windows 7 Computer and boot Windows 11 directly without installing. In this way, you easily boot Windows 11 on your Windows 7/8/10 Computer whenever you need..
To install Windows 11 on Windows 7 without USB, you need to search online and download win11 ISO image and Dism++10.1.1002.1 to your Computer. Then install 7-zip on the Computer.
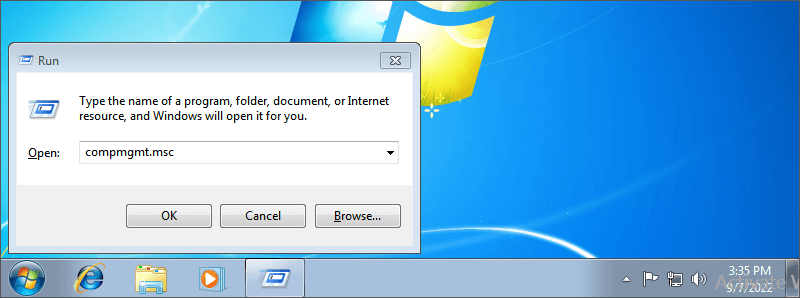
1. Press Win + R to open Run window and type compmgmt. msc. Then press Ctrl + Shift + Enter to run Computer Management as administrator.
2. Right-click on the Disk Mangement and choose Create VHD.
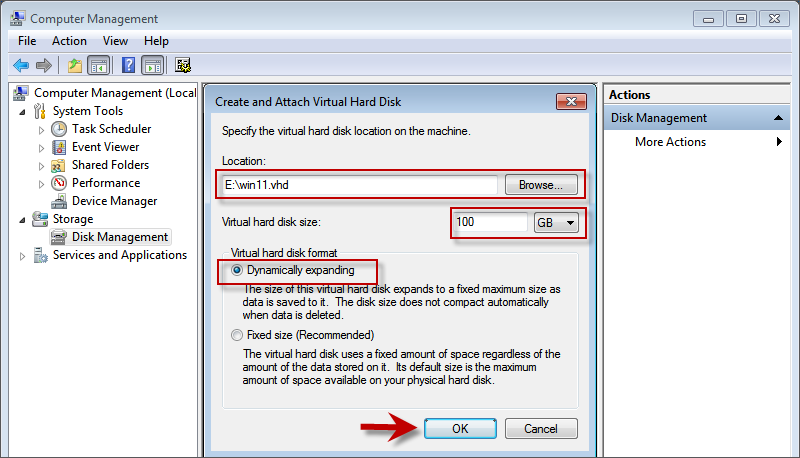
3. Click Browse button to select a location for the VHD, and then set the virtual hard disk size. For Windows 11, 100GB is suggested.
4. Choose Dynamically expanding option and click OK.
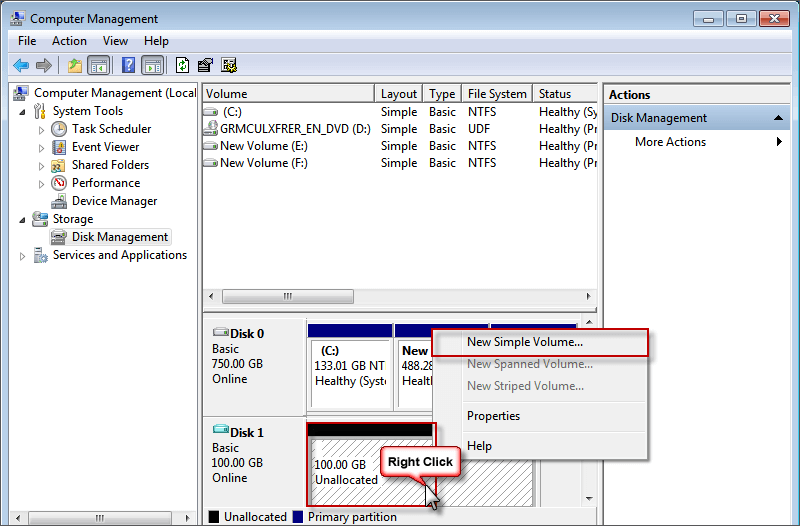
5. Locate Disk 1 and right-click on the Unallocated space. Then choose Initialize Disk.
6. Initialize the disk into MBR partition format and click OK.
7. Right-click on the Unallocated space and choose New Simple Volume when a New Simple Volume Wizard appears, click Next to set your virtual hard disk.
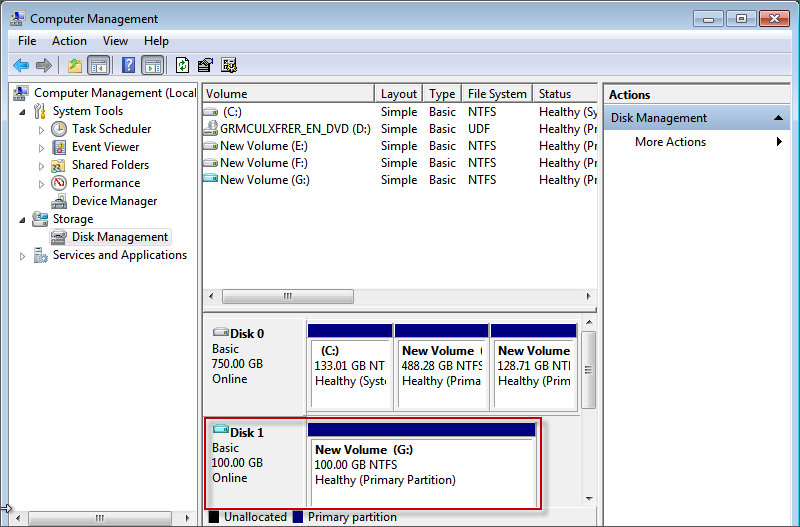
After completing the new simple volume wizard, you can find the created VHD in Disk Management.
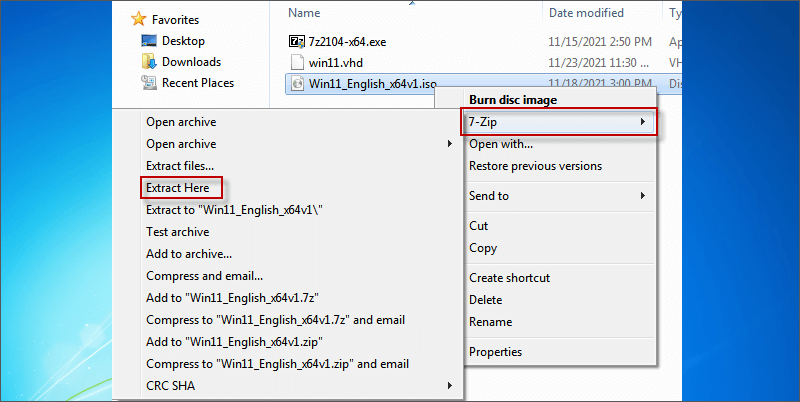
1. Extract Windows 11 ISO on your Computer with 7-Zip.
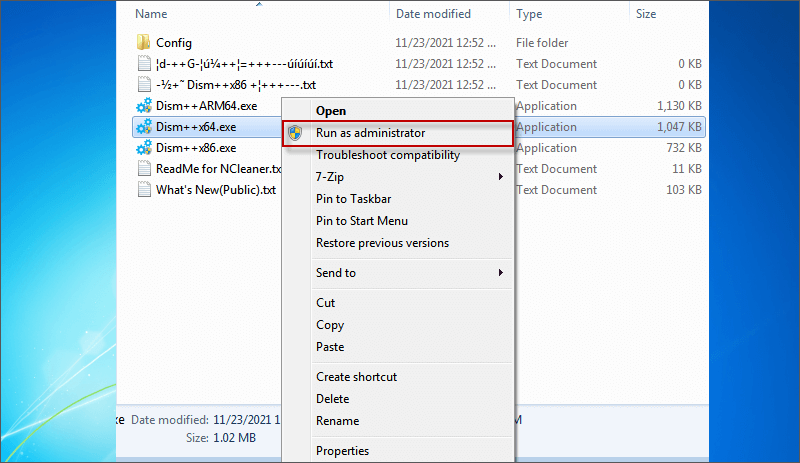
2. Extract Dism++10.1.1002.1 with 7-Zip. Then run Dism++x6.exe as administrator and click Yes to confirm to run the program. Next, click Accept button to accept the Dism++ User Agreement.
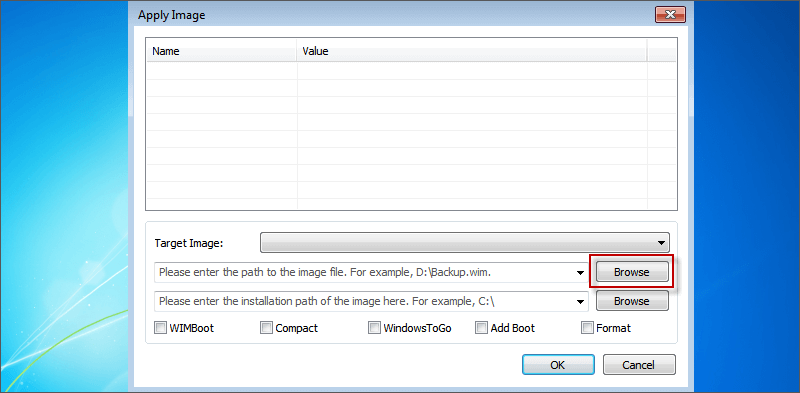
3. Click File and choose Apply Image.

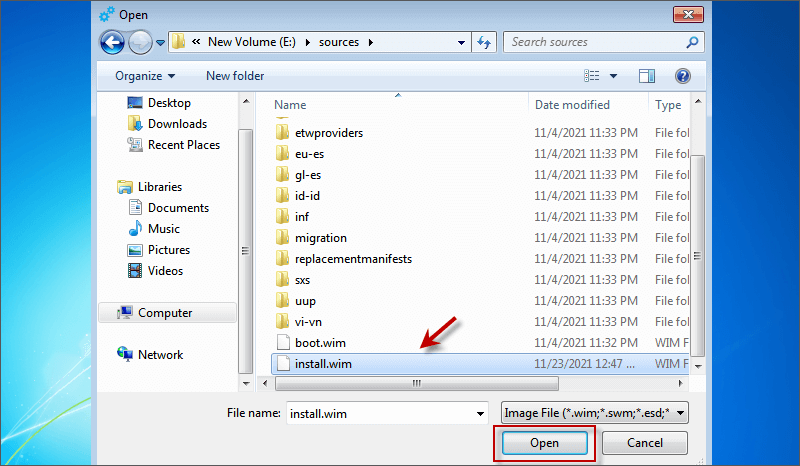
4. Click the upper Browse button.
5. Select the install.wim file in the extracted Windows 11 ISO.
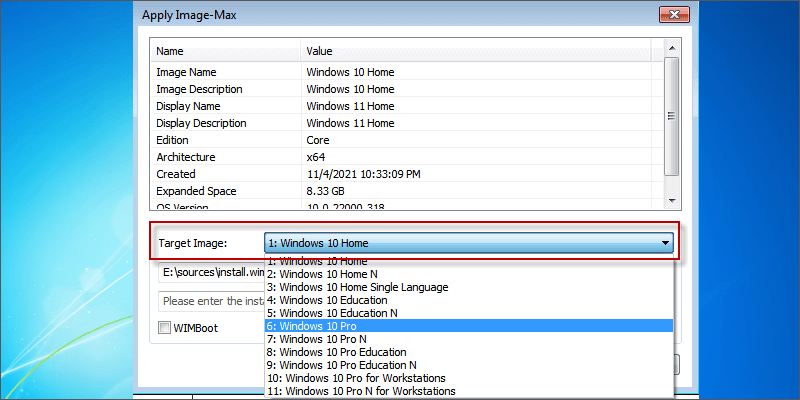
6. Select the target image in the drop-down menu. If the Windows 11 version is still not available in Dism++, it is find for you to choose Windows 10 version and it won’t affect your Windows 11 applying.
7. Click the lower Browse button to choose the newly created virtual disk as the location for install.wim file. Then mark Add Boot and click OK button.

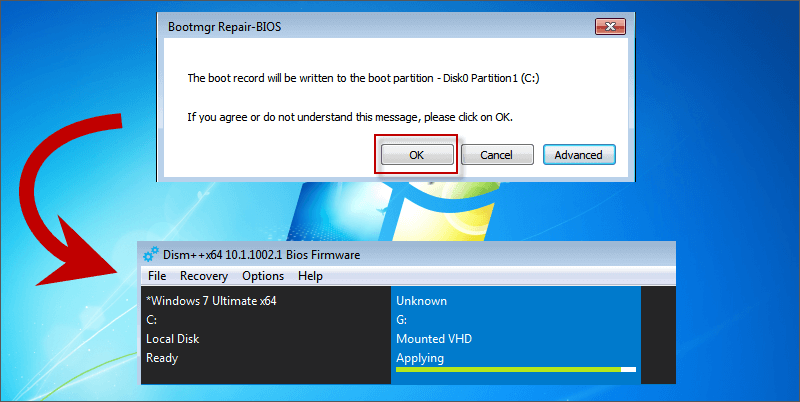
8. Click OK to start applying Windows 11 install.wim file to the VHD you have created. Then wait until it is done.
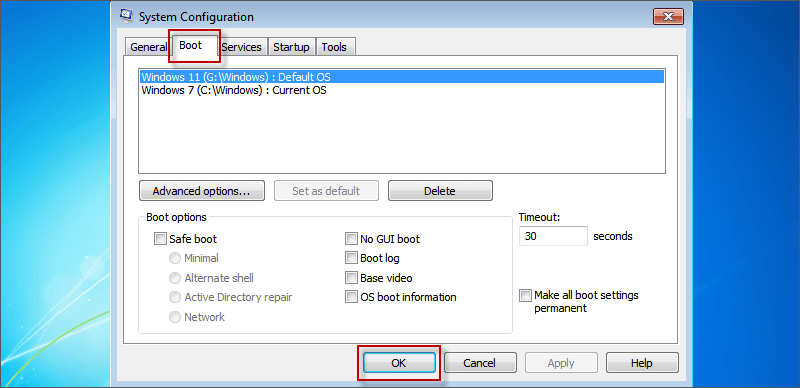
9. Press Win + R and type msconfig to open system configuration. Then you can check if the Windows 11 boot option is added.
10. Restart your Computer and choose Windows 11 in Windows Boot Manager to start installing Windows 11. Then follow the instructions to finish Windows 11 setup. If you want to switch to Windows 7, you just need to restart your Computer and choose Windows 7 option on the Windows Boot Manager.
 How to Try Windows 11 without Installing It on PC
 How to Boot Windows 10 and Windows 11 on the Same PC & Laptop
 [FIXED] Media Creation Tool
Not Working in Windows 10
[FIXED] Media Creation Tool
Not Working in Windows 10
 How to Install Windows 11 on VMware
Workstation 16 Pro
How to Install Windows 11 on VMware
Workstation 16 Pro
 How to Upgrade Windows 10 to Windows 11 without TPM 2.0
 7 Ways to Find Windows 11 Product Key on Laptop/PC