
Backing up the system can help prevent data loss due to system crashes. This article is a comprehensive tutorial on system backup in Windows 11, including 2 practical and effective methods. Let's get started!

The Backup and Restore is a free tool in Windows 11 that enables you back up a system or other files as needed.
Step 1: Open File Explorer, then click the dropdown button on the address bar and select Control Panel.

Step 2: Click on the button beside Control Panel and choose All Control Panel Items.

Step 3: Click on Backup and Restore (Windows 7) » Create a system image in sequence.

Step 4: Select the option On a hard disk, and choose a drive or partition to save system backup file. Then click Next. (Note: The amount of free space on the selected drive or partition should be larger than the amount of space used on the system drive.)

Step 5: Choose the C drive or a partition to back up, then click Next. (In this example, select the EFI partition and drive C.)

Step 6: Confirm your backup settings, then click Start backup to proceed.

Step 7: The program will start to create a system backup. If a prompt box appears, select No.

Step 8: Click Close after the operation is completed successfully.

Step 9: The system backup portfolio is saved in the location that you set previously.

iSumsoft Cloner, an excellent disk cloning software for Windows 11, is used to copy or clone Windows OS, data partitions, and even the entire hard drive. Not only does the software have a user-friendly interface design that makes it easy to back up system efficiently, but it also has a high success rate.

Step 1: Launch Cloner and click Backup option in the home page.

Step 2: Select the C drive (system drive) to back up.
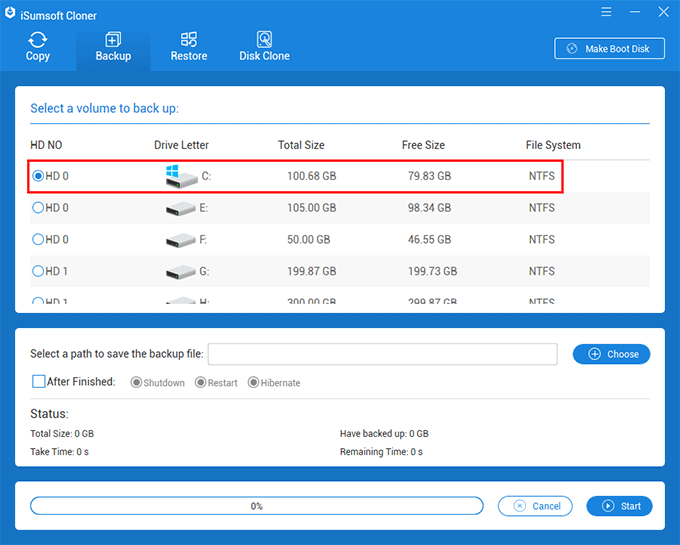
Step 3: Click Choose button to select a path to store the backup file.

Step 4: Click Start button to begin backing up and select Yes to confirm your selection.

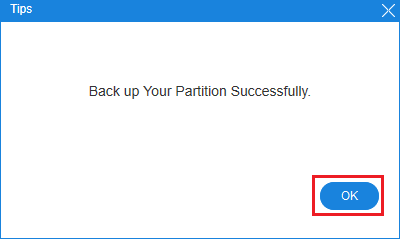
Step 5: Wait for the backup process to complete. Then click OK button when a Tips box appears. (This usually takes about 15 minutes to finish, depending on the size of the data being backed up.)
 Easily
Migrate Windows 11 to New m.2 SSD without Reinstalling
Easily
Migrate Windows 11 to New m.2 SSD without Reinstalling
 How to
Create an Administrator Account in Windows 8/8.1
How to
Create an Administrator Account in Windows 8/8.1
 Cannot
Sign into Microsoft Account on Windows 10
Cannot
Sign into Microsoft Account on Windows 10
 Fix:
Windows 10 Won't Let Me Enter Password at Login Screen
Fix:
Windows 10 Won't Let Me Enter Password at Login Screen
 How
to Add Sign-in Options for User Account on Windows 10
How
to Add Sign-in Options for User Account on Windows 10
