This is a tutorial on how to quickly insert multiple rows or columns in Excel worksheet.
This guide describes 2 quick ways to insert multiple rows or columns in a worksheet: One is to insert multiple rows or columns with F4 key, the other is to insert multiple rows or columns using a hidden insert feature in Excel.
With these ways below, you can insert multiple rows or columns at once.
Note: F4 key will repeat all your last action in Excel Worksheet.
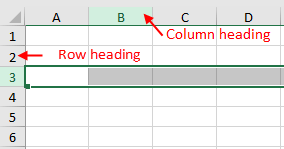
Step 1: In a worksheet, select entire row or column by clicking on the row or column heading.
Step 2: Right-click on the selected row, and choose Insert.
The row will be inserted directly above the currently-selected row.
Step 3: Repeat this action to insert multiple rows or columns by pressing F4 key.
Step 1: In a worksheet, click and drag to select the total number of rows to insert.
Step 2: Right-click on anywhere selected and select Insert.
Rows or columns will be inserted directly above the currently-selected rows.