
Find My iPhone is an essential feature that helps you locate your device if it gets lost or stolen. However, some users face an issue where the "Find My iPhone" option is greyed out, making it impossible to turn off or configure. If you're experiencing this problem, don’t worry! In this article, we’ll guide you through several methods to fix the "Find My iPhone" greyed out issue.

There are several reasons why Find My iPhone may appear greyed out, including software glitches, incorrect settings, or security restrictions. The issue can be caused by:
Screen Time Restrictions: If Screen Time restrictions are enabled, they might prevent access to Find My iPhone.
Unaccepted iCloud Terms: Sometimes, you need to accept new iCloud terms before being able to access certain settings.
Stolen Device Protection: If enabled, this feature could block modifications to Find My iPhone.
iCloud Account Issues: If your iCloud account is not properly synced with your device, Find My iPhone may be greyed out.
iOS Glitches: iOS glitches or corruption could also be a factor. These issues can disrupt the normal functioning of various features, including Find My iPhone.
Location Services restriction in Screen Time may prevent access to Find My iPhone, causing the feature to be grayed out and unavailable. Disabling this restriction may resolve the issue.
1. Open Settings on your iPhone and tap Screen Time.
2. Tap Content & Privacy Restrictions > Location Services, then check Allow Changes.

3. Return to your Apple ID settings and check if Find My iPhone is no longer greyed out.
If Find My iPhone is grayed out, it may be due to Stolen Device Protection, a security feature that restricts certain functions when your iPhone isn’t in a familiar location. Temporarily disabling it can help restore access to Find My iPhone.
1. Open Settings on your iPhone.
2. Tap Face ID & Passcode and enter your iPhone passcode.
3. Scroll down and tap Stolen Device Protection.
4. Toggle Stolen Device Protection to the off position.
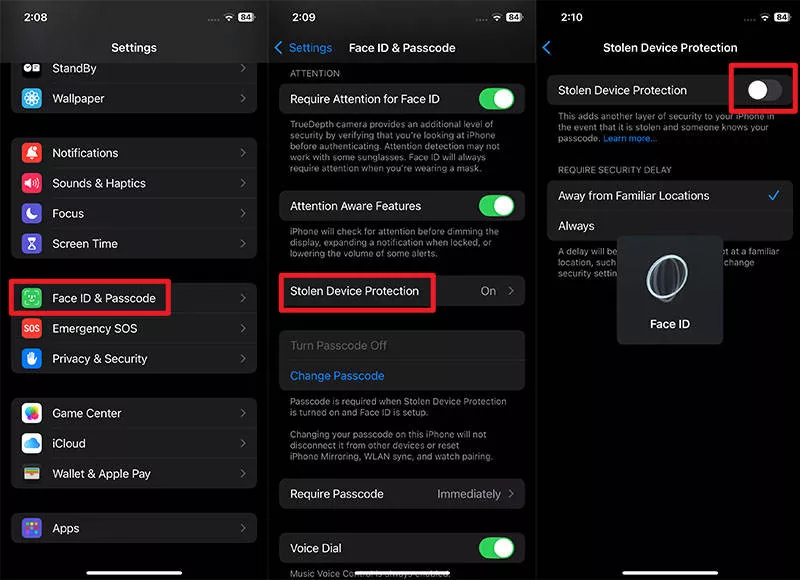
5. Tap Start Security Delay followed by Done.
6. Wait for the protection to be turned off.
7. Once disabled, Find My iPhone should no longer be greyed out.
If you’ve recently updated your iPhone, Find My iPhone may be greyed out because you haven’t accepted the latest iCloud terms and conditions. This is a common issue and can easily be resolved by agreeing to the new terms. Here’s how:
1. Open Settings on your iPhone.
2. If there is an option that says “New iCloud Terms and Conditions” under your Apple ID name, tap it.
3. Tap Continue.
4. Tap Agree.
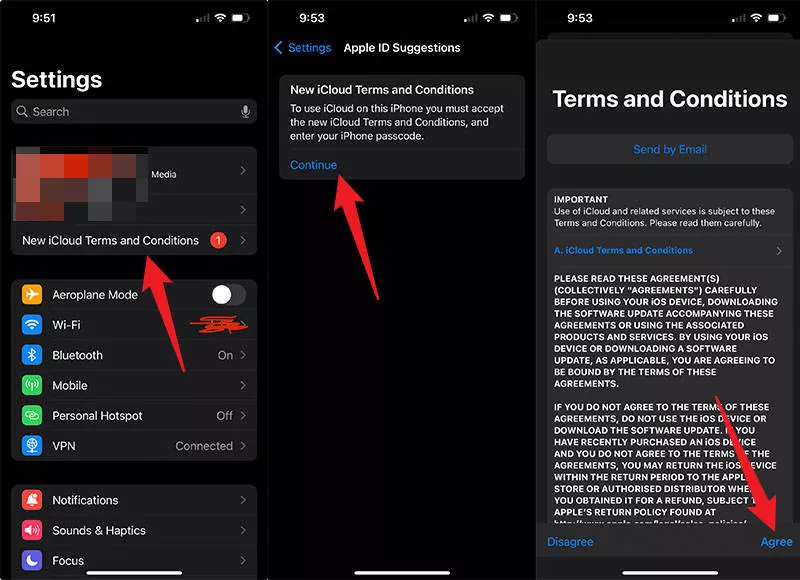
5. After agreeing, Find My iPhone should no longer be greyed out, and you can access it normally.
If your Find My iPhone option is still greyed out, adding your iCloud account to the Mail app can help resolve the issue.
1. Open Settings, then go to Mail > Accounts > Add Account. For iPhone running iOS 18 or later, go to Settings > Apps > Mail > Mail Accounts > Add Account.
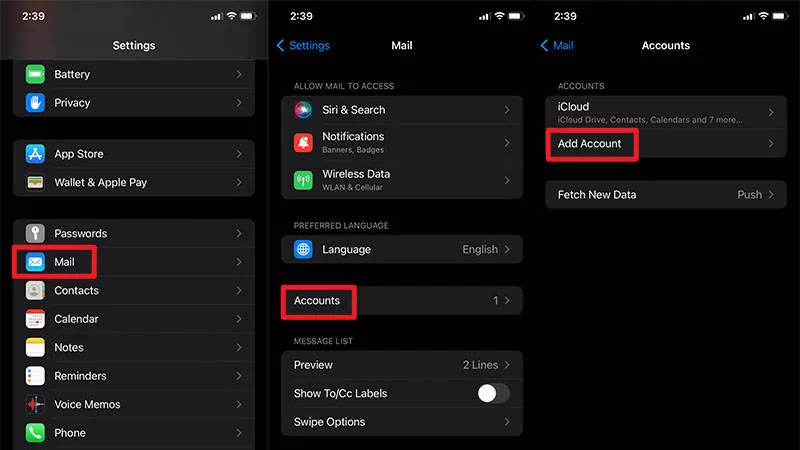
2. From the list of available services, select iCloud.
3. Enter your username and password of your iCloud account (use the same credentials already associated with your device). At this point, your phone may take a moment to process the information, and it might appear as though nothing is happening.
4. Once added, go back to the Find My iPhone settings and it should no longer be greyed out.
If Find My iPhone is still greyed out, signing out of your Apple ID account and then signing back in can often resolve syncing issues that may be causing the problem.
1. Open Settings on your iPhone and tap your Apple ID name at the top.
2. Scroll down and tap Sign Out at the bottom.
3. Enter your Apple ID password when prompted, then tap Turn Off.
4. Tap Sign Out and confirm again when prompted.
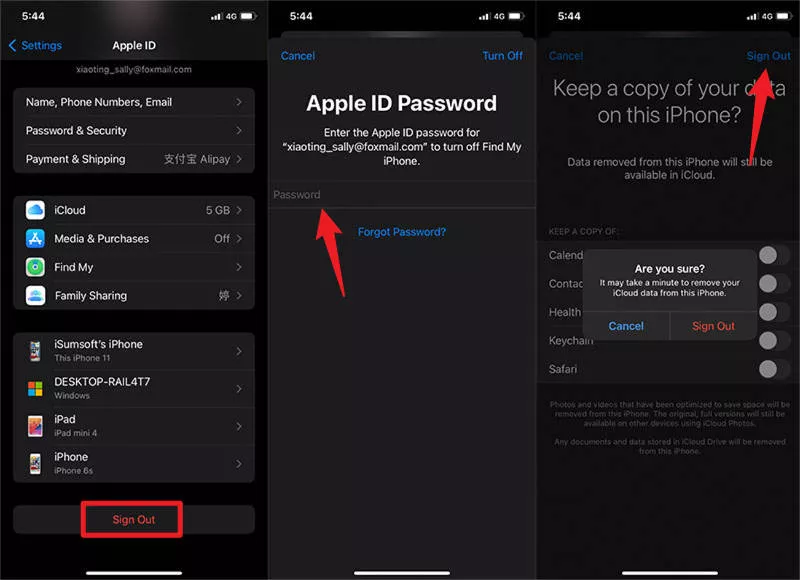
5. After signing out, restart your iPhone.
6. Go back to Settings, tap Sign in to your iPhone, and enter your Apple ID credentials.
7. Once you’ve signed back in, check if Find My iPhone is no longer greyed out.
If you’ve tried all the above solutions and Find My iPhone is still grayed out, iSumsoft iOS Refixer can be a powerful tool to resolve the issue. This specialized software is designed to fix various iOS system problems without causing any data loss.

1. Download and install iSumsoft iOS Refixer on your computer, then launch the program after installation..
2. Connect your iPhone to your computer using a USB cable, then unlock your iPhone and tap Trust if prompted.
3. Choose the System Repair option on the software.
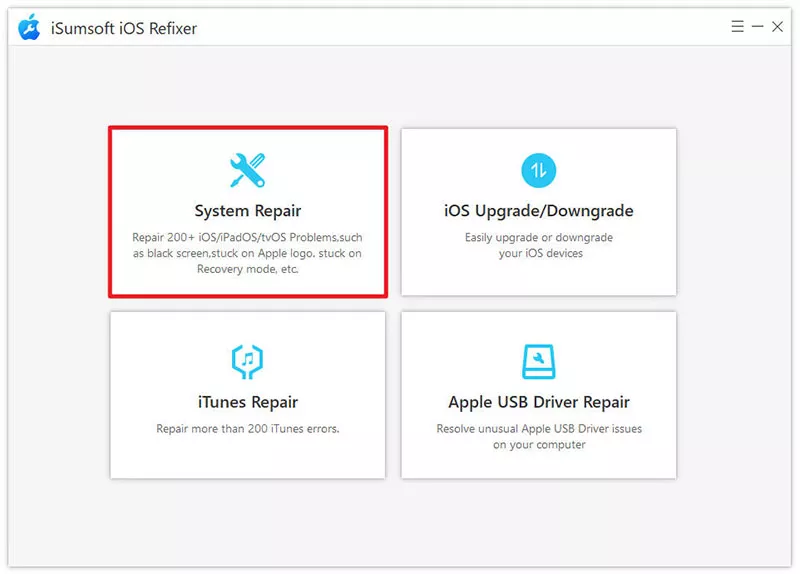
4. Choose Standard Mode.

5. Click Start to confirm that you want to proceed.
6. Click Next, so the software will automatically detect your iPhone.

7. Click Download to get the latest firmware needed to fix the iPhone.

8. Click Repair to start repairing your iPhone.

9. Once the repair is complete, your iPhone should function properly in all areas, and the Find My iPhone option will no longer be grayed out.

If you prefer not to use a third-party repair tool, the last resort is to reset your iPhone to factory settings to fix the Find My iPhone greyed out issue.
1. Open Settings on your iPhone and tap General.
2. Tap Transfer or Reset iPhone > Erase All Content and Settings > Continue > Erase iPhone.

3. Enter your iPhone passcode when prompted.
4. Enter your Apple ID password when prompted, then tap Turn Off.
5. Your iPhone will automatically erase itself..
6. Once complete, set up your iPhone from scratch.
7. When you get back into your iPhone, everything will function normally, including the Find My iPhone feature.
If the Find My iPhone option is greyed out on your device, don’t panic—this issue can usually be fixed with the right troubleshooting steps. Start by checking Screen Time restrictions, Stolen Device Protection, or pending iCloud terms, as there are common culprits. If those don’t work, try using iSumsoft iOS Refixer for deeper system repairs. As a last resort, a factory reset can restore full functionality.
By following these methods, you should be able to fix the Find My iPhone greyed out issue. If the problem persists, consider contacting Apple Support for further assistance.
 4 Methods to Freeze
Location on Find My iPhone
4 Methods to Freeze
Location on Find My iPhone
 FIXED:
iPhone Screen Keeps Dimming Even with Auto Brightness off
FIXED:
iPhone Screen Keeps Dimming Even with Auto Brightness off
 How to Fix iPhone Apps Closing
Unexpectedly
How to Fix iPhone Apps Closing
Unexpectedly
![[Solved] 8 Ways to Fix iPhone Lagging and Freezing](../images/ios-issues/iphone-lagging-and-freezing/8-ways-to-fix-iphone-lagging-and-freezing.webp) [Solved] 8 Ways to Fix iPhone
Lagging and Freezing
[Solved] 8 Ways to Fix iPhone
Lagging and Freezing
 Fix
iPhone Stuck in Recovery Mode Loop after Update
Fix
iPhone Stuck in Recovery Mode Loop after Update
 How to Fix iPhone Screen
Going Black Randomly
How to Fix iPhone Screen
Going Black Randomly
 How to Fix
iPhone Stuck on Headphone Mode
How to Fix
iPhone Stuck on Headphone Mode
 How to Unzoom iPhone
Stuck in Zoom Mode
How to Unzoom iPhone
Stuck in Zoom Mode
