
If you want to transfer photos from one iPhone to another, there are many methods available, and iCloud is one of the most commonly used methods. This article will show you how to transfer photos from iPhone to iPhone with or without iCloud.
Whether you want to transfer all the photos on your iPhone at once or selectively transfer specific photos, you can find the method you want from this article.

As a cloud storage service provided by Apple, iCloud is the most commonly used method for transferring photos from iPhone to iPhone, and is especially suitable for transferring from an old iPhone to a new iPhone. All you need is an Apple ID and WiFi, and then follow the steps below.
1. Open the source iPhone from which you want to transfer photos, and make sure that it is connected to a stable WiFi.
2. Go to Settings > Apple ID name > iCloud > Photos and turn on the iCloud Photos option. Then, turn off other files you don't want to back up to iCloud, such as Contacts, Calendars, messages, etc., if you want. This will save iCloud storage.

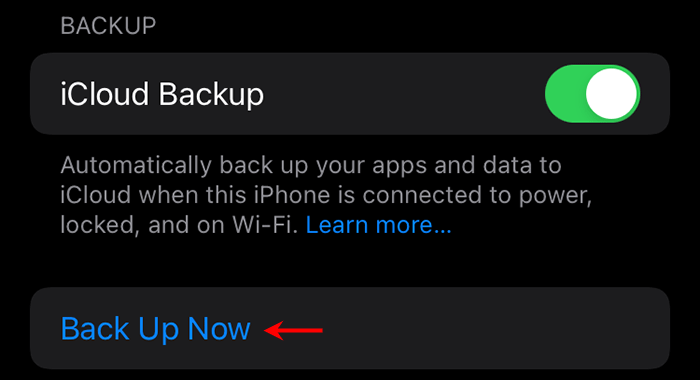
3. After making sure iCloud Photos is enabled, tap iCloud Backup and turn on the iCloud Backup option. Then, click Back Up Now and your iPhone will start uploading your photos to iCloud. This will take some time, especially if you haven't backed up for a long time.
1. Now go to the target iPhone you want to transfer photos to. Then, go to Settings > General > Reset to erase all contents and settings. This is a necessary step unless you are transferring to a brand-new iPhone that has not been set up.
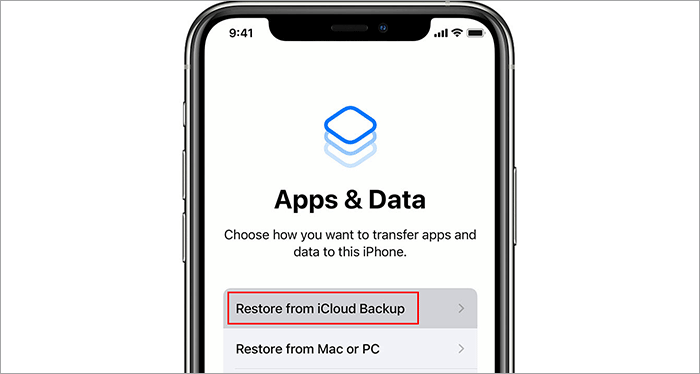
2. Choose your language and country and follow the on-screen prompts to set up the iPhone. When you get to the Apps & Data screen, choose Restore from iCloud Backup.
3. Sign in with your iCloud Apple ID that is logged in on your source iPhone to proceed. When you get to the Choose Backup page, choose your desired iPhone backup to continue.
4. Your iPhone will start restoring all photos as well as other data from the iCloud backup. Just Wait for the restoring to complete.
If you want the easiest and fastest way to transfer all photos on one iPhone to another iPhone at once without iCloud, the iSumsoft BackupTo is definitely the best choice. It's a safe and powerful iPhone data transfer tool, which enables you to transfer all photos from one iPhone directly to another without using iCloud and iTunes backup.
Moreover, iSumsoft BackupTo allows you to choose to transfer only photos, instead of all data. It doesn't even require your iPhones to connect to WiFi, Cellular data, and SIM card. All you need is a computer, and then follow the steps below.
Step 1: Download and install iSumsoft BackupTo on your Windows computer. After installation, launch the software.
DownloadStep 2: Use USB cables to connect the two iPhones between which you want to transfer photos to the computer. And, tap Trust on both iPhones if prompted.
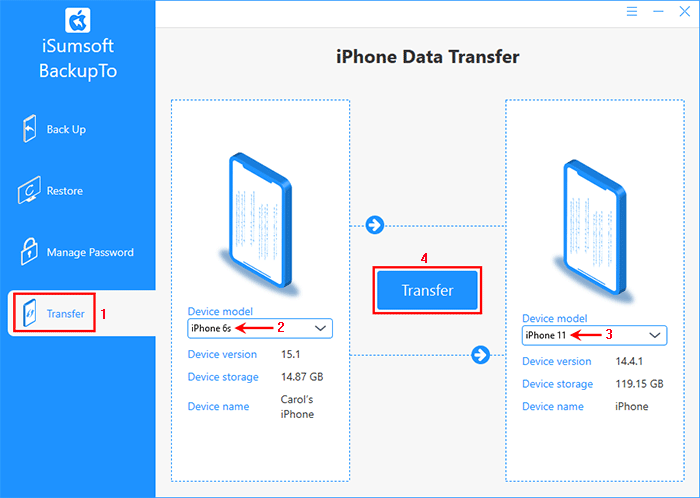
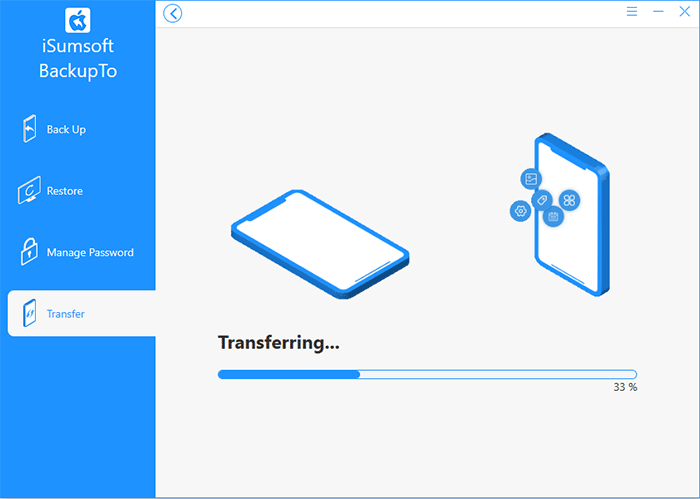
Step 3: Once iSumsoft BackupTo recognizes the two iPhones, select the Transfer option on the left. Then, select the source iPhone from which you want to transfer photos from the dotted box on the left, select the target iPhone to which you want to transfer photos from the dotted box on the right, and then click Transfer in the middle.
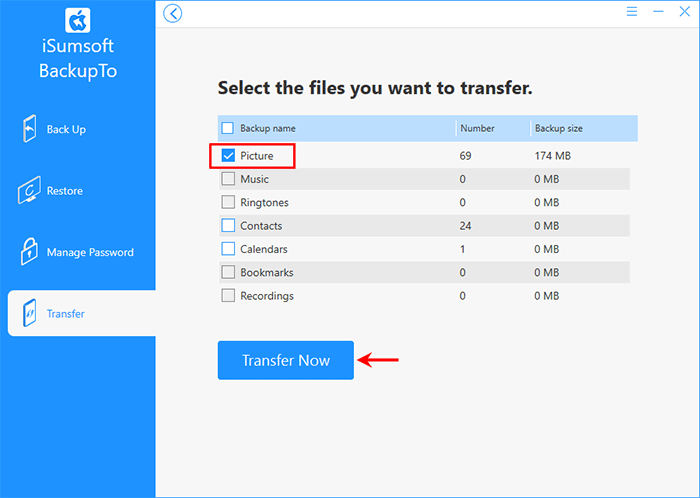
Step 4: Make sure the Picture check box is checked, and if necessary, uncheck other file categories that you don't want to transfer. Then, click Transfer Now and the software will immediately start transferring all photos from the source iPhone to the target iPhone. This will not overwrite the existing photos (if any) on the target iPhone.
Step 5: Wait for the transfer to complete. This will take only a few minutes, depending on the number of photos to transfer.
Step 6: When "Data migration is successful" is displayed on the software interface, all photos have been transferred without losing quality. You can then turn to the target iPhone and open the Photos app to check all the transferred photos.

As an iPhone management tool, iTunes is also a good choice for transferring data between iPhone and iPhone. It's another way to transfer photos from iPhone to iPhone without iCloud and WiFi. What you need is a computer, and then follow these steps.
1. Connect the source iPhone to your computer using a USB cable, and then tap Trust on the iPhone if prompted.
2. Open iTunes on the computer, and then click the phone icon in the upper left corner of the iTunes window to display your iPhone information.
![]()
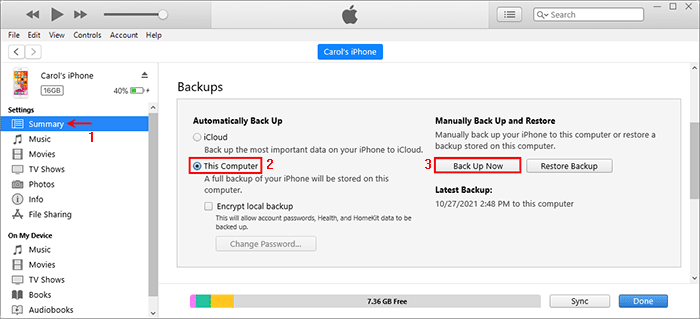
3. Select Summary on the left, and then locate the Backups section on the right. Select the "This computer" option, and then click Back Up Now. iTunes will start backing up all your photos as well as other data on your iPhone to your computer.
1. Connect the target iPhone to the computer using a USB cable, and then open iTunes on the computer.
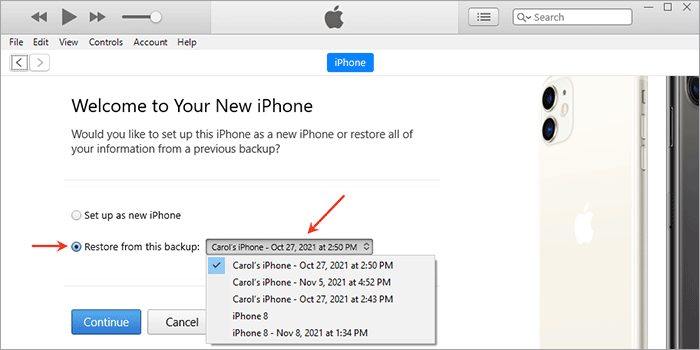
2. If the target iPhone has been reset, choose Restore from this backup in the iTunes window, then select your desired backup to transfer all photos to your iPhone.
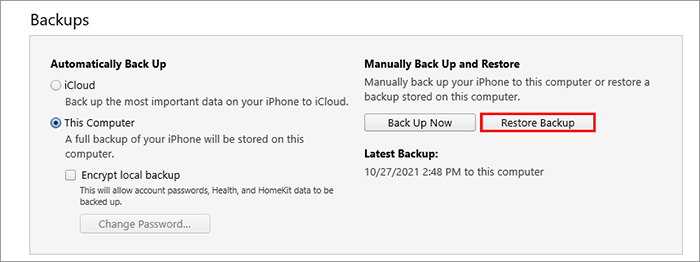
3. If the target iPhone is not reset, go to Settings > Apple ID name > Find My to turn off Find My iPhone, and then choose Restore Backup in the iTunes window to transfer photos.
In either case, all existing data (if any) on the target iPhone will be overwritten by the restored files.
AirDrop is a very convenient and interesting way to transfer photos directly from iPhone to iPhone without iCloud. More importantly, it enables you to transfer photos selectively. You need to have WiFi available, and then follow these steps.
Step 1: Make sure that both iPhones are connected to WiFi, Bluetooth enabled, Personal Hotspot disabled, and close to each other.
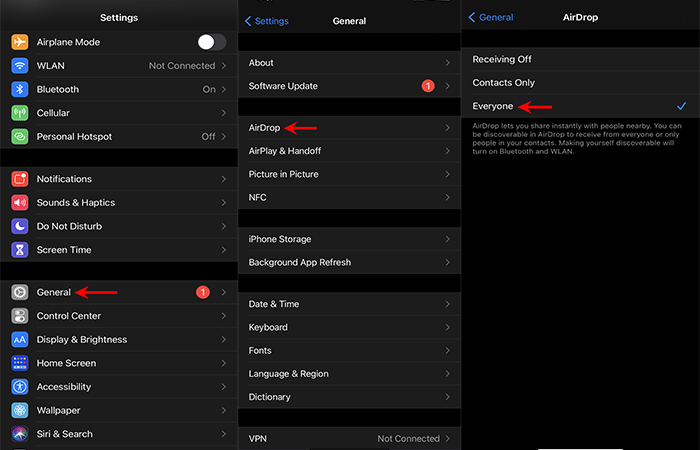
Step 2: On both iPhones, go to Settings > General > AirDrop and set AirDrop to Everyone.
Step 3: Open the Photos app on the source iPhone and get into the desired album. Tap Select in the upper right corner, select the photos you want to transfer to the target iPhone, and then tap the Share icon in the lower left corner.
Step 4: Tap AirDrop. When the target iPhone appears on the AirDrop page, tap it and all selected photos will be transferred to it immediately. The target iPhone will automatically open the Photos app to display the transferred photos.

Finally, you can use a cloud storage app like OneDrive or Google Photos to transfer photos from iPhone to iPhone. What you need to do is to install a cloud storage app on both iPhones and log in with the same account. Now, I will take OneDrive as an example to demonstrate how to transfer photos from iPhone to iPhone without iCloud.
Step 1: Download and install OneDrive on your source iPhone. After installation, open the app, and sign in with your Microsoft account.
Step 2: Select the Photos tab in the lower right corner, then tap Turn On at the top to turn on Camera upload. Once Camera upload is turned on, it will automatically back up all your iPhone photos to your OneDrive. Just wait for the backup to complete.

Step 3: Now, go to the target iPhone and make sure OneDrive is installed on it. Then, open OneDrive and sign in with the same Microsoft account.
Step 4: Select the Photos tab in the lower right corner and you can see all photos that come from the source iPhone. Select all photos you want to save to your Photos library, then tap the three-dot icon in the upper right corner, and then select Download, so that all photos will be downloaded to your iPhone Photos library.

 Top 6 Ways to Fix “Transfer Data Directly from iPhone” Not Working
 3 Ways to Transfer Everything from Old iPhone to New iPhone
 4 Ways to Transfer Photos from iPhone to PC without iTunes
 How to Backup iPhone to Computer without iTunes/iCloud
 5 Ways to Backup iPhone Contacts to PC/iCloud/Google
 How to Find iTunes Backup Files on Windows/Mac Computer
 How to Fix iTunes Cannot Read the Contents of the iPhone