
Typically, we create a new user with administrator privileges through Local Users and Groups option in Computer Management. However, it is not available in the System Tools list. Apart from this general method, is there another way to add a new administrator account? The focus of this article is to show you a new method of using CMD to create a new account with administrator privileges in Windows 11 Home.

Step 1: Type "cmd" in the search bar and choose Run as administrator from options.

Step 2: Click Yes to allow this app to make changes to your device.

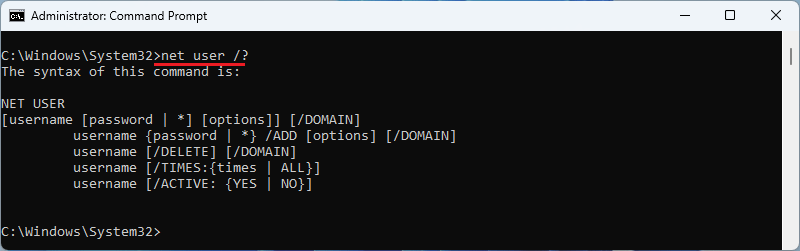
Step 3: Type "net user /?" and hit Enter key to view all the commands of NET USER.
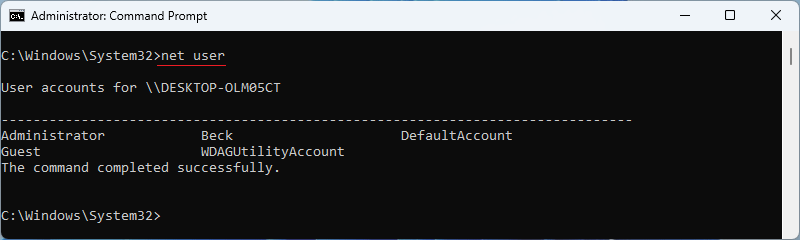
Step 4: Input "net user" and press Enter for all user information.
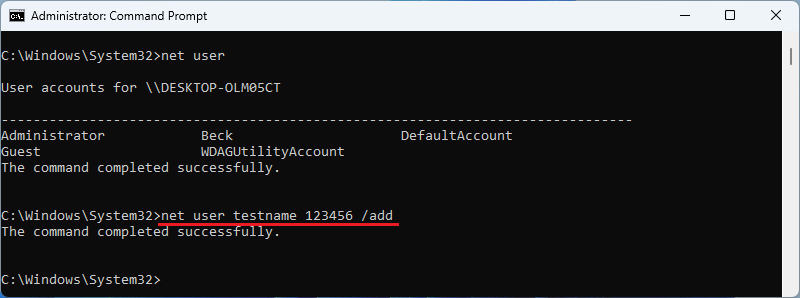
Step 5: Enter "net user testname 123456 /add" command and press Enter, which will create a new account named "testname" with a password of "123456".
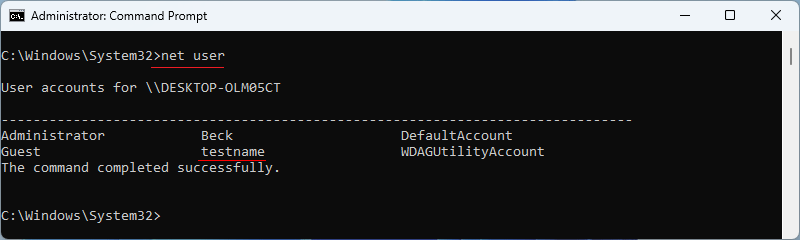
Step 6: Type "net user" and enter Enter to view all user information again, and the account "testname" will be displayed on the list.
Step 7: Input "net user testname" and press Enter for more information about "testname". You will see that the "testname" account has the permission: Users.

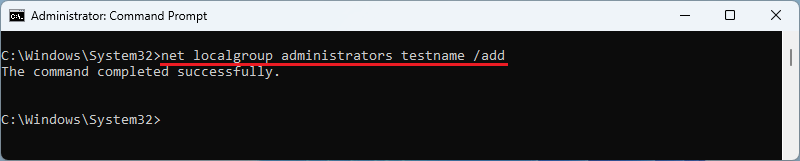
Step 8: Type command "net localgroup administrators testname /add" to assign administrator privileges for user "testname".
Step 9: Type "net user testname" and hit Enter, and you will see that you have finished adding administrator privileges to the "testname" account.

Step 1: Click Start icon, then choose "testname" from User option.

Step 2: Log in with the password "123456".

Step 3: You will be prompted to wait for a few minutes and don't turn off your PC.

Step 4: Pull down the scrollbar and select Accept to proceed.

Step 5: The user account is "testname" after entering the operating system, which has adminitrator privileges.

 [5 Ways] How to Create a
New User on Windows 11
[5 Ways] How to Create a
New User on Windows 11
 How
to Create Administrator Account When Can't Sign in Windows 10
How
to Create Administrator Account When Can't Sign in Windows 10
 Cannot
Remember Windows 10 Password, How to Access the PC
Cannot
Remember Windows 10 Password, How to Access the PC
 Fix:
Windows 10 Won't Let Me Enter Password at Login Screen
Fix:
Windows 10 Won't Let Me Enter Password at Login Screen
 How to
Create an Administrator Account in Windows 8/8.1
How to
Create an Administrator Account in Windows 8/8.1
 How
to Add Sign-in Options for User Account on Windows 10
How
to Add Sign-in Options for User Account on Windows 10