
Transferred iPhone HEIC photos to your Windows PC but can't open, edit, upload, or print them? This guide shows you how to convert HEIC to JPG on Windows 10/11 for free, including a no-install browser method, the Windows Photos app, Paint, and a batch conversion option for many images.
Quick answer:
HEIC (High Efficiency Image Container) is the photo format used by modern iPhones when the camera is set to High Efficiency. It is based on the HEIF standard and can keep image quality high while using less storage space than JPG.
The problem appears after you move iPhone photos to a Windows PC. Some Windows 10/11 systems can open HEIC files after installing Microsoft's extensions, but many apps, websites, printers, and older programs still expect JPG. That is why converting iPhone HEIC photos to JPG is often the fastest compatibility fix.
The best HEIC to JPG method depends on how many photos you need to convert and whether you want to install anything on the PC.
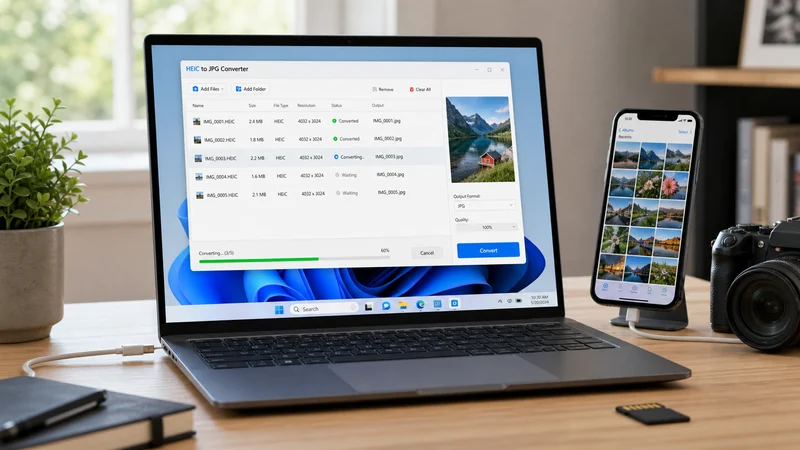
If you want to convert HEIC to JPG on Windows without software, use the free iSumsoft HEIC Converter. It runs in your browser, supports JPG and PNG output, and is suitable for iPhone photos that you want to upload, email, print, or edit on Windows. It can also handle HEIC files that include multiple images or frames and export them as separate JPG files.
Step 1 Open your browser and go to the iSumsoft HEIC Converter tool page.
Step 2 Click the upload area or drag and drop your HEIC files into the converter. You can add one photo or multiple HEIC files for batch conversion.
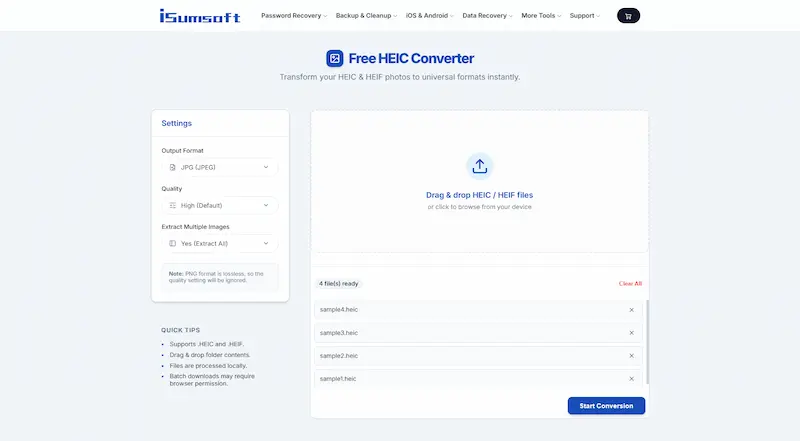
Step 3 Select JPG as the output format and adjust the quality setting if needed. If the HEIC file contains more than one image, keep the option to export all images enabled.
Step 4 Click Convert and wait for the conversion to complete.
Step 5 Download the converted JPG files to your computer.

If one HEIC file contains several images or frames, the converter will output separate JPG files so you can save each image individually instead of only keeping the default frame.
Note:
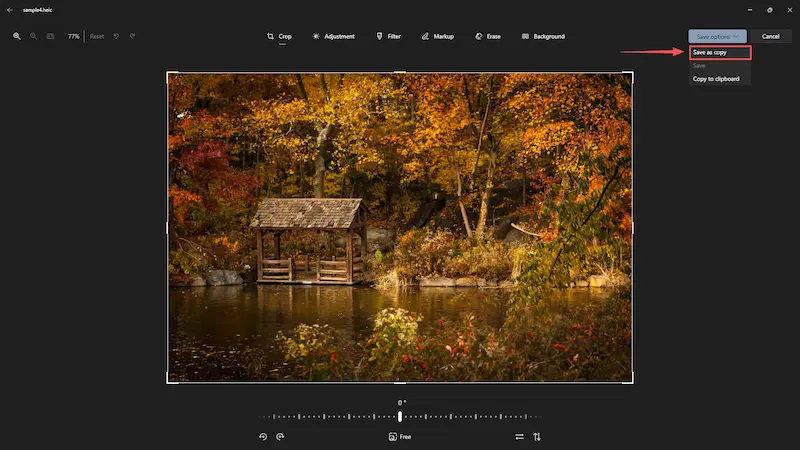
Windows Photos is convenient when you only need to open and convert a small number of HEIC files. It may require Microsoft Store extensions before Windows can read the HEIC format.
Step 1 Open the Microsoft Store app on your Windows PC.
Step 2 Search for "HEIF Image Extensions" and install the free extension by Microsoft.

Step 3 If Windows asks for the HEVC Video Extensions, install them as prompted. Availability and pricing can vary by region.
Step 4 After installation, double-click any HEIC file to open it in the Photos app.
Step 5 Click the ... menu, choose Save as or Save a copy, and save the image as a JPG file.
Paint or Paint 3D can also save a HEIC image as JPG after Windows has the required HEIC support installed. This method is simple, but it is still a manual one-file-at-a-time workflow.
Step 1 Right-click the HEIC file and select Open with > Paint or Paint 3D.
Step 2 Once the image opens, click File or Menu, then choose Save as.
Step 3 Select JPEG picture or JPEG as the output format.
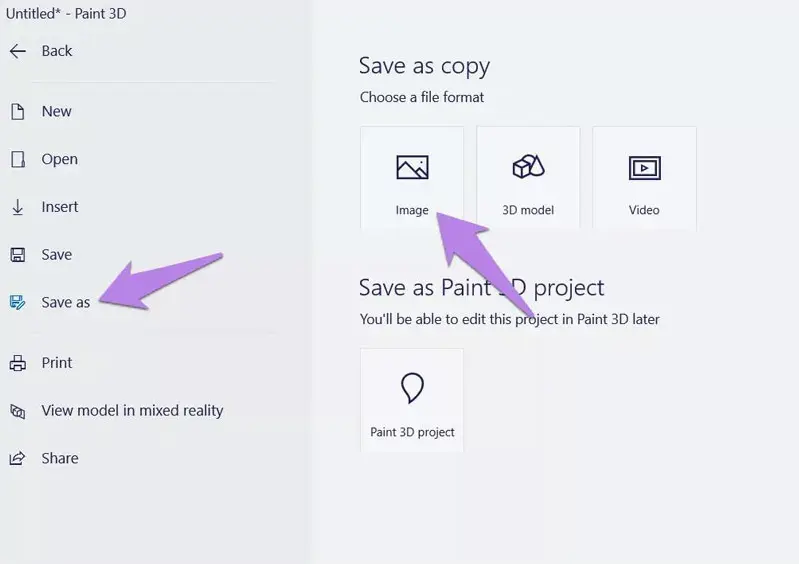
Step 4 Choose a save location and click Save.
When you have a full folder of iPhone HEIC photos, batch conversion saves the most time. You can use the browser converter for a small batch, or use ImageMagick if you want a command-line workflow.

To batch convert HEIC files with ImageMagick:
Step 1 Download and install ImageMagick from the official website.
Step 2 Open Command Prompt or PowerShell in the folder containing your HEIC files.
Step 3 Run the following command to convert a single file:
magick convert input.heic output.jpgStep 4 To convert all HEIC files in the current folder:
magick mogrify -format jpg *.heic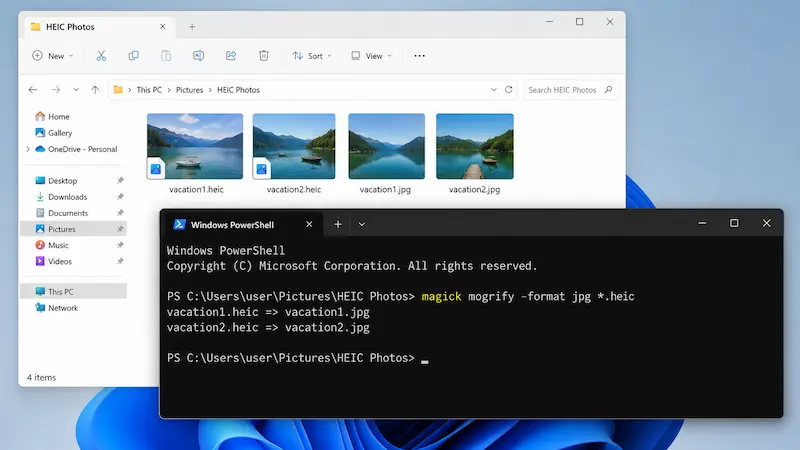
This command creates JPG versions in the same folder. Keep the original HEIC files until you have checked the converted JPG images.
A HEIC file is a container, so it can store more than a single still image. Depending on how the photo was created, one HEIC file may include a main image, depth data, thumbnails, bursts, image sequences, or several frames. If you only convert the default frame, you may miss other pictures stored inside the file.
The easiest way is to use Method 1 and let iSumsoft HEIC Converter export all images from the HEIC file. If you prefer an offline command-line method, you can also use ImageMagick to extract each image first and then save the exported files as JPG.
Step 1 Put the HEIC file in a separate folder so the extracted images are easy to find.
Step 2 Open Command Prompt or PowerShell in that folder.
Step 3 Run this command to export each image inside the HEIC file as a separate JPG file:
magick input.heic extracted-%03d.jpg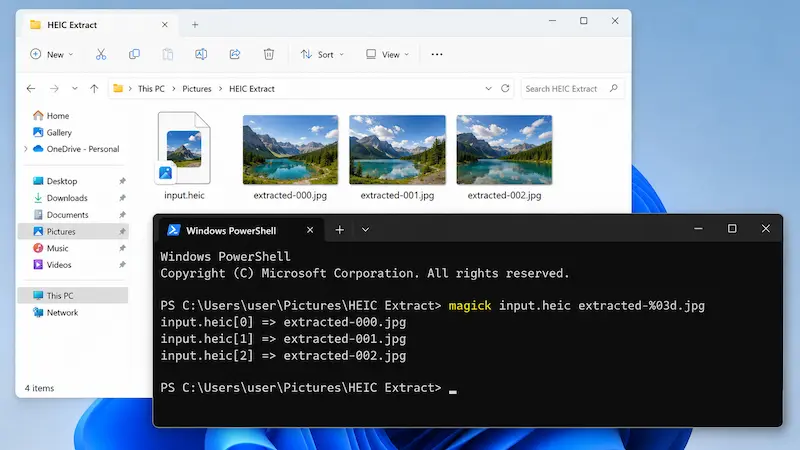
Step 4 Check the exported JPG files. If the HEIC file contains more than one image, you will see files such as extracted-000.jpg, extracted-001.jpg, and extracted-002.jpg.
Tip: Some HEIC files contain only one photo. In that case, the command exports only one JPG file, which is normal.
If you do not want to keep converting HEIC files on Windows, you can change your iPhone camera format so new photos are saved as JPG instead.
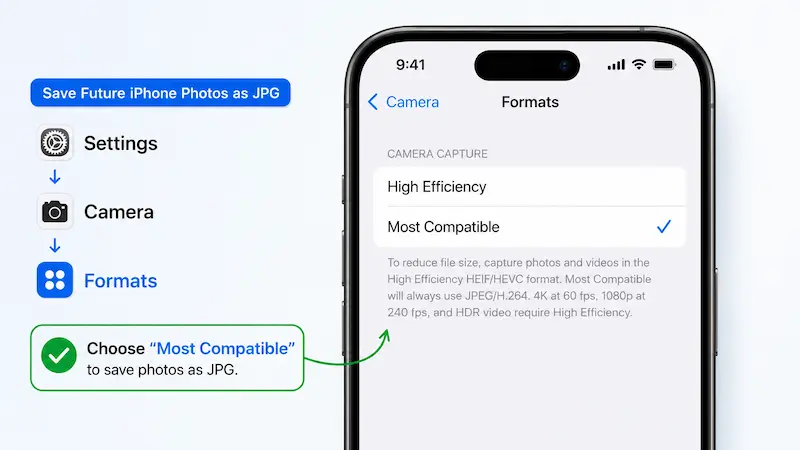
After that, new photos are saved in JPG format. Existing HEIC photos will not change automatically, so you still need to convert the photos already stored on your iPhone or Windows PC.
Converting HEIC to JPG on Windows is easy once you choose the right method. For a free no-install option, use iSumsoft HEIC Converter. For one or two photos, Windows Photos or Paint is enough after the HEIC extensions are installed. For a large iPhone photo folder, use batch conversion so you can turn many HEIC images into JPG files at once. If a HEIC file contains multiple images or frames, extract all images first so you do not lose anything stored inside the container.


