
HEIC (High Efficiency Image Format) is a newer image format developed by the MPEG group. It was introduced in iOS 11 and is now the default image format for photos taken on iPhones and other iOS devices. HEIC is designed to be a more efficient and higher quality alternative to JPEG, with the ability to store more information in a smaller file size.
However, because HEIC is a newer format, not all devices and software programs support it yet. To view HEIC images on your computer device, you need to change the HEIC format to JPG. In this article, I'll share you with several free methods for converting photo format from HEIC to JPG on iPhone.

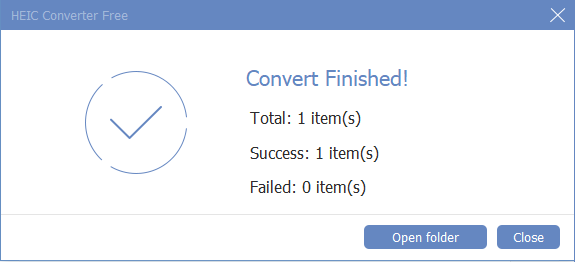
HEIC Converter Free is a free software changing HEIC to JPG. It provides the option to select the image quality before converting and allows you to convert photos one by one or in batch mode.
Step 1: Download and install the software, then launch it.
Step 2: To convert HEIC images, you can either drag one or more photos onto the interface or click Add HEIC to select photos from your computer.

Step 3: Select Convert. Before converting, you can also choose the conversion format and quality.

Step 4: Convert successfully.
ImageMagick is a free and open-source software for creating, editing, and converting raster and vector images. The software can also be used to perform a wide variety of image manipulation tasks, including resizing, cropping, rotating, flipping, and adjusting colors and brightness.
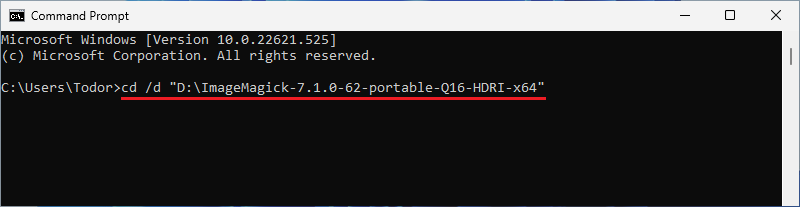
Tips: In this instance, I download and saved ImageMagick on the D drive. Additionally, there is a photo called "example.heic" also saved on the D drive.
Step 1: Download ImageMagick package.

Step 2: Download example.heic.

Step 3: Locate the downloaded file, and click Extract all to extract the zip to the current directory.

Step 4: Click Search icon on the taskbar and type "cmd" in the search bar, then choose the best match Command Prompt.

Step 5: Type cd /d "D:\ImageMagick-7.1.0-62-portable-Q16-HDRI-x64" and press Enter.
Note: You must replace the storage path with your own. (Reference: How to Copy Full Path of Files or Folders)
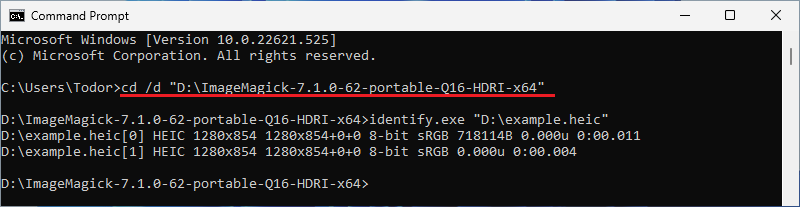
Step 6: Type identify.exe "D:\example.heic" and hit Enter. This will display information about the image stored in the D disk in the command prompt. Similarly, you also need to change the photo location.
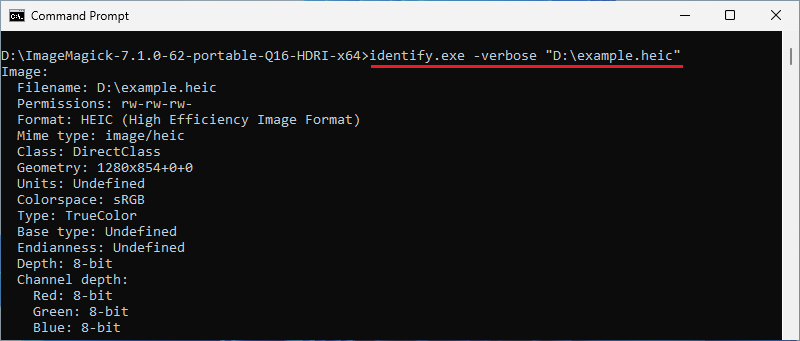
Step 7: Type identify.exe -verbose "D:\example.heic" and press Enter to obtain the details of the photo.
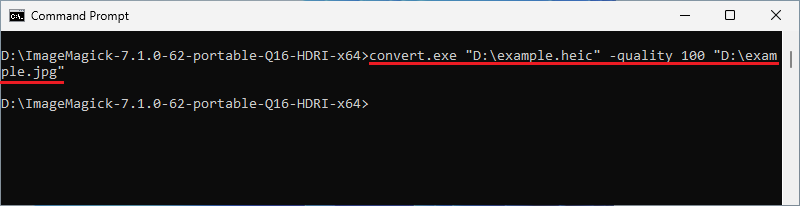
Step 8: Type convert.exe "D:\example.heic" -quality 100 "D:\example.jpg" and hit Enter.
Step 9: Navigate to the folder, you will see that the image has been converted successfully.

 Solutions for
Recovering an Unsaved Word Document
Solutions for
Recovering an Unsaved Word Document
 How
to Clone Windows System Drive to a New Hard Drive
How
to Clone Windows System Drive to a New Hard Drive
 What
is the BCD File? Backup, Restore, and Rebuild BCD File
What
is the BCD File? Backup, Restore, and Rebuild BCD File
 How to Initialize
and Partition a Hard Disk in Windows 10/8/7
How to Initialize
and Partition a Hard Disk in Windows 10/8/7
 How
to Do a System Restore if PC Fails to Boot up
How
to Do a System Restore if PC Fails to Boot up
 Windows Cannot be
Installed to This Disk GPT
Windows Cannot be
Installed to This Disk GPT