Some Windows 10 users run into problems while attempting to connect to WiFi (Wireless Network) on the laptop. Now right here in this article, we will introduce how to connect to WiFi on Windows 10 laptop and give some practical solutions if Windows 10 can't connect WIFI network.
In order to make Windows 10 can successfully connect to WiFi, firstly you should make sure that your laptop comes with a wireless network adapter, the network adapter works normally, and wireless function has been enabled. If you can see the wireless network icon at the far right of Windows 10 taskbar, that means your laptop comes with wireless network adapter and the wireless function is enabled. Then following you can connect to WiFi on your Windows 10 laptop with ease.
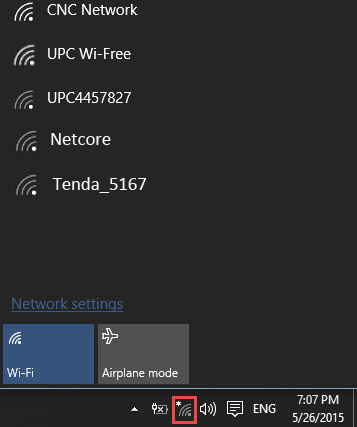
Step 1: Click the wireless network icon in the lower right corner of the Windows 10 desktop. This will pop up a WiFi list containing all the available WiFi networks around your laptop.
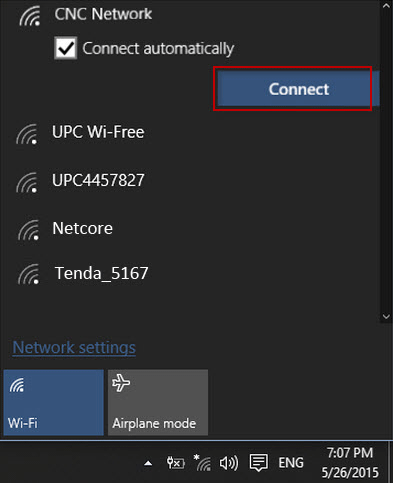
Step 2: Select the target WiFi network you want to connect and click on its name. Then click the Connect button.
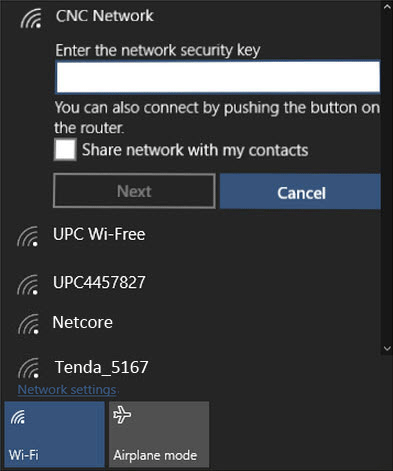
Step 3: If the WiFi network is password encrypted, it will require you to type the correct security key and then click Next. Then it will verify and then successfully connect to this Wifi network as long as your entered security key is correct.
Note: Do not turn on the Airplane mode at the bottom, which will automatically turn off your Wifi connection.
Some people find their laptops can't connect to the WiFi network on Windows 10. The causes can be various.
If there is no wireless network icon in the lower right corner of your Windows 10 desktop, that means your laptop has no wireless network adapter driver. You should install or reinstall the driver before Windows 10 can connect to Wifi network.
If it displays a red "X" on the wireless network icon and you can't discover any Wifi wireless network signal on the laptop, that's probably because the wireless network has not been enabled yet on your Windows 10. You need to turn on the wireless network.
Step 1: Right-click on the wireless network icon and then click "Open Network and Sharing Center".
Step 2: Click Change adapter settings link on the left-side pane.
Step 3: On the Network Connections pane, find the "WLAN", right-click on it and click Diagnose.
Step 4: Once diagnosing is completed, it will prompt "Windows wireless service is not running on this computer". Then you can troubleshoot the problem as administrator. After troubleshooting, you can successfully discover and connect to the WiFi network.
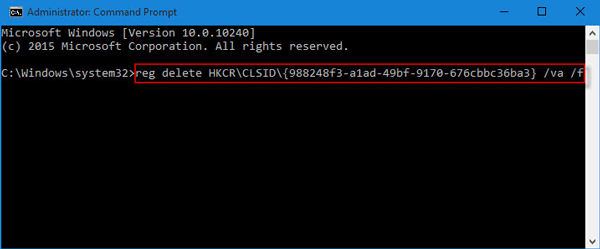
If no wireless network is available to connect to even though wireless network is available in the range, and the adapter appears to be working with compatible drivers installed, you can fix the problem by command prompt.
Step 1: Open Windows 10 Command Prompt as administrator.
Step 2: Type the following command and press Enter key.
![]()
Step 3: Type the following command and press Enter key.
![]()
Step 4: Restart your laptop. Then all wireless networks around you should now be visible and you can connect to them.