
C Drive Still Small After Cloning to a Larger SSD? How to Use Unallocated Space

You replace a 256GB SSD with a 1TB model, clone Windows 11 successfully, and boot from the new disk. Everything runs correctly, but C: still looks like a 256GB partition. Where did the rest of the storage go?
In many cases, the cloning process preserves the original partition sizes and leaves the extra capacity as Unallocated space. You can often extend C: to use it, but only if the partition layout allows it.
Quick answer:
- Open Windows 11 Disk Management. If unallocated space is on the same disk and immediately to the right of C:, right-click C: and use Extend Volume. If a Recovery partition lies between them, the built-in tool cannot simply extend across that partition.
- Why a Larger Cloned SSD Can Show the Old C Drive Size
- Check the SSD in Disk Management
- Method 1: Extend C Drive When Unallocated Space Is Adjacent
- Method 2: What If Extend Volume Is Greyed Out?
- Method 3: Confirm the Physical SSD Capacity and Partition Style
- Back Up Your SSD Before Changing Partitions
- FAQ
- Conclusion
- Sources
Why a Larger Cloned SSD Can Show the Old C Drive Size
A disk clone may copy the original partition boundaries without automatically growing the main Windows partition. For example:
| Partition | Before cloning | After cloning to 1TB |
|---|---|---|
| EFI system | 260MB | 260MB |
| Windows (C:) | About 237GB | About 237GB |
| Recovery | About 800MB | About 800MB |
| Remaining | None | Hundreds of GB unallocated |
This is an illustrative layout, not a universal partition size.
If you see a large black bar labeled Unallocated in Disk Management, the SSD's capacity is present but is not yet assigned to a usable volume.
Check the SSD in Disk Management
Use the older Windows screenshots below to recognize the controls. Your Windows 11 layout and partition sizes can differ.
Step 1 Press Windows + X and choose Disk Management.
Step 2 Identify your new SSD by its total disk capacity. Do not confuse it with the old SSD if both are still connected.
Step 3 Locate the C: partition and any black-bar Unallocated space.
Step 4 Check whether the unallocated region directly follows C: in the visual disk map.
Step 5 Also confirm whether there is a Recovery or other partition between them.
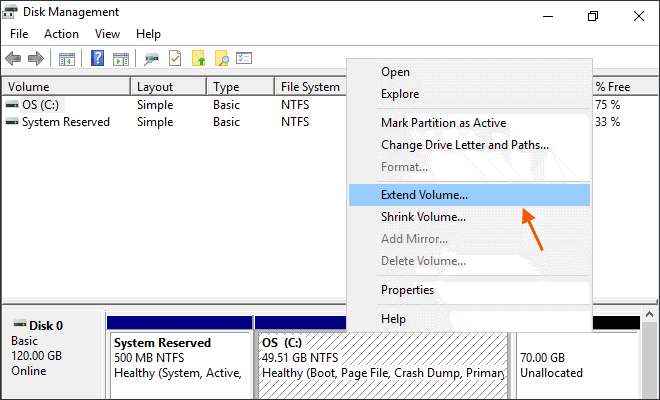
Existing iSumsoft screenshot from an older Windows interface. It illustrates adjacent unallocated space; it is not a test of a newly cloned Windows 11 SSD.
Method 1: Extend C Drive When Unallocated Space Is Adjacent
This is the simplest supported case. Windows Disk Management can grow a suitable NTFS or ReFS volume into contiguous space immediately following it on the same disk.
Step 1 Back up important data before changing partitions.
Step 2 In Disk Management, right-click C:.
Step 3 Select Extend Volume.
Step 4 In the wizard, click Next.
Step 5 Choose the amount of unallocated space to add. The default may select all available space.
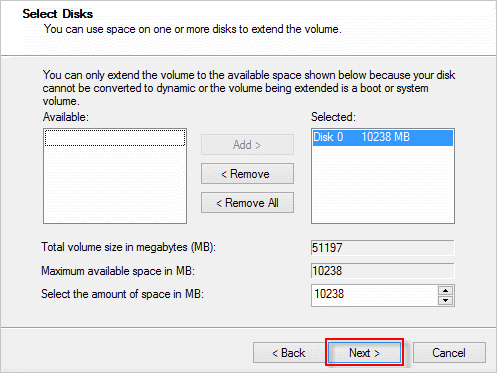
Existing iSumsoft screenshot from an older Windows interface. It illustrates space selection in the wizard; it is not a test of a newly cloned Windows 11 SSD.
Step 6 Click Next > Finish.
Step 7 Open File Explorer > This PC and verify C: now shows the expected capacity.
If Extend Volume is unavailable, do not repeatedly click other disk options. Continue to the next section and check the partition arrangement.
Method 2: What If Extend Volume Is Greyed Out?
The most common layout obstacle after cloning is:
EFI | Windows (C:) | Recovery | Unallocated
In that arrangement, a Recovery partition sits between C: and the free space. Microsoft confirms that Extend Volume cannot skip over an intervening partition in its basic workflow.
You have several choices:
Option A: Leave the Recovery partition intact and create a new data drive
This is the lower-risk solution if you simply need to use the SSD's spare capacity.
Step 1 In Disk Management, right-click Unallocated.
Step 2 Choose New Simple Volume.
Step 3 Select the space size and a drive letter such as D:.
Step 4 Choose a suitable file system, normally NTFS for a Windows data volume.
Step 5 Complete the wizard and confirm the new drive appears in File Explorer.
Warning:
- Creating a new volume consumes the selected unallocated area; it does not enlarge C:.
Option B: Protect your data with iSumsoft Cloner before adjusting partitions
If you want to move the Recovery partition so you can extend C:, start by protecting your existing Windows installation and files. iSumsoft Cloner offers partition backup and disk cloning, helping you prepare a recovery copy before making changes to your SSD.
Choose the backup approach that fits your plan:
- Backup: Save your Windows or data partition as an image archive on a separate drive.
- Disk Clone: Copy the entire SSD, including its partitions, to another disk. Back up any files on that destination first, because cloning overwrites it.
- Restore: Restore a saved partition image when needed. Confirm the backup scope and restoration procedure before changing your disk layout.
Download iSumsoft Cloner for Windows and follow the Cloner User Guide to prepare your backup. After verifying it, use a compatible partition-management tool to move the Recovery partition; Cloner provides the backup, while the partition tool handles the layout change. Keep your BitLocker recovery key and Windows recovery media available.
Option C: Revisit the cloning or migration plan
If the disk is new and you can safely start over from a verified source backup, consider a migration method that explicitly supports adjusting destination partition sizes. Check the tool's actual options before overwriting the SSD.
Method 3: Confirm the Physical SSD Capacity and Partition Style
Sometimes the problem is not the size of C: but that Windows does not recognize the disk's full capacity.
Step 1 In Disk Management, note the total size shown on the left for the physical Disk 0/Disk 1 label.
Step 2 Compare it with the SSD's advertised capacity, accounting for the difference between decimal GB and binary GiB.
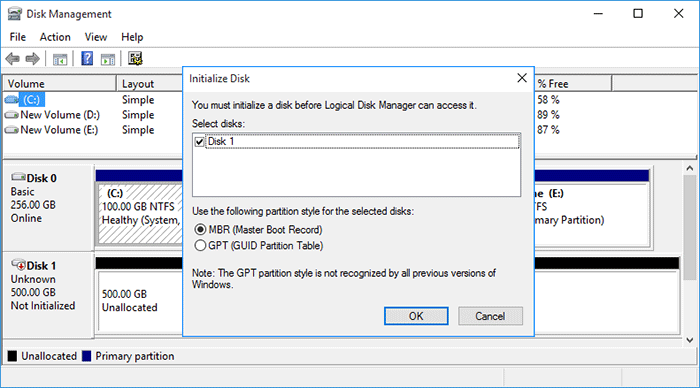
Step 3 If the disk is larger than 2TB and is set up as MBR, investigate GPT requirements before attempting to use the whole disk.
Step 4 Do not select Initialize Disk, Convert to Dynamic Disk, or Delete Volume as a trial-and-error fix on a drive containing valuable data.
See Microsoft: Extend a basic or dynamic volume for the exact adjacency, file-system, and partition-style limitations.
Back Up Your SSD Before Changing Partitions
Partition work is riskier than simply making a new folder. If you want a separate copy of your Windows partition or disk before proceeding, iSumsoft Cloner provides Windows/partition backup and disk-cloning functions. Verify that the selected method protects all partitions required for your intended restore, not only C:.
You can also refer to iSumsoft's existing guide on cloning an SSD to a larger SSD, which is related but should not replace this article's more specific post-clone capacity problem.
FAQ
Will extending C: delete my files?
A successful supported extension is designed to preserve existing files. Nonetheless, partition changes carry risk, so create and check a backup first.
Why does the new SSD show 931GB instead of 1TB?
Manufacturers usually advertise decimal capacity while Windows may display binary units; roughly 931GiB for 1TB is expected and is different from missing unallocated space.
Can Windows Disk Management move a Recovery partition?
No. Its standard Extend Volume workflow needs immediately adjacent free space. Moving an intervening Recovery partition requires a different method and careful recovery planning.
Is it safe to delete the Recovery partition to extend C:?
Do not delete it as a routine shortcut. It may be required for Windows Recovery Environment and future repairs.
Conclusion
When C: remains small after cloning to a larger SSD, first inspect the actual partition layout. Adjacent unallocated space can usually be added with Extend Volume. A Recovery partition between C: and the free space changes the options. If simplicity and safety matter more than having one giant C: partition, a separate data volume may be the better choice.
![[Windows 11] A Comprehensive Tutorial on System Backup](../images/backup-recovery/a-comprehensive-tutorial-on-system-backup-in-windows-11/a-comprehensive-tutorial-on-system-backup-in-windows-11-s.webp)
