
When Win + L is not working, Windows may not lock even when you press the keyboard shortcut, press Ctrl + Alt + Delete, or look for the Lock option in account settings. This usually happens because the Lock Computer feature is disabled by policy, the Registry value DisableLockWorkstation is set incorrectly, the Windows key is blocked by keyboard software, or the computer is controlled by a work or school administrator.
Quick answer:
Why this fix works: Microsoft documents the DisableLockComputer policy under ADMX_CtrlAltDel. Its Group Policy path is User Configuration > Administrative Templates > System > Ctrl+Alt+Del Options, and its Registry value is DisableLockWorkstation. When that policy is enabled, users cannot lock the computer from the keyboard.
Reviewed for: Windows 10 and Windows 11 PCs. The Group Policy method applies to editions that include Local Group Policy Editor, such as Pro, Enterprise, and Education. Windows Home users should use the Registry method or contact the device administrator if the PC is managed.

Use this quick check to decide which fix to try first. It prevents unnecessary Registry edits when the problem is only a keyboard or shortcut conflict.
| What you see | Likely cause | Best fix |
|---|---|---|
| Win + L does nothing, and Lock is missing from Ctrl + Alt + Delete. | Lock Computer is disabled by policy. | Use Way 1 if Group Policy Editor is available. |
| Group Policy Editor cannot open or gpedit.msc is missing. | You may be using Windows Home. | Use Way 2 with Registry Editor. |
| Only Win + L fails, but Ctrl + Alt + Delete still shows Lock. | Keyboard, Windows key lock, gaming mode, or hotkey software. | Check the keyboard first before changing policy. |
| The PC is managed by your company or school. | Admin policy may intentionally block locking options. | Contact the administrator before changing settings. |
Use this method if you are on Windows Pro, Enterprise, or Education and can open Local Group Policy Editor. The goal is to disable the policy named Remove Lock Computer. In this context, Disabled means the restriction is turned off, so Windows can show the Lock option again.
Note: If Windows says it cannot find gpedit.msc, skip to Way 2. Many Windows Home editions do not include Local Group Policy Editor.
Step 1: Type "gpedit.msc" in the search box on the taskbar, and then click it in the results.

Step 2: From the Local Group Policy Editor, expand User Configuration » Administrative Templates » System sequentially.

Step 3: Select Ctrl+Alt+Del Options from System folder.

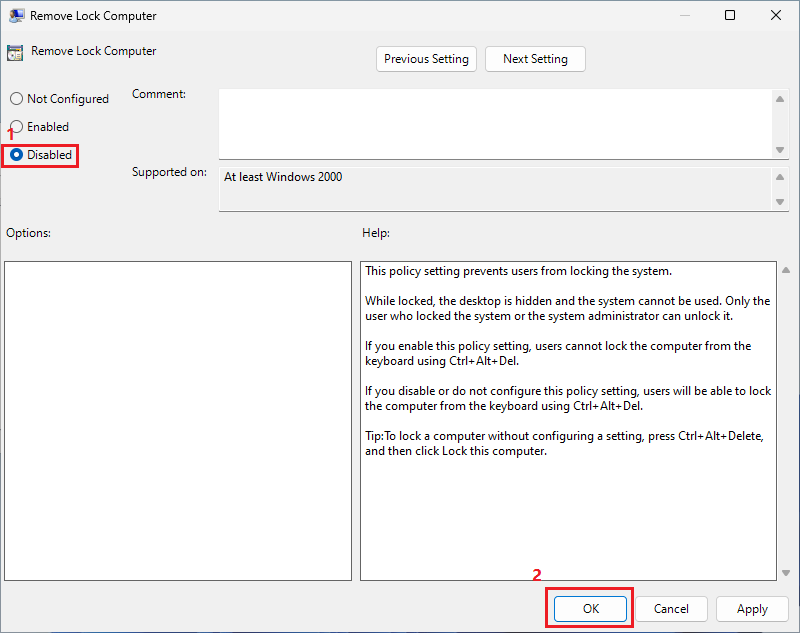
Step 4: Double-click Remove Lock Computer on the right side.

Step 5: In the new window, check Disabled, and then click OK to confirm.
After applying the policy, sign out and sign back in, or restart your PC. Then press Win + L again. If the shortcut still does not work, continue with the Registry method below.
Use this method if Group Policy Editor is unavailable or if you prefer to check the exact Registry value behind the policy. This method changes a user-level policy value under HKEY_CURRENT_USER, so it affects the current Windows account.
Important:
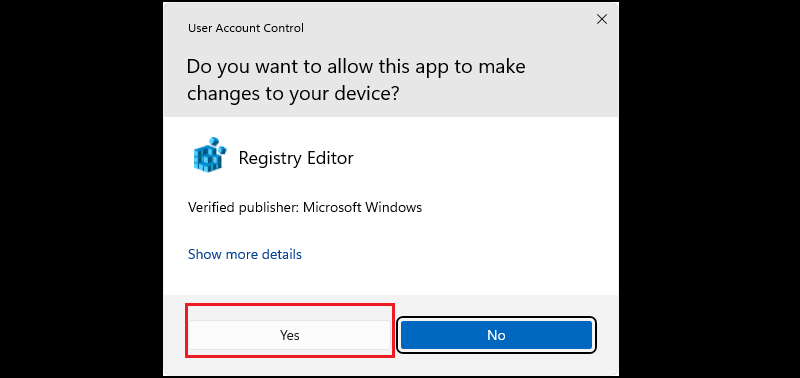
Step 1: Input regedit in the search box on the taskbar, and then click the Registry Editor result.

Step 2: Click Yes to allow it to make changes to your device when you are given a prompt box.
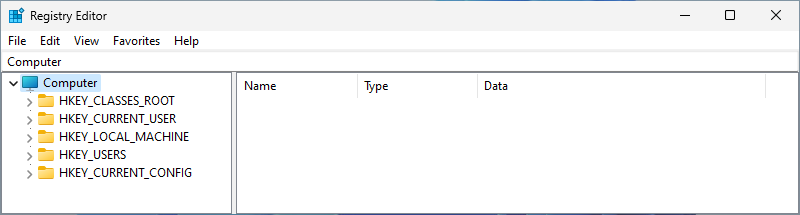
Step 3: Now you are accessing Registry Editor.
Step 4: Enter the following path into the address bar and press Enter key.
HKEY_CURRENT_USER\SOFTWARE\Microsoft\Windows\CurrentVersion\Policies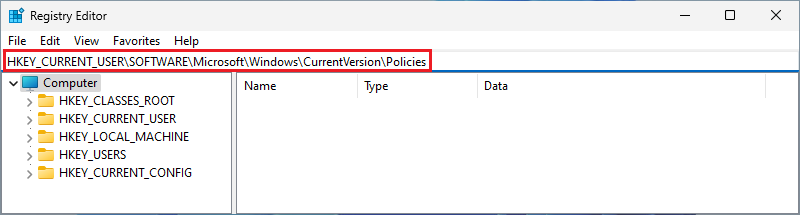
Step 5: You are navigated to Policies directory.
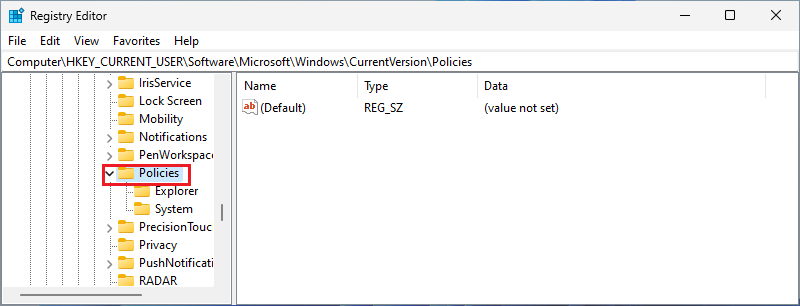
Step 6: Expand it, and then select System option. (If the System option is not included, right-click on Policies and select New » Key to create a folder called System.)
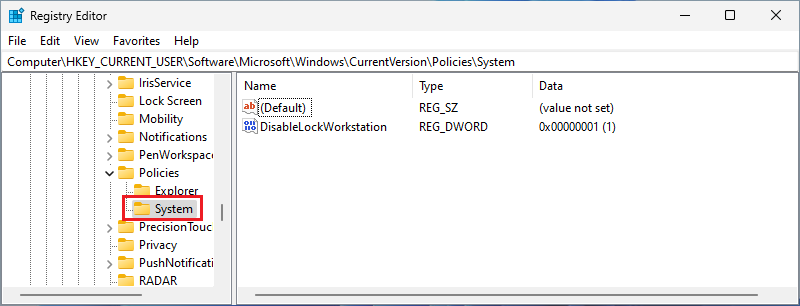
Step 7: Double-click DisableLockWorkstation. Similarly, right-click on the blank place on the right to create one if it does not exist. Create it as a DWORD (32-bit) Value.

Step 8: After a new window appears, modify the Value data to 0 and click OK to exit.

Close Registry Editor and restart Windows, or sign out and sign back in. If you need to undo the change later, set DisableLockWorkstation back to 1, delete the value, or import the .reg backup you exported before editing.
If the Lock option is available but the Win + L shortcut still fails, the policy may not be the problem. Check these common causes before making more system changes.
DisableLockWorkstation is the Registry value mapped to the Windows policy named Remove Lock Computer. When it is set to 1, Windows blocks users from locking the computer. When it is set to 0, the lock shortcut and Lock option can work again unless another policy overrides it.
Use Group Policy Editor first if it is available, because it is easier to understand and less risky. Use Registry Editor if you are on Windows Home or if you need to check the exact DisableLockWorkstation value.
The same policy that affects Win + L can also remove the Lock option from the Windows Security screen. That is why this guide focuses on Ctrl+Alt+Del Options and the matching Registry value.
If Win + L is not working and the Lock option is missing, the most likely cause is that Lock Computer has been disabled by policy. On Windows Pro, Enterprise, or Education, set Remove Lock Computer to Disabled in Local Group Policy Editor. On Windows Home, back up the Registry first, then set DisableLockWorkstation to 0.
If the policy and Registry settings are already correct, troubleshoot the keyboard, Windows key lock, gaming mode, hotkey software, or organization-managed restrictions.
 How to Disable Test
Mode
in Windows 11
How to Disable Test
Mode
in Windows 11
 How
to
Create an Administrator Account in Windows 8/8.1
How
to
Create an Administrator Account in Windows 8/8.1
 Cannot
Sign into Microsoft Account on Windows 10
Cannot
Sign into Microsoft Account on Windows 10
 Fix:
Windows 10 Won't Let Me Enter Password at Login Screen
Fix:
Windows 10 Won't Let Me Enter Password at Login Screen
 How
to Add Sign-in Options for User Account on Windows 10
How
to Add Sign-in Options for User Account on Windows 10

