
Reviving an old computer or laptop often involves two key upgrades: replacing the hard drive with a solid-state drive (SSD) and increasing the RAM. While installing an SSD can be complex, upgrading RAM is relatively straightforward. This guide will walk you through the process of adding more RAM to your laptop to enhance its performance.
Although modern operating systems and applications can run with 2GB of RAM, it's highly recommended to upgrade to more RAM for smoother performance. Insufficient RAM can lead to poor performance, unresponsive programs, "low memory" or "out of memory" notifications, and even system crashes. If you're experiencing these issues, a RAM upgrade is likely the solution.
If you are experiencing any of these symptoms, a memory upgrade may be in order.

With more RAM, your computer will handle multitasking more efficiently, reducing performance drops when running multiple programs or opening files. It also speeds up the loading of programs and web content. Additional RAM enables your computer to process more information simultaneously, significantly improving overall system performance.
The amount of RAM you need depends on how you use your computer. First, it's crucial to know whether your computer has a 32-bit or 64-bit processor. A 32-bit processor is limited to 4GB of RAM, while a 64-bit processor can support much more. Your usage patterns, such as web browsing, office work, video editing, or gaming, also play a significant role in determining your RAM needs.

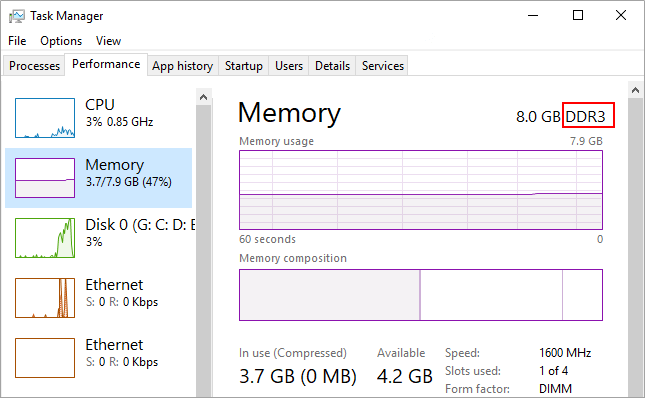
The type of RAM compatible with your computer is determined by its motherboard. Common types include DDR2, DDR3, and DDR4. Most systems currently use DDR3, with 240-pin DIMM for desktops and 204-pin SODIMM for laptops. Consult your computer or motherboard manual, or use a memory configuration tool from a memory manufacturer to confirm compatibility. Newer desktops are increasingly adopting DDR4 memory.
Look through the manuals came with your computer or motherboard.
Many retailers and memory manufacturers provide this information if you can't find the manuals.
Once you have the RAM, installation is straightforward. Here's a step-by-step guide.
Although issues are unlikely, it's a good practice to back up your data before making significant changes to your computer's hardware or operating system. If you have a lot of data, use Windows' built-in Backup and Restore utility to back up your files to an external hard drive.
Place a towel or soft cloth on a table. Shut down your PC, unplug your laptop, and lay it on the soft cloth. Wait a few minutes for it to cool down, then remove the battery.
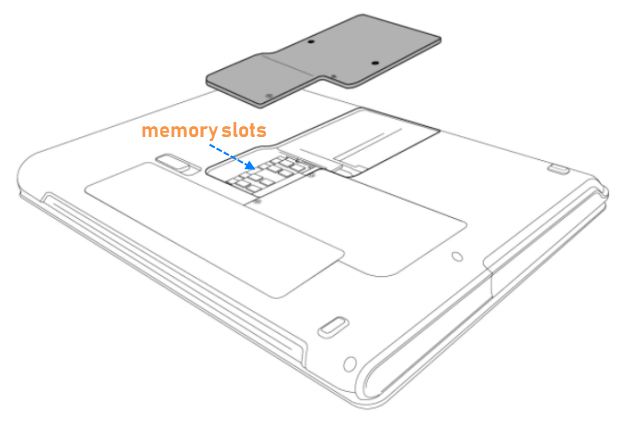
Use Phillips screws to remove the screws and take off the door. Locate and access the memory slots.
If all RAM slots are filled, you'll need to remove the existing DIMMs and replace them with the new, higher-capacity modules. Handle the modules by the edges to avoid touching the components and gold pins.
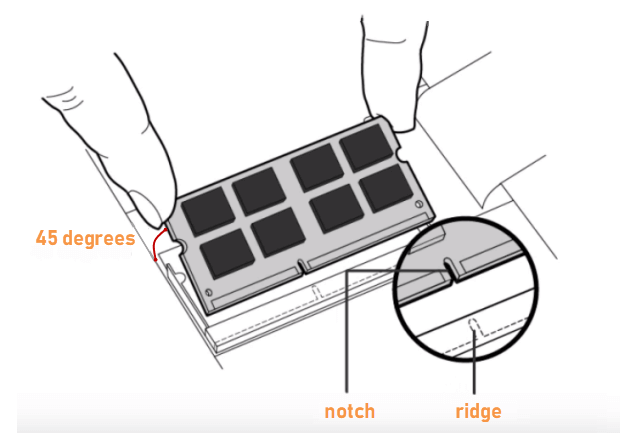
Align the notches on the module with the ridges in the slot. Insert the module firmly at a 45-degree angle. Push down until the clips snap into place. Once the RAM is installed, reassemble the system and reconnect the battery.
That's it. When you power on the laptop, it will recognize the new RAM. When you check "About This PC" (Windows logo + Pause Break), you'll see the new RAM amount installed.