If a picture looks sharp before you add it but blurry after you insert it into Word, the usual cause is compression, resizing, or a low-resolution source image. The fastest fix is to turn off Word's picture compression for the document, choose High fidelity as the default resolution, insert the original image file instead of pasting, and avoid enlarging the picture past its real pixel size.
| Cause | What you see | Best fix |
|---|---|---|
| Word compressed the image. | The picture looked clear before saving, but softer after reopening or exporting. | Turn off compression and set the default resolution to High fidelity. |
| The image was copied and pasted. | The inserted picture is smaller, fuzzier, or not the same quality as the original file. | Use Insert > Pictures and select the original file. |
| The image was enlarged in Word. | Edges and text in the picture become fuzzy after resizing. | Set scale back to 100% or use a larger source image. |
| The source image is already low resolution. | The picture is blurry even outside Word or when zoomed in. | Replace it with a higher-resolution screenshot or export. |
Microsoft explains that Office picture compression can reduce both file size and picture dimensions based on how the picture will be used. That is useful for smaller files, but it can make detailed screenshots, charts, product images, and diagrams look blurry. Microsoft's turn off picture compression instructions also note that disabling compression improves picture quality but can increase file size.
Step 1: In Word, go to File > Options > Advanced.
Step 2: Scroll to Image Size and Quality. In the drop-down list, choose the current document. If you want this setting for future Word files, choose All New Documents if that option is available.
Step 3: Check Do not compress images in file.
Step 4: In Default resolution, choose High fidelity, and then click OK.
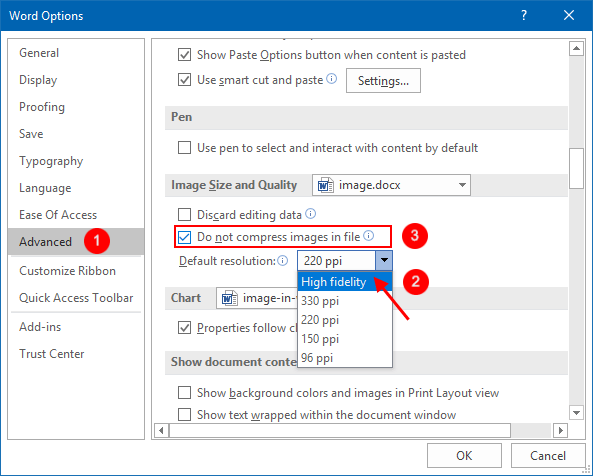
Important: This setting helps preserve image quality inside the Word document, but it does not repair an image that was already compressed, blurry, or too small before you inserted it. If the picture is still poor, reinsert the original image file.
Copying and pasting from a browser, PDF viewer, chat app, or image editor can pass a resized preview to Word instead of the full-quality image. For screenshots, charts, scanned pages, and product images, save the source image first and insert the file directly.
Step 1: Save the original picture as a PNG, JPG, or another image file on your computer.
Step 2: In Word, place the cursor where the image should appear.
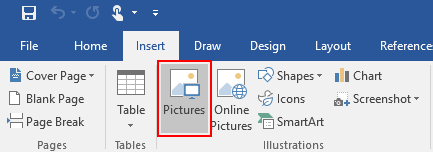
Step 3: Go to Insert > Pictures, select the image file, and insert it.
For screenshots that contain text or interface details, PNG is often cleaner than JPG because it avoids extra compression artifacts. For photos, JPG is usually fine if the file is exported at a high quality setting.
Even with High fidelity enabled, Word cannot create detail that is not in the original image. If you stretch a 600-pixel-wide screenshot to fill an 8.5-inch page, the screenshot will look soft because each pixel has to cover more space.
Step 1: Right-click the picture and choose Size and Position.
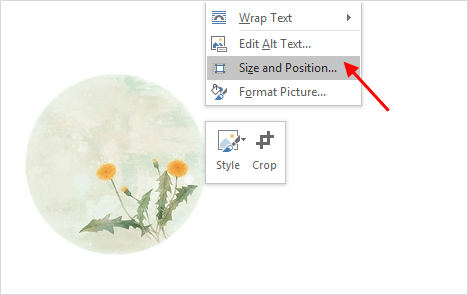
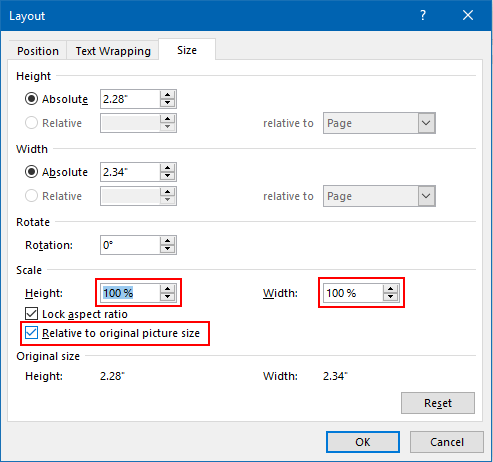
Step 2: On the Size tab, check the Scale value.
Step 3: Set Height and Width to 100% or smaller. If you see Relative to original picture size, check it.
If the picture must be larger on the page, recapture or export a larger source image rather than stretching the small one. A larger original gives Word more pixels to display and print.
Word's settings matter, but the original file still sets the upper limit for clarity. Use these rules before inserting the image:
Microsoft's picture compression guidance explains that lower compression reduces file size but also removes detail. For a final document that must look crisp, make quality settings first, insert the original images, and compress only after you have saved a backup copy.
| Problem after trying the fixes | Next step |
|---|---|
| The picture is sharp in Word but blurry in PDF. | Use Word's built-in Save As or Export PDF option and choose settings intended for print or standard publishing, not minimum size. |
| The picture is blurry only while editing. | Set Word zoom to 100% and check print preview. Some zoom levels can make images appear softer on screen than they will in output. |
| Only screenshots with small text are blurry. | Recapture the screenshot at a larger size, crop unnecessary margins, and insert the PNG file directly. |
| The Word file becomes too large. | Keep compression off while editing, then compress a copy of the final document for sharing. Do not overwrite your high-quality original. |
Most blurry Word images come from compression, pasting a lower-quality preview, enlarging a small picture, or starting with a low-resolution source image.
Go to File > Options > Advanced, find Image Size and Quality, select the current document or all new documents, and check Do not compress images in file.
No. High fidelity helps Word preserve image detail, but it cannot recover detail from a blurry, enlarged, or already-compressed picture.
Use PNG for screenshots, UI images, diagrams, and images with text. Use JPG for photos when the JPG was exported at a high quality setting.