Modern CPUs include hardware virtualization capabilities that help accelerate VirtualBox, VMware, Hyper-V, Windows Sandbox and other virtual machine applications.
However, Intel VT-x is not always enabled by default. If the hypervisor is not enabled, you will see a message like "The processor on this computer is not compatible with Hyper-V" or or "No hypervisor was found". In this post, you will learn how to enable virtualization technology in BIOS/UEFI on on popular computer systems (Lenovo / HP / Dell / Asus / Acer).
Some Acer systems enable Virtualization Technology by default if the system supports it. Use the following steps to verify that virtualization technology is available on your system:
1. Right-click any space on the taskbar and select Task Manager to open it.
2. Click on the Performance tab.
3. On the right side of CPU tab, you can see Virtualization is Enabled or Disabled.
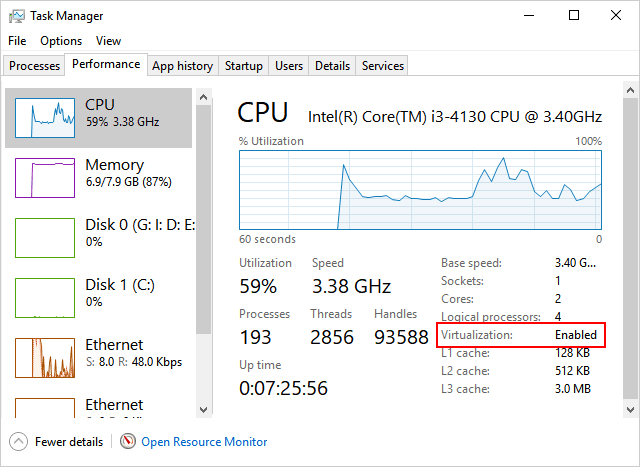
If "Virtualization: disabled" is displayed, it can be enabled in the BIOS by following the steps.
On a UEFI-based computer, you don't have to press a key when the computer starts. Instead, you need to hold down the Shift key and click Restart to reboot directly from the Advanced Startup options to the UEFI firmware settings.
Once you enter the setup menu, you can start looking for options labeled "Intel VT-x," "Intel Virtualization Technology," "Virtualization Extensions," "Vanderpool," or similar. When this option is enabled, press F10 to save the settings changes and reboot the PC.
Typically, you can find the option under the Processor submenu. This submenu can be located somewhere under the "Chipset," "Northbridge," "Advanced Chipset Control," or "Advanced CPU Configuration" menus.
Note: CPU virtualization has a different name depending on the CPU manufacturer.
Intel CPUs, this feature is called Intel Virtualization Technology or Intel VT, while for AMD CPUs, it is called AMD-V. Whatever it is called, each virtualization technology generally provides the same functionality and benefits to the operating system.
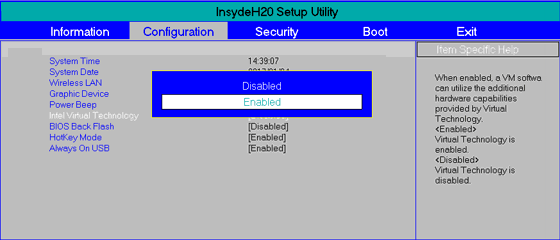
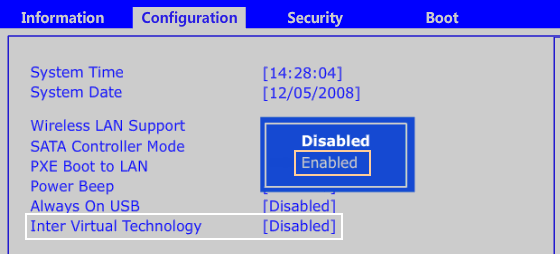
Turn on the computer.
Press the BIOS access key to start the BIOS.
Navigate to the Configuration tab and select Intel Virtual Technology, then switch to Enabled.
Press F10. Then, press Enter on YES to save the settings and confirm booting to Windows.
Open the Acer system. Press the F2 key in the boot BIOS Setup.
Select the System Configuration tab, then select Virtualization Technology and press Enter.
Select Enabled and press Enter. Press the F10 key to save your changes.
Turn on your computer.
Press the F2 key to start the BIOS Setup.
Go to the Advanced tab, select Virtualization Technology and then Enable it.
Press the F10 key, select Yes, then press Enter to save your changes and reboot to Windows.
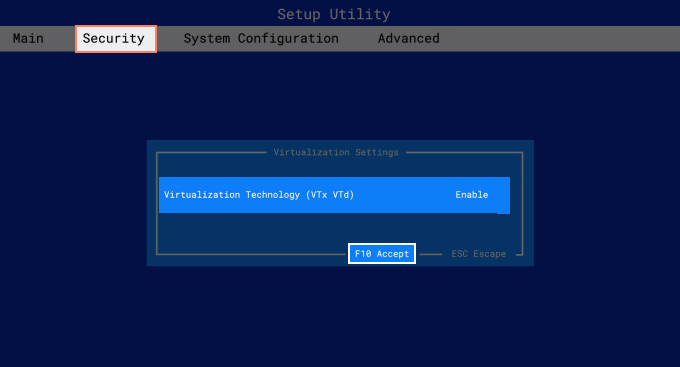
Turn on the HP computer and immediately press F10 to boot into the BIOS.
Under the Security tab, use the down arrow to select System Security and press Enter.
Select Virtualization Technology (VTx), press Enter, then Enable it.
When you are done, click F10 to save your changes and exit the BIOS.

Turn on your Dell computer. Press the F2 key to start the BIOS.
Select the Advanced tab, then select Intel Virtualization Technology and Enable it.
Press the F10 key and select Yes, then press the Enter to save changes and reboot to Windows.
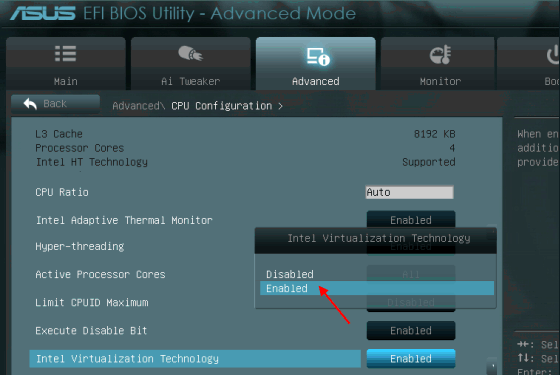
In the BIOS setup menu, press F7 key to open Advanced mode.

On the Advance menu, choose the CPU Configuration.
Find Intel Virtualization Technology and enable it.
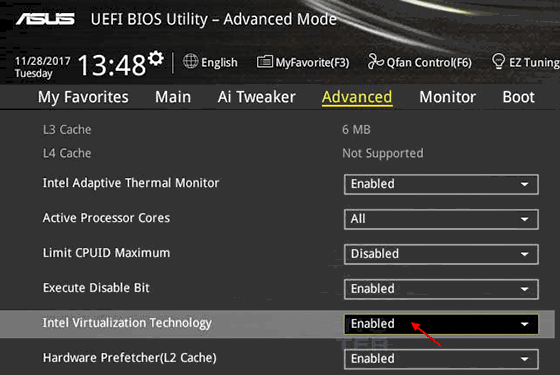
Save your changes and reboot to boot into the system.
Intel virtualization:
In the BIOS setup menu, open the Chipset tab.
Select Intel VT for Directed I/O Configuration and then press Enter.
Select "Enabled" and press Enter.
Save this change and exit.
In BIOS setup menu, open the M.I.T tab and select Advanced Frequency Setting.
Choose Advanced CPU Core Settings > SVM Mode.
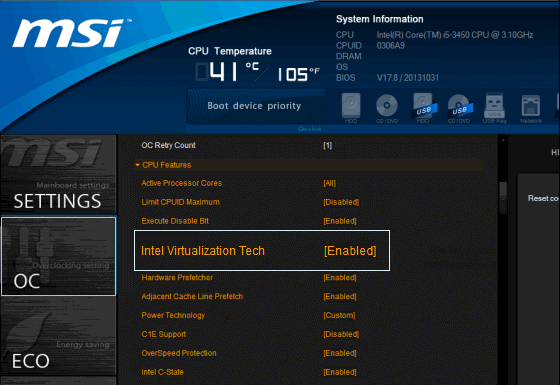
In the BIOS setup menu, select the OC tab and press Enter.
Find Intel Virtualization Tech and choose to enable it.
Press the F10 to save your changes and reboot to Windows.