
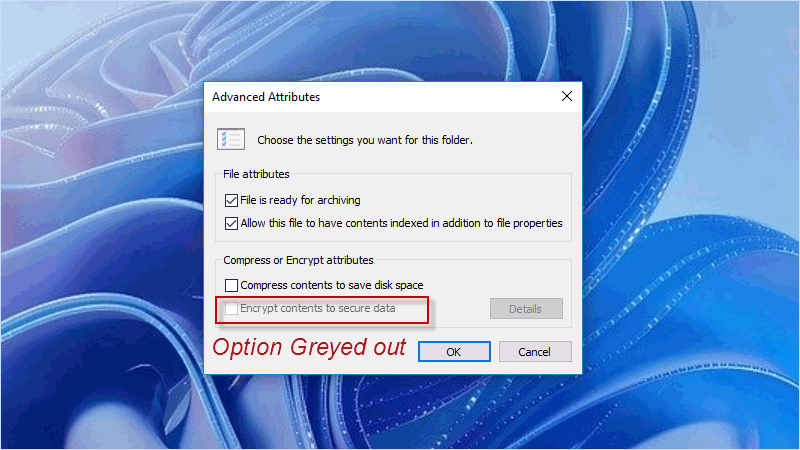
As a built-in encryption tool, the encrypting file system (EFS) enables you to easily protect private data from unauthorized access in different account. However, some users complain that “encrypt contents to secure data” option is greyed out and they can’t encrypt folder in Windows 10. If you are facing the same issue, here in this guide you can know why Windows 10 encrypt folder greyed out and how to fix it with 4 useful ways.
Several factors can account for the encrypt option greyed out. Above all, please note that “Encrypt contents to secure data” option is not available in Windows Home Edition. So, check your Windows Edition and If it is Windows Home Edition, you can consider upgrading Home Edition to Pro or Enterprise Edition supporting this encryption feature. Alternatively, you can choose to encrypt folder with a professional tool like iSumsoft FileCarer.
Additionally, Windows services plays an important role on the operation of encryption feature. Thus, once encryption service disabled or stopped, your encryption feature. Last but not least, improper registry value and corrupted system files can also be the cause. After taking all above factors into consideration, you can try to fix the issue with some workarounds in next part.
One of common ways to fix "Encrypt contents to secure data" option greyed out is managing Encrypting File System (EFS) services. You need to go to Windows services and check If the EFS service is stopped or disabled. If yes, just find out the Encrypting File System service and set it automatically start. In this way, the encryption option may be available again.
Step 1: Press Win + R and enter services.msc in the Run window. Then hit Enter button.
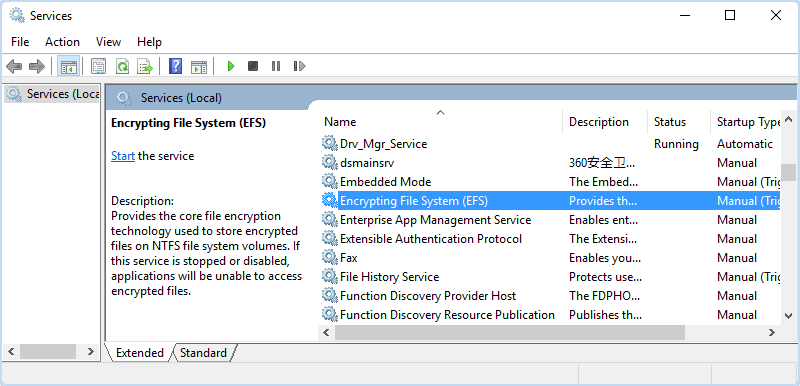
Step 2: In Services window, locate Encrypting File System and double-click on it.
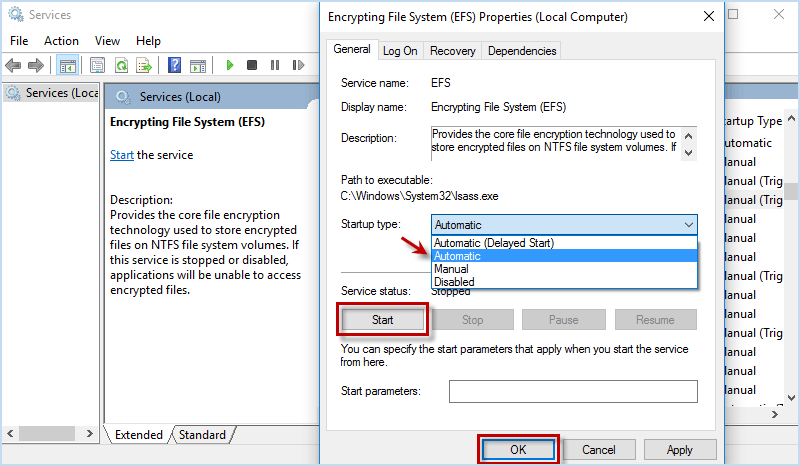
Step 3: In Startup type, Choose Automatic in the draw-down menu. Then choose Start and click OK.
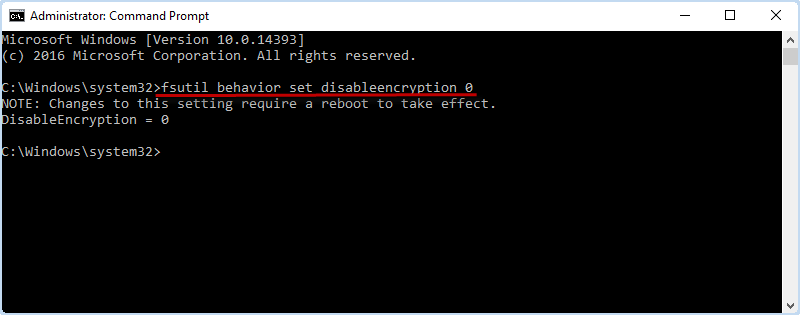
If “Encrypt contents to secure data” option is greyed out, there is still another way for you to enable the Encrypting File System on Windows. In fact, you can simply enable this feature in Windows Command Line. Here come the steps.
Step 1: Right-click Start menu and press A key to run Command Prompt as administrator.
Step 2: Enter following command and press Enter.
fsutil behavior set disableencryption 0
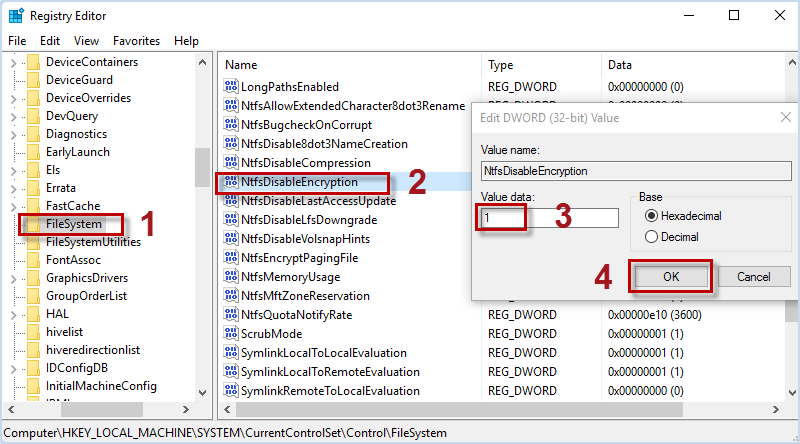
Sometimes, “Windows 10 encrypt folder greyed out” issue can be caused by registry error. To solve it, you may need to modify registry key of File System. Here these steps will guide you to set proper registry value data and make encryption tool work again.
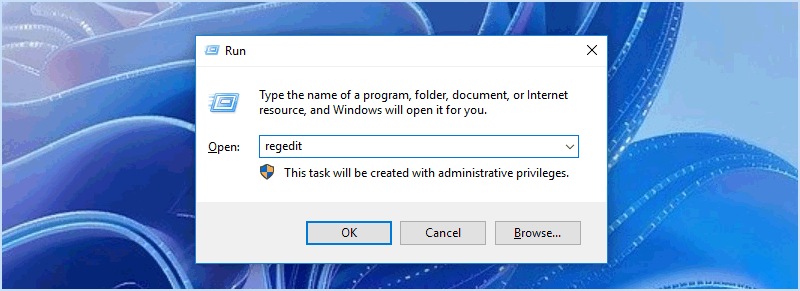
Step 1: Press Win + R to open Run window. Then enter regedit and click OK.
Step 2: Open FileSystem folder with following path: HKEY_LOCAL_MACHINE\SYSTEM\CurrentControlSet\Control\FileSystem
Step 3: Under FileSystem folder, double-click on NtfsDisableEncryption value. When editing window popping up, set Value data to 1 and click OK button. After modifying the registry, reboot your Computer and check if the problem is solved.
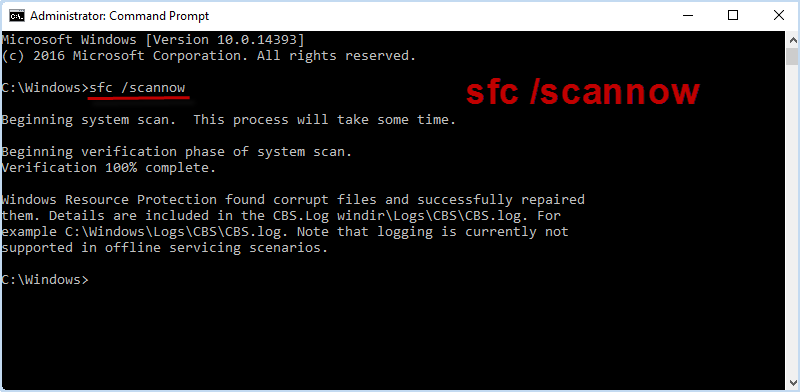
Corrupt System file can also lead to your greyed out encryption option. Thus, another possible way to fix encrypt option is to check if Windows system files is missing or damaged and had them fixed. Here SFC tool and DISM tool can help you make it.
Step 1: Right-click Start button and choose Command Prompt (Admin).
Step 2: Enter the command below and hit Enter button.
sfc /scannow
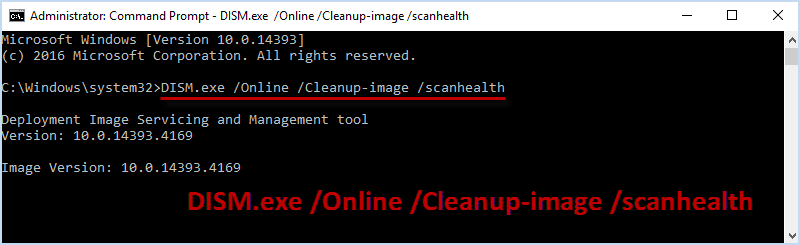
Step 3: Run Command Prompt as administrator as step 1. Then enter following command and hit Enter.
DISM.exe /Online /Cleanup-image /scanhealth
When your corrupt system file is repaired by troubleshoot tool, the encryption option may not show as greyed out any more.
If your native encrypt option is still greyed out, it is suggested that you use a third-party encryptoin tool to encrypt specific file and folder. If you are looking for a professional file encryption tool, you should definately give iSumsoft FileCarer a try. Compared with Windows built-in encryption feature just preventing from unauthorized access in a different account. iSumsoft FileCarer allows you to easily encrypt and safely protect folder from being accessed by other users without a password in all accounts.
In addition to encrypt files and folders, it also enables you to rapidly hide folder, disguise folder icon and permenantly delete folder. Now, let’s try to encrypt folder with iSumsoft FileCarer. Before begin, install iSumsoft FileCarer on Computer and launch it.
DownloadStep 1: On the main interface of iSumsoft FileCarer, choose Encrypt option in the left tab.
Step 2: On the upper right, click folder icon to select the folder you want to encrypt.
Step 3: In password box, create a desired password to encrypt folder and click Encrypt button.

Now, you have already known what to do when you can’t encrypt folder with encrypt contents option greyed out. In addition to using the built-in folder encryption tool, you can also use a third-party tool such as 7-Zip to compress and password protect files. However, to better secure your sensitive files on Windows, it is more recommended to use iSumsoft FileCarer, a professional file encryption tool that can help you easily and strongly encrypt specific files either on local drive or external hard drive.
 2 Ways to Hide Files and Folders in Windows 10
 How to Lock/Encrypt/Password Protect Folder in Windows 11
 How to to Password Protect a Folder on a Shared Hard Drive Windows 10
 How to Encrypt Hard Drive in Windows 10 by Using BitLocker
 How to Encrypt USB Drive with or without BitLocker in Windows 10
 Turn on or off Device Encryption/BitLocker on Surface Pro/Laptop