
“Hi. Patched to 15.4 yesterday evening and today see that iCloud account is inaccessible. My iPhone shows error message ‘Verification failed. There was a problem connecting to the server’. Any suggestions can help me get rid out of this? Thank you.”
Usually, the error connecting to the server will occur when you want to sign in iCloud or reset your passcode, etc. If you are encountering this problem on your iPhone, here you are in the right place. Let’s get to know about why and how to fix the error connecting to Apple ID server.

The error connecting to Apple ID server can be resulted from following factors.
Apple has an outage/issue on service: If Apple ID service is being repaired by Apple, your iPhone/Mac may be trapped in the problem connecting to Apple ID Server.
Network connection issue: Apple cannot verify that your ID and password without internet. If there is something wrong with your network connection, verification is prone to error.
Bugs on Settings: Some iPhone Settings including network settings, time settings, etc. may also result in this issue.
Login account on multiple devices: When the same Apple ID are used to sign in many devices, an error connecting to the Apple ID server will occur on your iPhone/Mac.
Software problem: Apple update its security system, which may lead to the verification error when you login Apple ID on an old version of iOS. Besides, any unknown iOS bug may also cause verification failed.
When the verification error message “There was a problem connecting with the server” shows up on your iPhone, it can be caused by service outage or issues on Apple Server. Thus, the first thing you need to do is to check Apple Server. Here you can follow these steps.
Step 1: Open a web browser and visit https://www.apple.com/support/systemstatus/
Step 2: You will view all the services status offered by Apple. The service marked with green dot is operating normally. If there is any issue on the service, a clickable link will be available to let you know the detail problem.
Step 3: Check if there is any issue occurring on Apple ID service. If yes, just wait until the service is resolved by Apple and problem will be solved itself.

If iPhone shows” There was a problem connecting with the server”, you may need to check your Windows network connection. You can try to fix it with following adjustment.
Option 1: You can try to reboot router. Then forget the network on iPhone and reconnect your iPhone to the network.
Option 2: Try to provide the ‘Settings’ app with access to WLAN and Mobile Data in this way: Go to Settings > WLAN > choose Apps using WLAN & Cellular. Then choose Settings app and tap WLAN & Cellular data option.
Option 3: Go to WIFI connection and choose the WIFI you are connected to. Then disable "Private Address" and "Limit IP Address Tracking".
Option 4: Go to Settings > Network > Proxies. Then turn off the SOCKS Proxy option and apply the changes.
Option 5: If you are using cellular, try to connect to wireless instead of cellular.
Option 6: If you are using WIFI, try to use mobile data connection. Go to Settings>Mobile>Settings turn toggle on, so settings are able to use my mobile data.
Some users have solved this verification problem by adjusting Time and date settings. Here you can also have a try.
Step 1: Go to settings > Date & Time. Then turn on 24-Hour Time option and turn on Set Automatically.
Step 2: Keep change it and then changed it back for a few times. Then the problem won't reoccur.

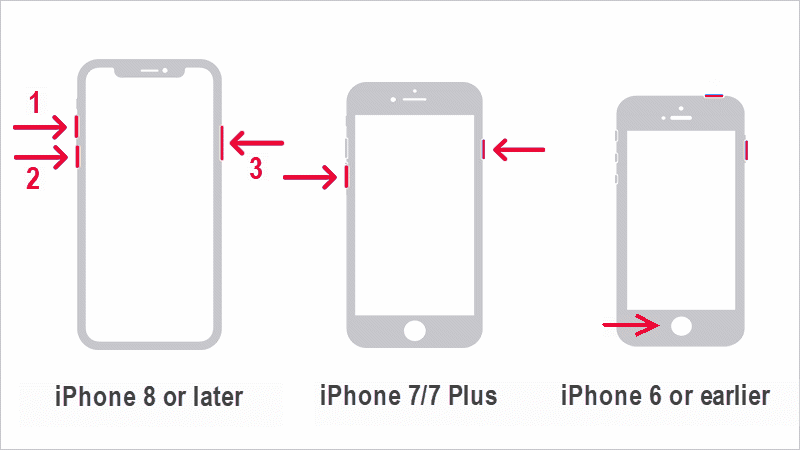
Force restart iPhone can fix some small temporary glitches, which is a common way to fix the error connecting to the Apple ID server. Here you can follow the steps below.
To fix the problem connecting to the Apple ID server, you can try to reset your network settings with these steps.
Step 1: On your iPhone, choose Settings and tap General.
Step 2: Choose Transfer or Reset iPhone option.
Step 3: Tap Reset and choose Reset Network Settings.

If resetting network settings not working, you can attempt to reset all settings on your iPhone. Here are the steps.
Step 1: Go to iPhone Settings, locate and enter General Settings.
Step 2: Scroll down and select Transfer or Reset iPhone option.
Step 3: Choose Reset > Reset All Settings.

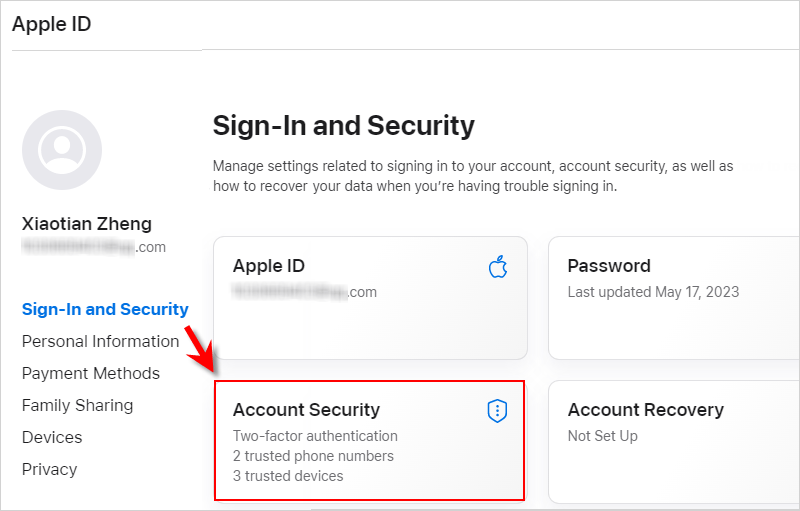
If your account has trusted multiple devices to send verification code, you can try to remove all the trusted devices from your Apple ID account. Here come the steps.
Step 1: Visit https://appleid.apple.com/ using web browser on your computer and sign in with your Apple ID and passcode. Under Sign-in and Security, enter Account Security.
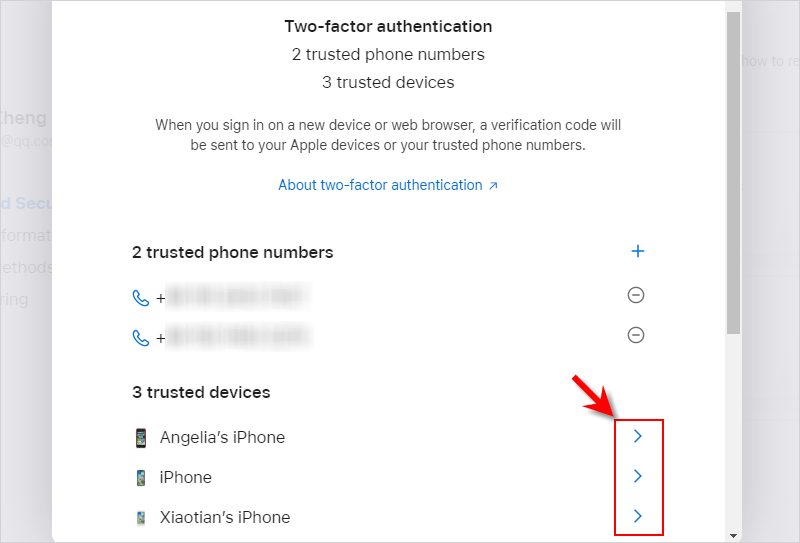
Step 2: Enter the trusted devices for your Apple ID account.
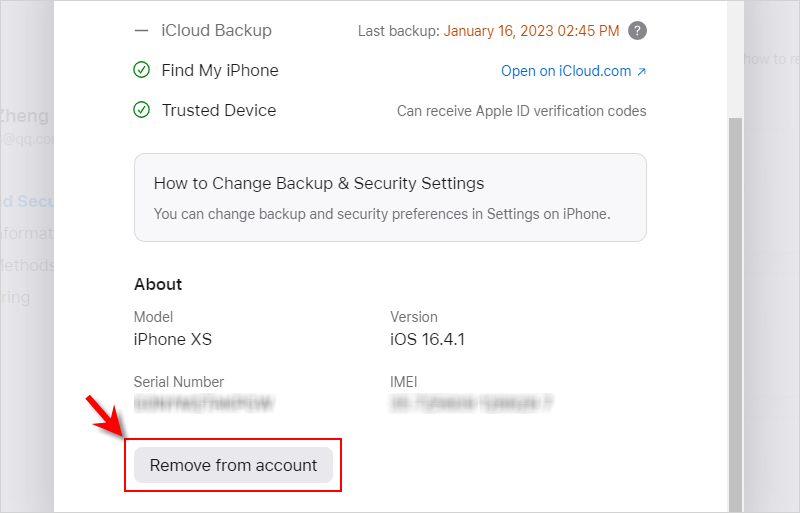
Step 3: Click Remove from account. After removing all the trusted devices from your Apple ID account, you may login with your apple id in iPhone without “there was an error connecting to apple id server” verification problem.
If you have signed your Apple ID on multiple iOS devices, try to sign out account on all of your devices and sign in account with your Apple ID and passcode again.
Step 1: Launch Settings app on your iPhone.
Step 2: Tap your Name. Then scroll down and tap Sign Out.
After that, try to log in your Apple ID to check if the error can be fixed.

Keeping your iOS version up to date can be one of the effective ways to fix this issue. Now, follow the steps to update iPhone.
Step 1: In General Settings, choose Software Update.
Step 2: If there is a latest iOS Security Response, click Install Now.

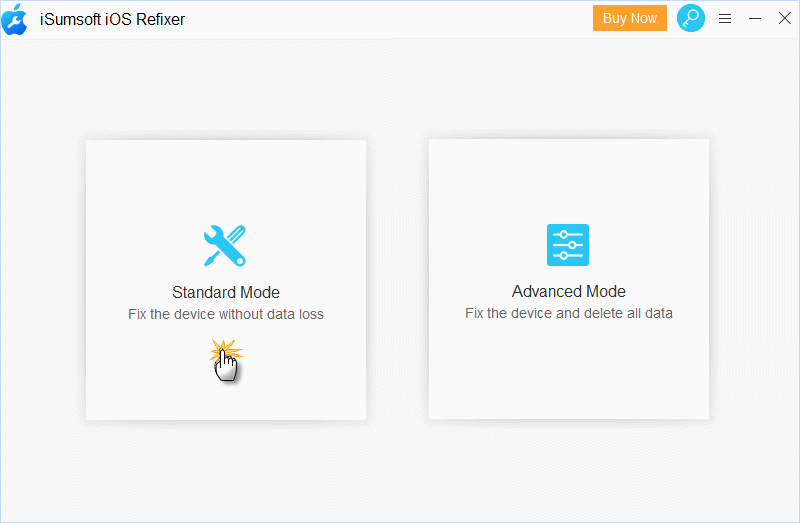
If iPhone still prompts the error connecting to the Apple ID server, there may be some iOS issues leading to the verification failed. Here you should try to use a professional repair tool to solve the iOS problem and get rid out of the error message. Now. let’s install iSumsoft iOS Refixer on computer and use this powerful tool to repair your iPhone.
Step 1: Run the software and choose Standard Mode on its main interface.
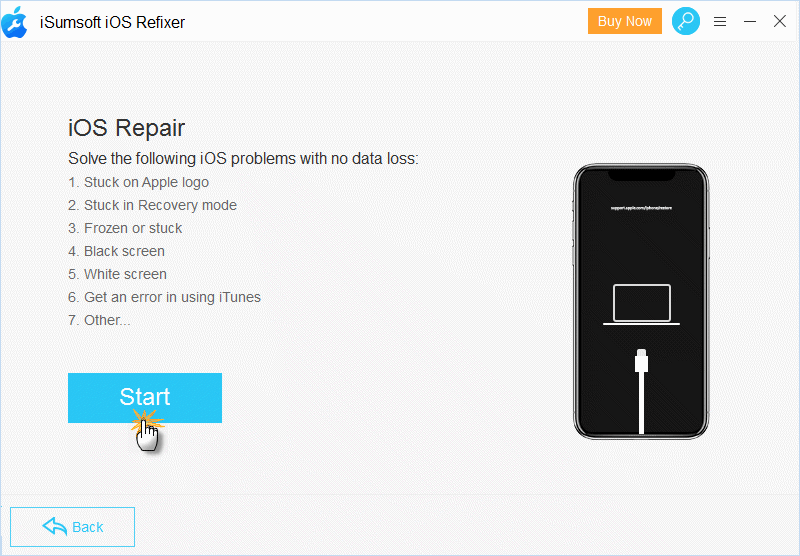
Step 2: Click Start and then connect your iPhone to the computer. After that, put iPhone into recovery mode.
Step 3: iOS Refixer will recognize your device and offer a firmware package, you can click Download to save it on computer for repairing your iPhone.
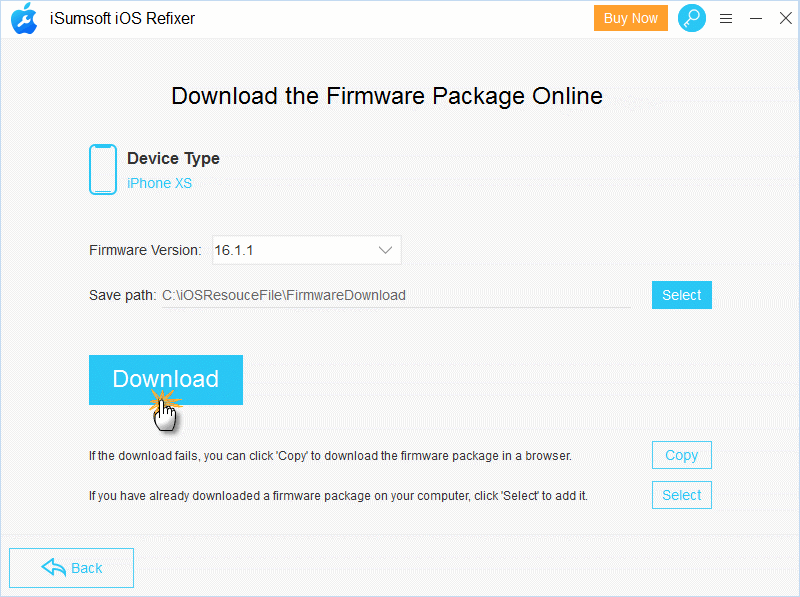
Step 4: After getting the firmware package, click Repair to start fixing any iOS issue on your iPhone.

Step 5: Once the process is done, go back into Settings > Apple ID > Sign out. Then re-sign in account with your Apple ID, and the verification problem can be solved.

Video guide:
When iPhone shows “verification failed and there was an error connecting to apple id server”, the above top 10 ways may easily help you fix this Apple ID issue. If you find this article is helpful, please share it with anyone trapped in this problem. Besides, welcome to share your experience or useful solutions with us. Thank you.
![[9 Tips] How to Fix Update Apple ID Settings Stuck 2023](../images/apple/update-apple-id-settings-stuck/fix-update-apple-id-settings-stuck-s.webp) [9 Tips] How to Fix Update Apple ID Settings Stuck 2023
[9 Tips] How to Fix Update Apple ID Settings Stuck 2023 This Apple ID Is Not Active? 6 ways to Fix Verification Failed
 [Solved] The Apple ID Cannot Be Used to Unlock This iPhone
 3 Ways to Reset a Forgotten Apple ID Password on iPhone
 How to Remove Activation Lock without Previous Owner
 Forgot Apple ID and Password to Activate iPhone, What to Do?
 iPhone Keeps Asking for Old Apple ID Password [FIXED]