In this tutorial, you'll learn how to convert between MBR and GPT partition style in different ways: You can use the Windows Disk Management tool, or you can use the diskpart command line. If you clone a GPT partition style to an MBR partition table or clone an MBR HDD to a GPT SSD, you will be required to initialize the SSD disk to MBR or GPT -exactly the same as your current system disk, which will ensure you can boot your system effortlessly after cloning your Windows system.
Table of Contents
There are two hard disk styles: MBR and GPT. Some professional tools need to specify the partition scheme which they require. In this case, we need to check which partition scheme our disk is using. There are several choices to do that, for more details, see 4 ways to check if a disk uses MBR or GPT partitions in Windows 10/8/7.

MBR is short for Master Boot Record, it is the first sector of the computer hard disk, telling the computer how to load the operating system and how to partition the hard disk. MBR contains a small amount of executable code called the master boot code, the disk signature, and the partition table for the disk. When a storage device has been partitioned with the MBR partition scheme, the MBR contains the primary partition entries in its partition table.
MBR disk only supports storage devices of no more than 2 TB, so it is not recommended to use the MBR partition scheme for disks larger than 2 TB. Instead, the GUID Partition Table (GPT) should be used in that case. MBR disks support up to four primary partitions. If you want more partitions, you have to create three primary partitions plus one extended partition, and then create logical partitions inside the extended partition.
GPT is short for GUID Partition Table, it was introduced as part of the (UEFI) initiative. GPT provides a more flexible mechanism for disk partitioning than the older Master Boot Record (MBR) partitioning scheme that was common to PCs. For exaple, a storage device using the GPT partitioning scheme can support hard disks larger than 2TB ( the MBR only supports hard disk within 2TB), and the GPT doesn't limit the number of partitions (the MBR supports up to four primary partitions).
In addition, GPT is more modern and requires Windows to be booted from a UEFI-based computer, while MBR disk is booted from a traditional BIOS-based computer.
We'll show you how to safely convert between GPT disk and MBR disk in different ways. Tips to convert between MBR and GPT with Disk Management and Command Prompt:
1. You must have administrator privilege to do this in Windows.
2. Before you convert a disk, be sure to back up anything on the GPT disk that you want to convert to MBR disk. Converting the disk requires that all partitions and volumes are deleted on the disk first.
We will show you the complete guide to convert between MBR and GPTin Windows by using Windows built-in Disk Management. This will destroy all data on the disk you choose to convert, so please back up all the data on the disk before continuing.
Step 1: Open the Disk Management tool.
You can search for it from the Start menu or press Win + X and K in Windows 10.
![]()
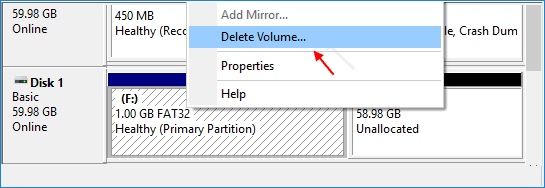
Step 2: In Disk management tool, locate the disk you want to convert. Right-click any partitions on the drive and select "Delete Volume" or "Delete Partition" to remove them.
Step 3: Right-click it and select the "Convert to GPT disk" option.
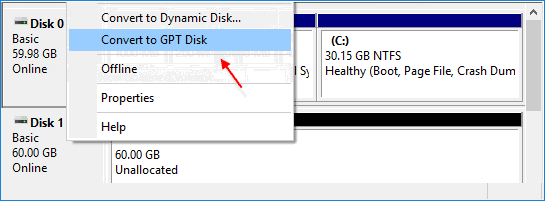
Note: If you find that option is unable to use, which means your disk is partitioned already. In this case, you need to delete all the partitions beforehand and later convert MBR to GPT or GPT to MBR.
A good solution for converting between MBR and GPT is to use the Diskpart command line. It is a built-in command line utility that can be used to partition or manage disk. After converting it from MBR to GPT, your data will be lost. Therefore, it is recommended to back up your data in advance.
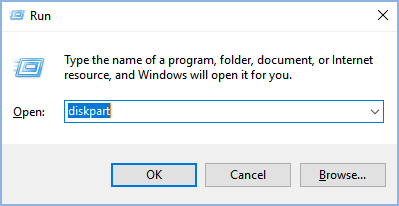
Step 1: Press Win+R to open the Run box, then type in "diskpart" and press Enter. This will open an interface similar to a command line.
Step 2: In the Diskpart.exe, type the command "list disk" and press the Enter key. This will generate a list of all the disks on your system.
Step 3: Select the disk you want to convert. For example, if you wish to select disk 1, then write "select disk 1" and press the Enter key again.
Step 4: After selecting the disk, you need to clean it. This can be done by simply providing the "clean" command.
Step 5: Now you can convert it to any format (either MBR or GPT). To convert it to GPT, give the command "convert gpt". Similarly, type the command "convert mbr" to perform GPT to MBR conversion.

The "mbr2gpt" command can help you perform a direct conversion without any trouble. After making a backup of your disk and wiping it entirely, simply follow these steps to convert MBR to GPT, which can change Legacy to UEFI without reinstalling Windows 10.
Step 1: Launch the Command Prompt as Administrator. (Press Win+X, A)
![]()
Step 2: Perform the conversion of the disk from MBR to GPT.
In Windows 7, type this command "mbr2gpt /convert /disk: n" to perform the conversion. Here, "n" is the number of the disk (0, 1, etc.).
If you are using Windows 10, then use the command "mbr2gpt /convert /disk: n /allowfullOS'. Similarly, "n" represents the disk number.
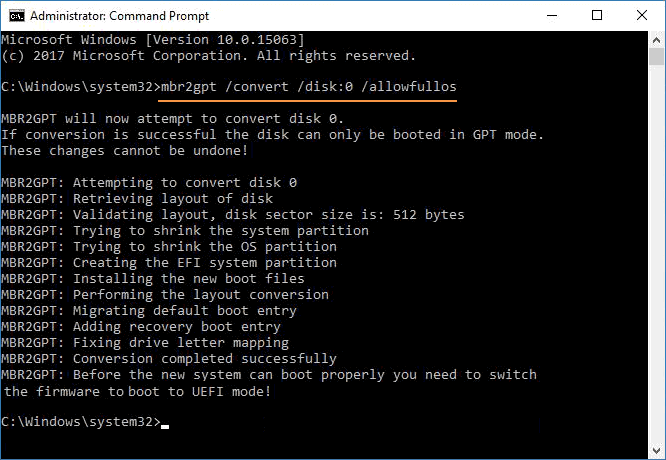
Wait for a while. You will receive a notification when the conversion is successfully completed. Now you can reboot your device and use the disk as you wish.
Once you have converted the drive using a GPT partition style, your device will no longer boot correctly, until you access the motherboard's firmware to switch from BIOS to UEFI. Usually, this process requires hitting one of the function keys (F1, F2, F3, F10, or F12), the ESC, or Delete key as soon as you start the computer.
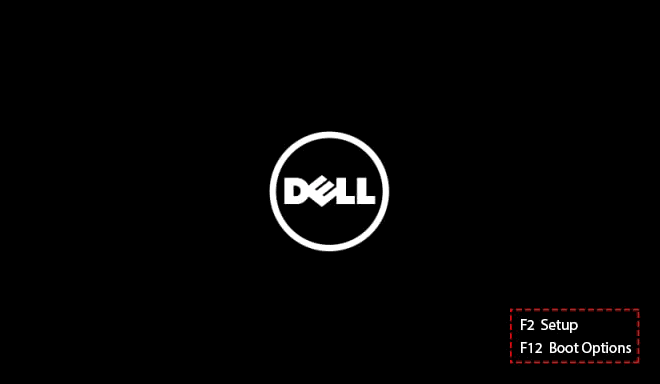
These settings will be different per manufacturer, and even by computer model. So make sure to check your device manufacturer's support website for more specific instructions.
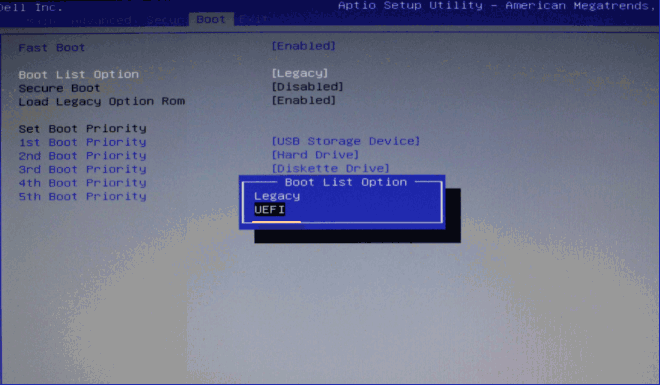
While in the firmware interface, find the "Boot" menu, make sure to enable the UEFI option, save the changes, and then your device should start correctly.
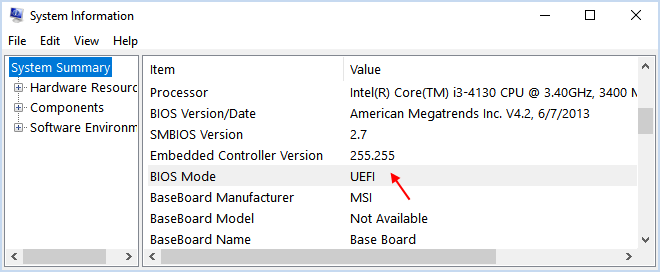
Press the Windows + R keys to open the Windows Run dialog, type msinfo32, and then press Enter to open System Infomation window.
In the right pane of System Summary, you should see the BIOS MODE line.
If the value of BIOS MODE is Legacy, then Windows is booted in legacy BIOS mode. If the value of BIOS MODE is UEFI, then Windows is booted in UEFI BIOS mode.