
How to Enter and Exit iPhone Recovery Mode in iOS 27

Recovery Mode can help when an iPhone cannot update, restore, or start normally. iPhone 18 Pro and iPhone 18 Pro Max use the same button sequence described below for iPhone 8 and later. Try a normal restart and an Update before choosing an erasing Restore.
For the full launch checklist, see the iPhone 18 Pro and iOS 27 upgrade guide.

- Part 1: How to Put an iPhone Into Recovery Mode
- Part 2: How to Get an iPhone out of Recovery Mode
- Part 3: How to Put an iPad Into Recovery Mode
- Part 4: How to Get an iPad out of Recovery Mode
- Part 5: How to Get an iPhone/iPad out of Recovery Mode with iTunes/Finder
Before getting started:
- 1. Connect your iPhone/iPad to the computer.
- 2. The iPhone/iPad can be either powered on or off.
- 3. Recovery Mode itself does not erase data, but selecting Restore does.
Part 1: How to Put an iPhone Into Recovery Mode
For iPhone 8 and later
1. Press and quickly release the Volume Up button.
2. Press and quickly release the Volume Down button.
3. Press and hold the Side button (also known as the Sleep/Wake button or Power button) until the recovery mode screen appears.

For iPhone 7 and iPhone 7 Plus
Keep pressing both the Side and Volume Down buttons at the same time until you see recovery mode screen.
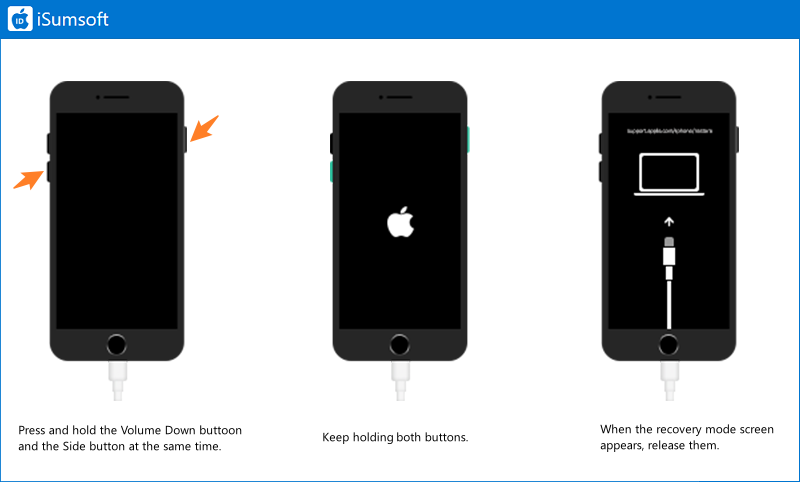
For iPhone 6s and earlier
Press and holde both the Side and Home buttons simultaneously until the recovery mode screen appears.

About Recovery Mode Screen
- There are two types of recovery mode screens, depending on the iOS version. One is the "connect to iTunes" screen and the other is the "connect to computer" screen (starting from iOS 15), as shown in the picture below:

Part 2: How to Get an iPhone out of Recovery Mode
In general, if the update or restore is successful, iPhone will automatically exit recovery mode and turn on normally. Of course, if iPhone was working properly before, you can get it out of recovery mode without updating/restoring it. All you need to do is simply restart. Here are the steps:
For iPhone 8 and later
1. Press and quickly release the Volume Up button.
2. Press and quickly release the Volume Down button.
3. Press and hold the Side button until the Apple logo appears.

For iPhone 7 and iPhone 7 Plus
Keep pressing both the Side and Volume Down buttons at the same time until you see the Apple logo.

For iPhone 6s and earlier
Keep pressing both the Side and Home buttons simultaneously until the Apple logo appears.

Part 3: How to Put an iPad Into Recovery Mode
For an iPad without Home button
1. Press and quickly release the volume button closest to the top button.
2. Press and quickly release the volume button farthest from the top button.
3. Press and hold the top button until the recovery mode screen appears.

For an iPad with Home button
1. Press and hold both the Home and the top (or side) buttons at the same time.
2. Keep holding the buttons until you see the recovery mode screen.

Part 4: How to Get an iPad out of Recovery Mode
For an iPad without Home button
1. Press and quickly release the volume button closest to the top button.
2. Press and quickly release the volume button farthest from the top button.
3. Press and hold the top button until the Apple logo screen appears.

For an iPad with Home button
1. Press and hold both the Home and the top (or side) buttons at the same time.
2. Keep holding the buttons until you see the Apple logo screen.

Part 5: How to Get an iPhone/iPad out of Recovery Mode with iTunes/Finder
If your iPhone or iPad is stuck in Recovery mode and you are unable to exit it through a force restart, the recommended solution is to update or restore the device using iTunes or Finder. Follow these steps:
Step 1: Connect the iPhone/iPad to your computer. Then launch iTunes on a PC or Finder on a Mac. Make sure both iTunes and Finder are up to date.
Step 2: When asked to Update or Restore, click Update and follow the onscreen instructions to complete the process.

See Apple's official Recovery Mode instructions for the current device sequences and Update/Restore options.
Related Articles
 How to Force Restart Any
iPhone or iPad
 How
to Fix iPhone Stuck in Recovery Mode Loop after Update
 Restore iPhone
in Recovery
Mode with or without iTunes
-
 How to Fix
iPhone Stuck on
Black Screen with Spinning Wheel
-
 iPhone
Shows
White Screen with Apple Logo Then Turns Off
-
 How
Factory Reset iPhone
without Passcode and Computer