
Sometimes, you may record your songs, speeches or other meaningful voice using Voice Memos in your phone. After recording, you want to keep your recordings while you are afraid of your recordings occupying so much space in your phone. So, what should you do? To keep your important recordings as well as to free up your iPhone space, it's actually a wise choice to move your voice memos to your computer. So how to copy voice memos from iPhone to computer? iTunes is a common method for iPhone users to back up files, and here we will also talk about how to transfer voice memos from iPhone to PC/Mac without iTunes.

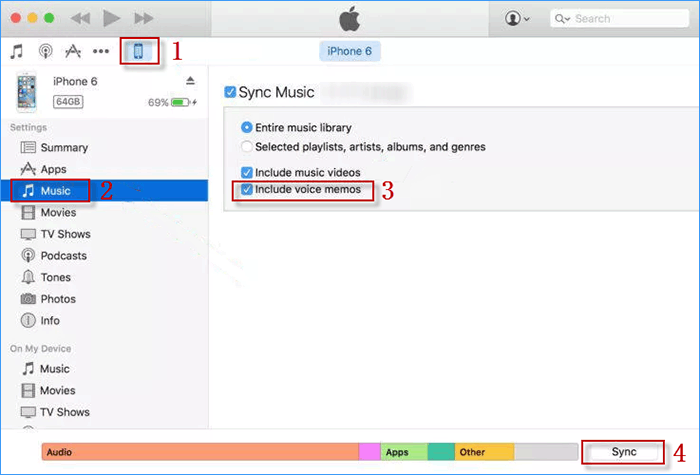
When it comes to transferring voice memos, iTunes may be a common way for iPhone users. If you are a new user to iTunes, you can follow the steps as below. Before transferring your voice memos, please check if there is the latest version of iTunes on your PC and your iPhone is connected to your PC successfully.
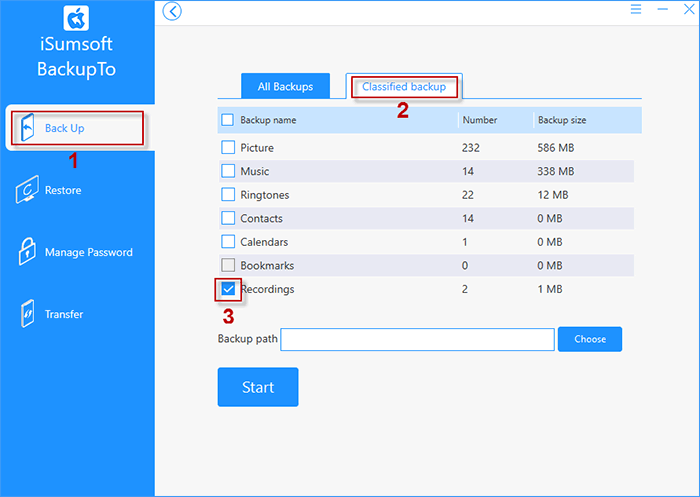
Sometimes, you may find iTunes running error and wonder how to transfer voice memos from iPhone to PC without iTunes? Here you can choose alternatives such as iSumsoft BackupTo to transfer your voice recordings. iSumsoft BackupTo is a versatile iPhone backup software tool for Windows, which helps you backup, restore, and transfer iPhone data more quickly and simply. With iSumsoft BackupTo, you can transfer your multiple voice memos to your customized location on PC and play them directly. Here comes the steps on how to copy voice memos from iPhone to computer. At the beginning, please download iSumsoft BackupTo and install it on your PC. Open iSumsoft BackupTo and it will guide you to connect your device to PC.
DownloadStep 1: Click on "Back Up" and select "Classified backup", and the backup options will be available for you. Tick the box for "Recordings", which enables you to transfer recordings to your PC separately.
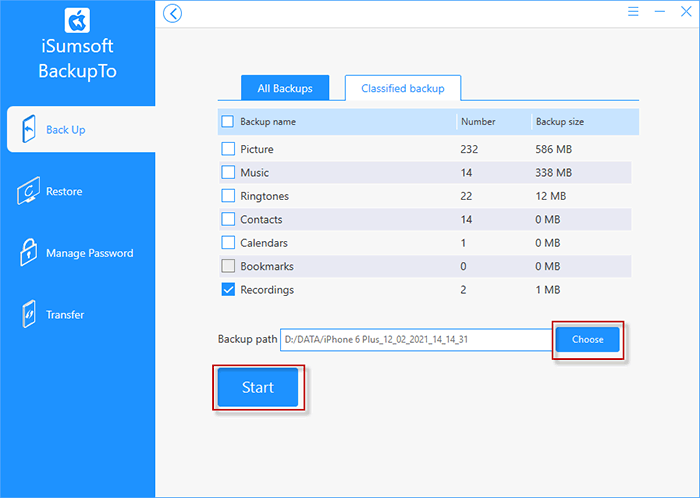
Step 2: Click on "Choose", you are able to browse and set the backup path. After path setting, you can click on "Start" to copy your voice recordings to your PC. Hold on a second, you can find "finished" on the interface and check the copied voice recordings on PC.
As a common backup app built in iPhone, iCloud can also help you to upload your voice memos to iCloud and download to them from iCloud to Computer. If you are using iCloud, you can follow the steps to transfer your voice memos to Mac. If you have a PC, but how to transfer Voice Memos from iPhone to PC without iTunes via iCloud? Actually, you can also sync your voice memos one by one to your iCloud via share sheet.
Step 1: Enter Settings on phone > Tap on your account name > Choose iCloud > Turn on Voice Memos option.
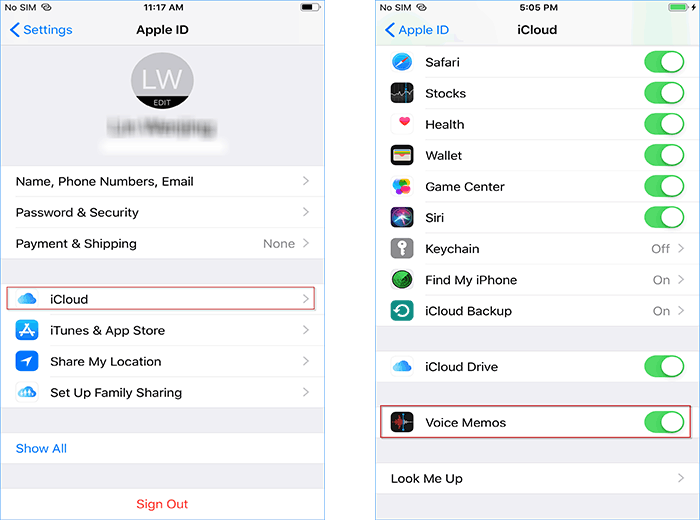
Step 2: On Mac, follow this way to sync your voice memos. Tap Apple logo on the top left corner> Choose System Preferences > Touch Apple ID >Enter iCloud Drive Options > Tick the checkbox for Voice Memos > Tap Done. Then you will sync your iCloud voice recordings from iPhone to Mac in a few minutes.

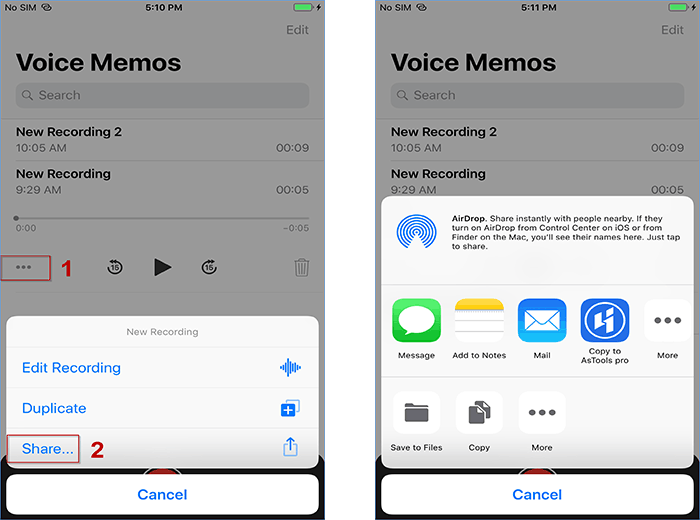
If you just have several voice recordings to copy, then how to transfer voice memos from iPhone to PC without iTunes in an easy way? Here you can make full use of the Share Sheet inside your Voice Memos app. At the beginning, run Voice Memos app and tap on one of your recordings. Next, when "..." icon appears below, you can tap on it and choose "Share".
As you can see, with Share sheet, you are able to transfer voice recordings to PC via Messages, Mail, iCloud drive, Dropbox, Google Drive, One Drive, Box, etc. If you are a Mac user, you can also transfer voice recordings to Mac via Airdrop. Take iCloud Drive and Airdrop as examples as follows.
Step 1: Choose "Save to files" in share sheet > select iCloud drive > Tap on "add". Then you have copied your recordings to iCloud drive.
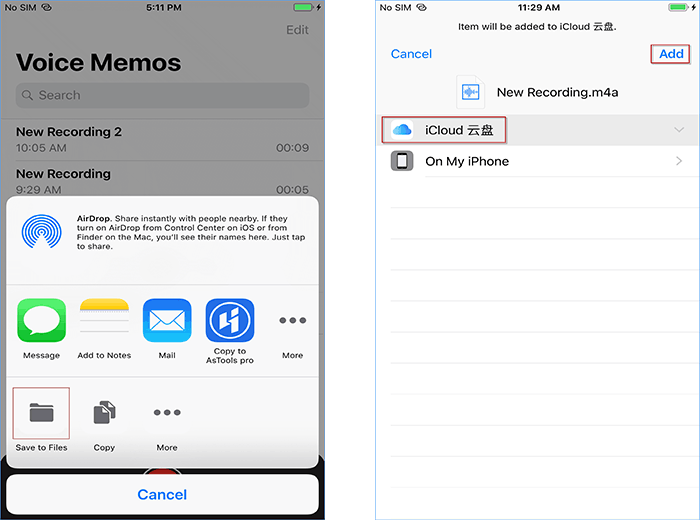
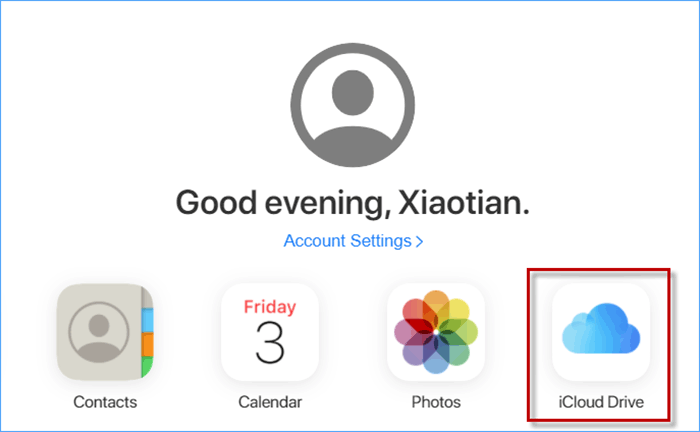
Step2: Enter iCloud.com on PC and sign in account with your Apple ID and password. Next, you can find the backup apps on your iCloud and choose "iCloud drive".
Step3: Inside iCloud Drive, you can choose the recordings you have added from iPhone and click download icon on the top tab of the window to download. When a pop-up window appears, just set your save location and confirm to download.![]()
To begin with, you need to turn on Airdrop both in your iPhone and Mac. Go to the Control Center of your iPhone and Finder on Mac to tap on AirDrop, allowing that the devices can be discovered by "Contacts only" or "Everyone". The process on how to turn on AirDrop is mentioned here.
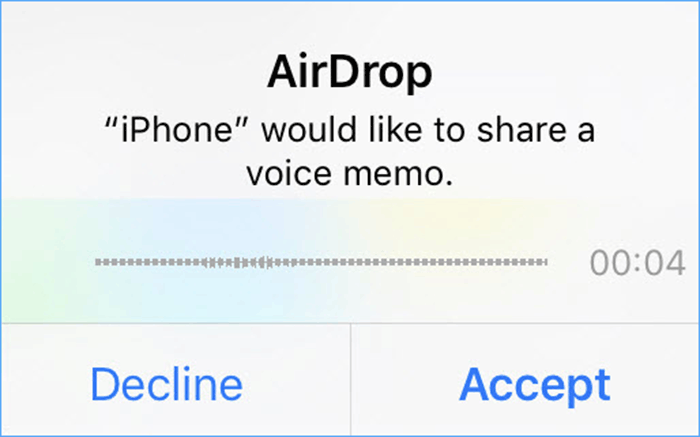
Step1: After turn on AirDrop, tap on AirDrop in share sheet, you will see your Mac name and tap to share. Then your iPhone will send a request to your Mac.
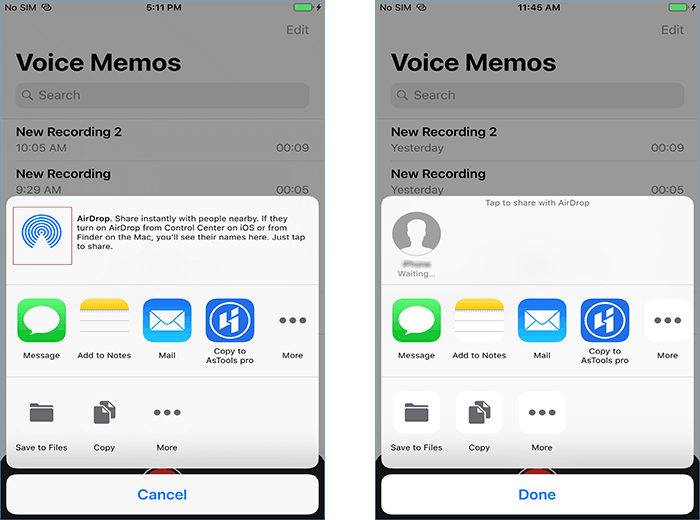
Step2: On your Mac, tap on Accept to receive the recordings sent from iPhone. After getting permission, the recordings will be downloaded and saved in your Mac's Downloads folder.
It is so convenient to copy voice recordings from iPhone to PC via Share Sheet inside Voice Memos, and it's OK to send recordings one by one if you have several ones. Instead, if you want to copy multiple recordings in one time, iSumsoft BackupTo offers you an easy and fast way, which is recommended. Anyway, you can choose a most suitable way to copy your voice memos from iPhone to computer at your pleasure.
That's all 4 methods on how to copy voice memos from iPhone to PC. If you are a PC user, you can copy your voice memos with iTunes, iSumsoft BackupTo,etc. If you are a Mac user, you can copy your voice memos via iCloud, AirDrop, etc. Hope these methods above can help you clearly know and copy your voice memos more easily and rapidly. Thank you.
 How to to Lock and Password Protect Voice Recordings on Windows & USB
 How to Transfer Music from iPhone to Computer in 5 ways
 5 Ways to Transfer Photos from iPhone to USB Drive
 3 Ways to Transfer Everything from Old iPhone to New iPhone
 How to Transfer Data from iPhone to iPhone without Backup
 Transfer Text Messages from iPhone to Computer without iTunes
 Easy Ways to Backup iPhone without iTunes or iCloud
 How to Fix iTunes Cannot Read the Contents of the iPhone
 5 Ways to Fix iPhone Not Showing up in Windows Explorer