
Does your computer run painfully slow? Don’t worry! Cleaning up space on your computer is often considered a good solution to help your computer save more free space on the drive for better performance, and your system and various apps can take advantage of the extra space as needed. This guide will show you completely clean hard drive space in Windows 10 using various tools.
- Way 1: Clean hard drive by using System Refixer
- Way 2: Clean hard drive by using Disk Cleanup
- Way 3: Clean hard drive by using Storage Sense
- Way 4: Empty Temp Folder by resetting Windows Store app
- Way 5: Uninstall apps you no longer need
- Way 6: Delete useless large files
- Way 7: Move apps and files to a new drive
- Way 8: Fresh Start Windows 10
Way 1: Clean Hard Drive Using System Refixer
As the usage time of your computer, it collects many unused files and settings, which take up space on your hard drive, making it run slower and slower. iSumsoft System Refixer can help clean these system junk files and makes it instantly faster.
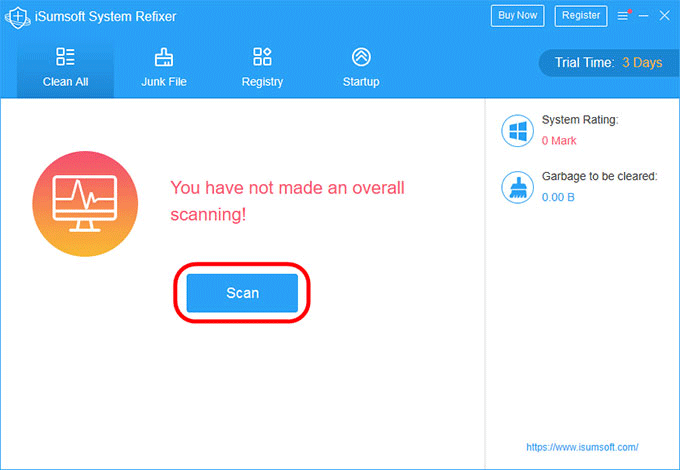
Step 1: Download and install the iSumsoft System Refixer on your computer. After installation, launch it.
Step 2: In the main interface, click the Scan button. The software will make a quick and overall scan of your computer.
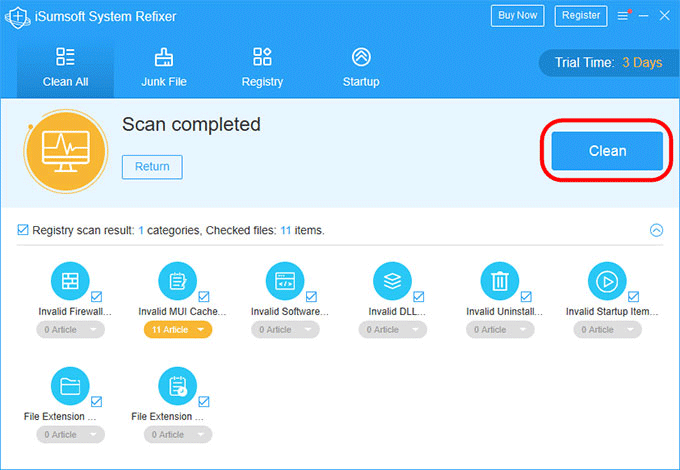
Step 3: When the scan is complete, click the Clean button to clear all the useless files.
Way 2: Clean Hard Drive by Using Disk Cleanup
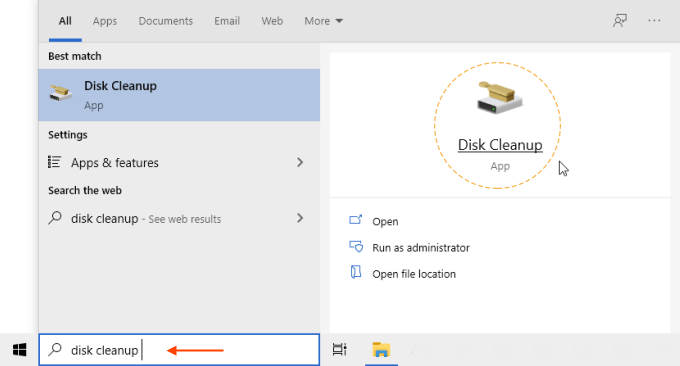
Step 1: In the search box on the taskbar, type disk cleanup, then select it from the results.
Step 2: Select the drive you want to clean then click OK.
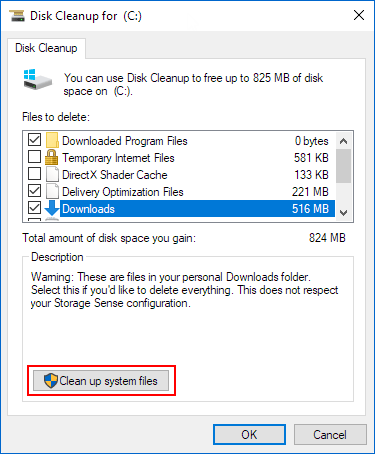
Step 3: Select the checkbox next to the type of files you want to delete. By default, Downloaded Program Files, Temporary Internet Files, and Thumbnails are selected. Be sure to clear those checkboxes if you don’t want to delete those files.
- Temporary files
- Empty recycle bin
- Delete system files
- Remove Windows. old folder (Previous Windows installation(s)
- Temporary Windows Installation Files
- Clear the delivery optimization cache
- Windows update cleanup
- Windows upgrade log files
- The system created Windows error reporting
Step 4: To free up even more space, select Clean up system files, and then select the type of system files you want to delete. Disk Cleanup will take a few moments to calculate the amount of space that can be freed up.
Step 5: After you’ve selected the types of files you want to delete, select OK, and then select Delete files in the confirmation window to start the cleanup.
Way 3: Clean Hard Drive Using Storage Sense
You can use Storage Sense to delete unnecessary or temporary files from your device.
If you turn on Storage Sense, Windows will automatically free up space by getting rid of files you don’t need, like temporary files and items in the Recycle Bin, when you’re low on disk space or at intervals you specify.
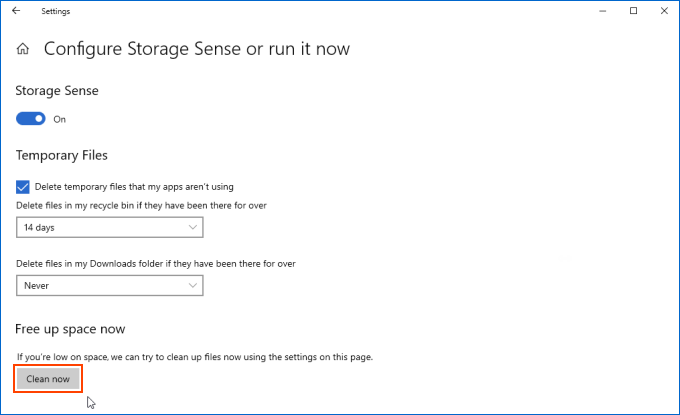
Step 1: Select Start > Settings > System > Storage .
Step 2: In the Storage area, turn on Storage Sense.
Step 3: Select Configure storage sense or run it now.

Step 4: In the Run Storage Sense area, choose how often you want Storage Sense to run.
Step 5: Select which files you want Storage Sense to delete automatically, then select the corresponding time intervals.
Step 6: Scroll down and select Clean now. Windows will take a few moments to clean up your files, and then you’ll see a message indicating how much disk space has been freed up.
Way 4: Reset Windows Store app
If you get an error message about Low Disk Space, it’s possible that your Temp folder is full. To remedy this issue, it’s a good idea to reset the Store app.
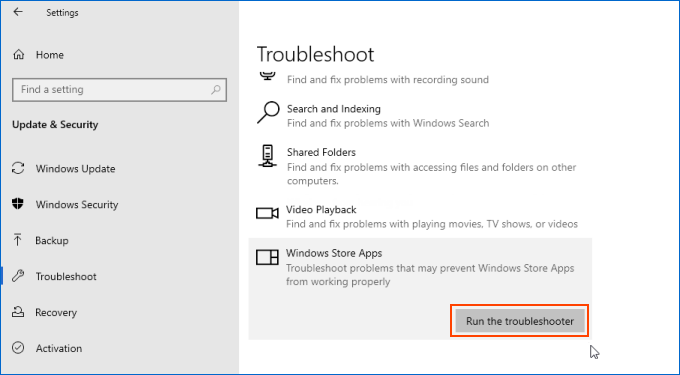
Step 1: Go to the Settings. Click on Update & Security and select Troubleshoot.
Step 2: Scroll down and select Windows Store Apps and then click on Run the troubleshooter.
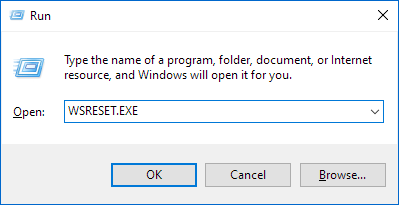
Step 3: Next, to clear the Microsoft Store cache, press the Windows Key + R. Type WSRESET.EXE and click OK. A blank Command Prompt window will appear.
Step 5: Wait for the Microsoft Store to open! After it does, just close it.
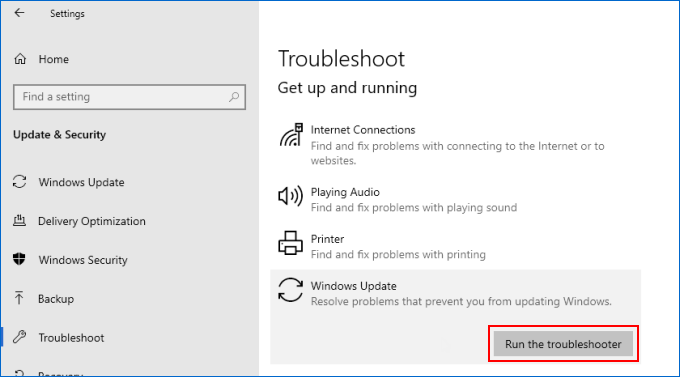
Step 6: Now, go back to the Update & Security > Troubleshoot option, and select Windows Update and run its troubleshooter.
Step 7: After you’ve completed all these steps, reboot your computer to see if the space restored.
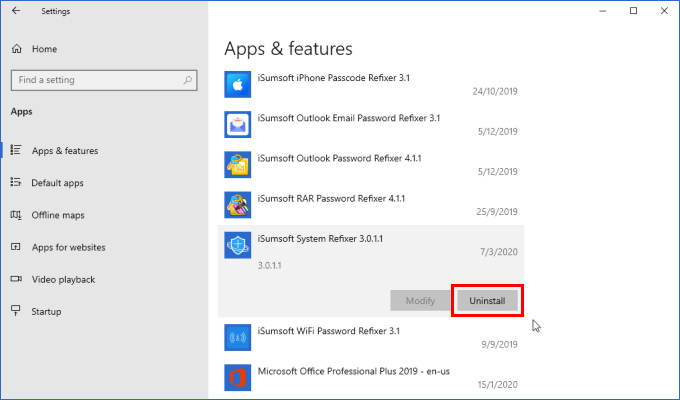
Way 5: Uninstall programs you don’t use anymore
Apps that you no longer use can take up large chunks of the storage on your PC. You can remove unused files and unwanted programs from your computer in order to increase the space on your hard drive. Know how to uninstall apps for all users on the PC or uninstall for the current user account only. When we communicate with others online, it can be taking up storage space, as they continually take up cache space. Periodically clearing these caches could free up space, while the fast and effective way is to uninstall social & communication apps and reinstall it again.
Way 6: Delete useless large files
An effective way to clean up disk space is to find, delete, and delete useless large files that take up space on your PC and reduce system performance. Windows gives you multiple ways to find all the large files stored on your drive. You can find large files in Windows 10 using File Explorer.
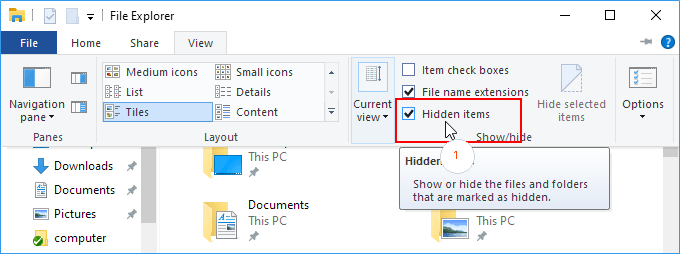
Step 1: Make sure the “Show hidden files and folders” option is enabled.
Step 2: In File Explorer, click the search box given in the upper right corner. Enter the size in the search box: size: > 1GB (replace 1GB with your size) and press Enter. It will only find files larger than the size you specify.
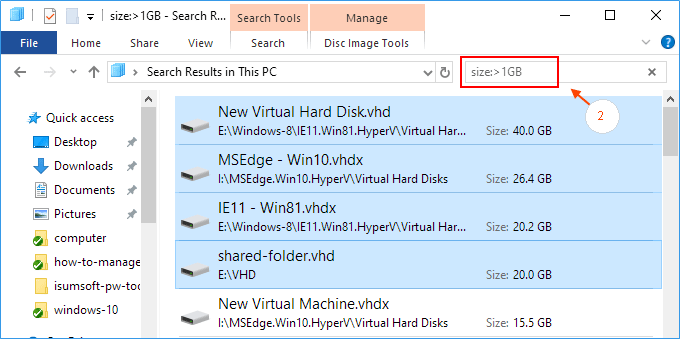
Step 3: When the search results appear, right-click in the blank space and select Sort by, Size, and Descending. This ensures that the largest file appears at the top of the results.
Step 4: Select large files that are no longer used and then delete them permanently from your computer.
See Also: How to delete hiberfil.sys file in Windows 10/8/7
How to Delete Old Backups of File History in Windows 10
Way 7: Move apps and files to a new drive
If you have photos, music, or other files that you want to keep but don’t use very often, consider saving them to an external hard drive or a USB drive. You’ll still be able to use them when the drive is connected, but they won’t take up space on your PC. To do: Connect the removable media to your PC.
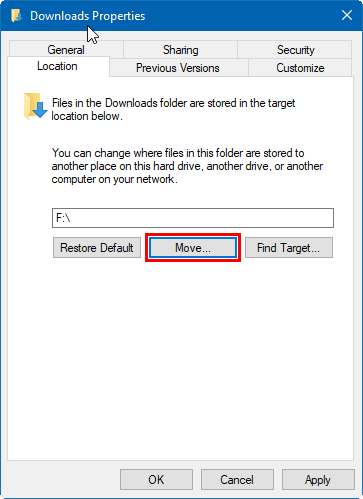
Step 1: Press Win+E to open File Explorer and find the files you want to move.
Step 2: Select the files, go to the Location tab and then select Move to > Choose the location.
Step 3: Select your removable media from the location list, and then select move.
Similarly, you can move OneDrive files to another drive. Do this you’ll need to create a folder on the removable drive for your OneDrive files. After you create the folder, follow these steps to move your files, see Change the Location of OneDrive Folder in Windows 10 for more info.
See also
More ways to extend C drive space in Windows 10/8/7 without formatting.

