
If you have wiped clean your hard drive, accidentally deleted an important file, or deleted the contents of the file, you know that it is very frustrating. Fortunately, deleting files may not be the end of the world. In fact, deleted files are not meant to substantially disappear because they are still invisibly hidden in the hard drive sectors with full directories and can be easily retrieved. We will show you two easy ways to recover deleted files in Windows 10 for free.
1. Recover recently deleted files from Recycle Bin
If you are not sure whether the file has been permanently deleted, then the Recycle Bin should be the first place you look to recover deleted files. I hope you just misplaced the file, then you can find it again.
Steps to restore the deleted files in the recycle bin to the original location on your computer:
Step 1: Double-click the recycle bin icon on the desktop to open it.
Step 2: Find and select any files or folders you need to restore.
- To select multiple files or folders, hold down the Ctrl key while selecting.
- To select a series of items, use the Shift key instead.
Step 3: Right-click on the selection and select “Restore“.
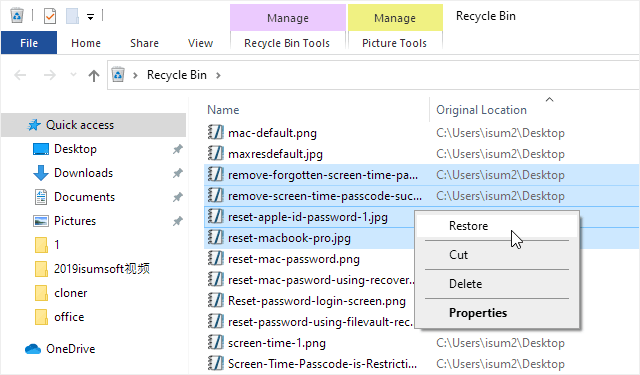
Step 4: Wait for the recycle bin to restore the deleted files.
Restoring deleted files from the Recycle Bin takes only a few minutes in Windows, but the time spent depends mainly on the number of files to be restored and the size of them together, but computer speed is also a factor.
If you have run the Shift + Delete keys to permanently delete files by mistake, or even if the recycle bin is emptied, how to recover permanently deleted files? Fortunately, to help you recover from this situation, Microsoft recently released a new tool called Windows File Recovery. The tool supports multiple file types and can help restore photos, audio, documents, videos, etc.
2. Recover deleted files using the command-line app
Microsoft’s Windows File Recovery is an official tool for recovering deleted files from hard disks, SD cards, USB drives, and other storage media. Here is how to use the Windows File Recovery command-line app to try and recover deleted files in Windows 10.
Step 1: If you haven’t already, you will need to download and install the Windows File Recovery command line app from the Microsoft Store.
This tool requires you’ve installed Windows 10’s May 2020 Update or a newer version of Windows 10. It doesn’t run on older versions of Windows.
Step 2: To run it, type “Windows File Recovery” in the Search box. Click on the program that shows up.
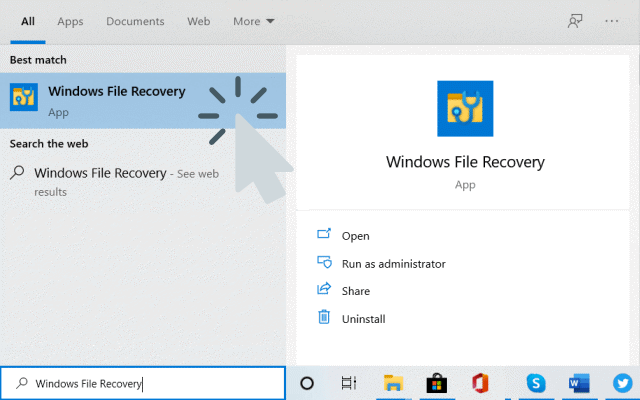
Step 3: If prompted by UAC, click on Yes to approve running as administrator.
Step 4: Use the winfr command in the following format to try and recover deleted files.
winfr source-drive: destination-drive: [/switches]
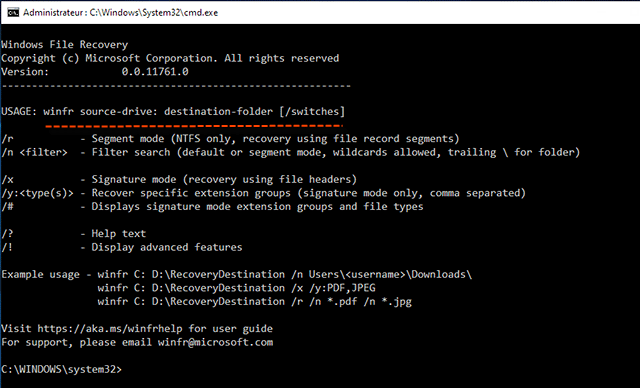
The source and destination drives must be different. When recovering from the operating system drive (often C: ), use the /n <filter> and /y:<type<(s)> switches to specify the user files or folder.
Examples of how to use Windows File Recovery
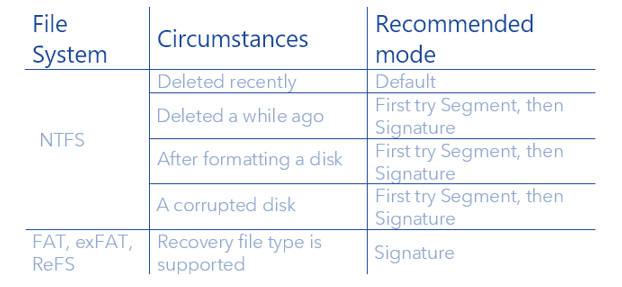
There are three modes you can use to recover files: Default, Segment, and Signature.
- Default: Find a file deleted by mistake recently on storage space with the NTFS file format, it is impossible to indicate the name of the exact file it is known.
- Segment: Find files that have been erased for a longer period of time or even after formatting your drive.
- Signature: This mode is ideal for external storage media, for example, a USB hard drive.
Default mode examples
To use the default mode, you use /n followed by a search path:
- To search for a file named document.docx, you’d use /n document.docx. You can also specify a full path to the file, such as /n \Users\Tom\Documents\document.docx
- To search for all files that were in the Documents folder if your username is Tom, you’d use /n \Users\Tom\Documents.
- To search with a wildcard, use a *. For example /n \Users\Tom\Documents*.docx will find all DOCX files there were in the Documents folder.
Let’s put that all together now. To search for all DOCX files on drive C: and copy them to drive D:, you’d run the following command:
winfr C: D: /n *.docx
You will have to type “y” to continue.
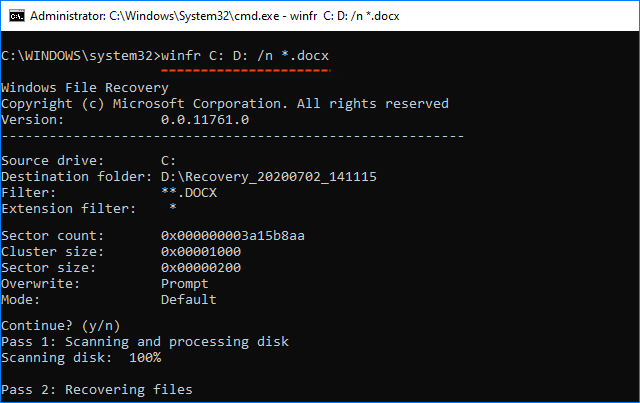
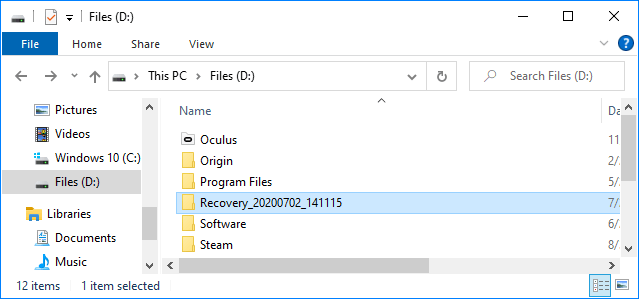
You’ll find the recovered files in a directory named “Recovery_[date and time]” on the destination drive you specified in the command line.
Segment mode examples (/r)
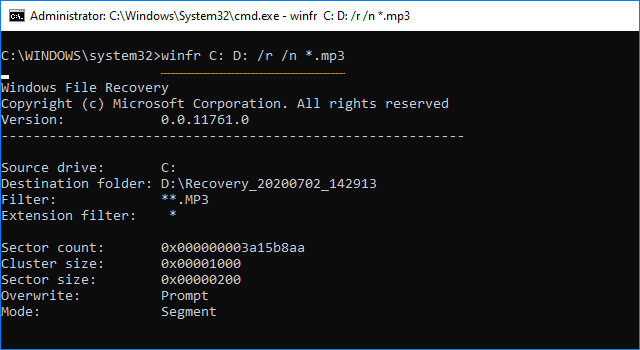
To use segment mode, which examines file record segments, you use /r in addition to /n. So, if a Default mode search doesn’t find what you’re looking for, add the /r and try again.
For example, to recover all deleted MP3 files from your C: drive and save them to your D: drive, you’d run:
winfr C: D: /r /n *.mp3
Recover any file with the string “invoice” in the filename by using wildcard characters.
winfr C: E: /r /n *invoice*
Signature mode examples (/x)
The signature mode works a bit differently. It examines file types, so it can only find deleted files of certain file types. To use Signature mode, you use /x to specify the Signature mode and /y: to list the file type groups you’d like to search for.
Here’s a list of supported file types and the groups they’re sorted into, taken from Microsoft’s documentation:
- ASF: wma, wmv, asf
- JPEG: jpg, jpeg, jpe, jif, jfif, jfi
- MP3: mp3
- MPEG: mpeg, mp4, mpg, m4a, m4v, m4b, m4r, mov, 3gp, qt
- PDF: pdf
- PNG: png
- ZIP: zip, docx, xlsx, pptx, odt, ods, odp, odg, odi, odf, odc, odm, ott, otg, otp, ots, otc, oti, otf, oth
If you want to search drive E: for images in JPEG format and save them to drive D:. You’d run the following command:
winfr E: D: /x /y:JPEG
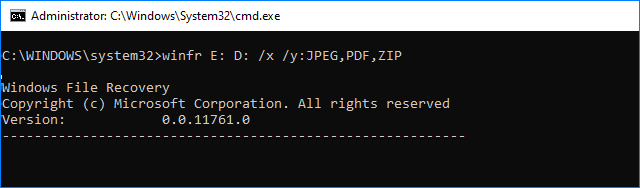
You can specify multiple file groups by separating them with space. So, if you want to find JPEG files, PDFs, and Word documents, you’d run
winfr E: D: /x /y:JPEG,PDF,ZIP
Bottom line: Using data recovery tools is an effective step that can help you save time and effort. In order to maximize the chance of recovering deleted files from the device, you can download the file recovery program below and use one of them to search and recover deleted files.
- Recuva
- Disk Recovery
- Disk Drill
