
By default, the computer boots the system from the primary internal storage device, and most computers allow you to boot from other disks. This includes external hard drives, CD, DVD, and USB flash drives. As long as there is a Windows installation or Windows OS file in that disk. Booting from a secondary boot disk is useful for running diagnostics and disk utilities on a primary disk.
-
- Option 1: Set up a computer to boot from that external device one time
- Option 2: Set up a computer to boot from that external hard drive every time
- A list of BIOS access keys for popular motherboards
- How to find out what BIOS version your Motherboard is running
How to set Dell to boot from an external hard drive one time
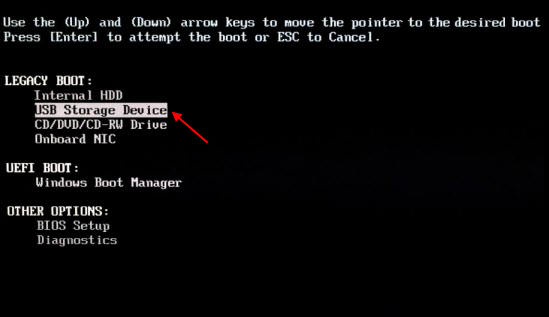
If your computer has a Boot Menu option, you can follow these steps below. This is a faster way to set your Windows PC boot from SSD or USB device but may not exist on every machine.
Step 1: Connect your external storage device to your computer.
Step 2: Turn on the PC and press F12 to open the boot-device selection menu.
Note: This boot process can occur quickly if you missed the chance to enter BIOS, restart the computer again.
Step 3: Select the option that boots the PC from the USB flash drive. Then hit Enter key. Your computer will boot from connected external hard drive, SSD or USB device, instead of a hard drive this time.
Boot your computer from the advanced boot options menu
On a UEFI-based PC, you can choose a bootable device from the advanced boot options menu. To do it as follows:
Press and hold the Shift key while clicking the Restart option on the sign-in screen. The PC will restart into the boot options menu.
Select the Use a device option on this screen and you can choose a device you want to boot from, such as a USB drive, SSD, or network boot.

How to change the Windows computer’s boot order
BIOS settings allow you to run a boot sequence from a floppy drive, a hard drive, a CD-ROM drive or an external device. To boot from an external hard disk, make sure that the boot order of the device takes precedence over the internal hard drive. This is permanent until you change it again, and it should exist on every computer.
Step 1: Access to BIOS/UEFI setup menu.
To set boot priority for a USB device, plug the device into a USB port.
The start or restart the computer and press BIOS Entry Key (ESC, F2 or F12), then your computer’s BIOS menu will appear.

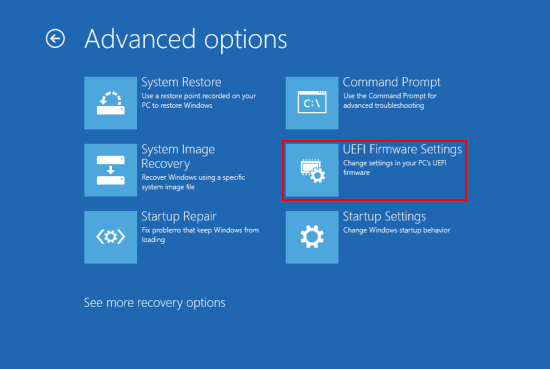
On a UEFI-based PC, press and hold the Shift key as you click the Restart option on the sign-in screen. Windows will reboot into a special boot options menu.
From there, click Troubleshoot > Advanced Options > UEFI Firmware Settings to access your computer’s UEFI BIOS.
Step 2: Set a USB or other removable device boot sequence priority over the hard drive.
In the BIOS or UEFI firmware menu, look for Boot options menu and use left/right arrow key to select it. You will see system devices appear in the first position. To give an external hard drive boot sequence priority over the hard drive, move the Removable Devices item to the first position in the list.
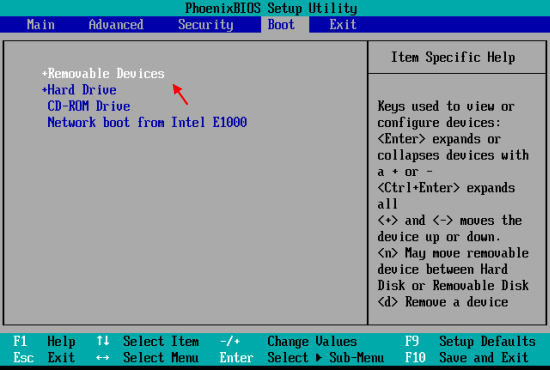
Press F10 to save the setting and Exit. When the computer restarts, it will boot from the selected drive, if it’s not connected or no operating system is present, it’ll then boot from the hard drive.
BIOS Access Key
The BIOS (basic input/output system) is a programmable chip that controls how information is passed to various devices in the computer system. It is part of your motherboard hardware. And different Computer motherboard has different ways to enter the BIOS.
Entering BIOS is actually very easy once you determine which key or combination of keys on your keyboard to press to access BIOS. This is generally displayed on-screen during the boot process. you may see a message that says “Press DEL to enter setup or Press F2 to access the BIOS“.
Press the required key at the correct time and your computer’s BIOS will appear. If you don’t see the required key on-screen, there’s still hope. Our first suggestion would be to take a look at one or both of these lists of BIOS access keys:
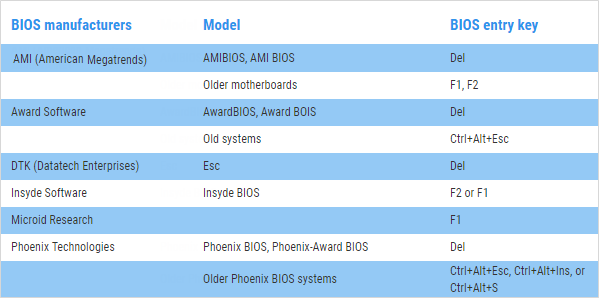
BIOS setup utility access keys for popular system
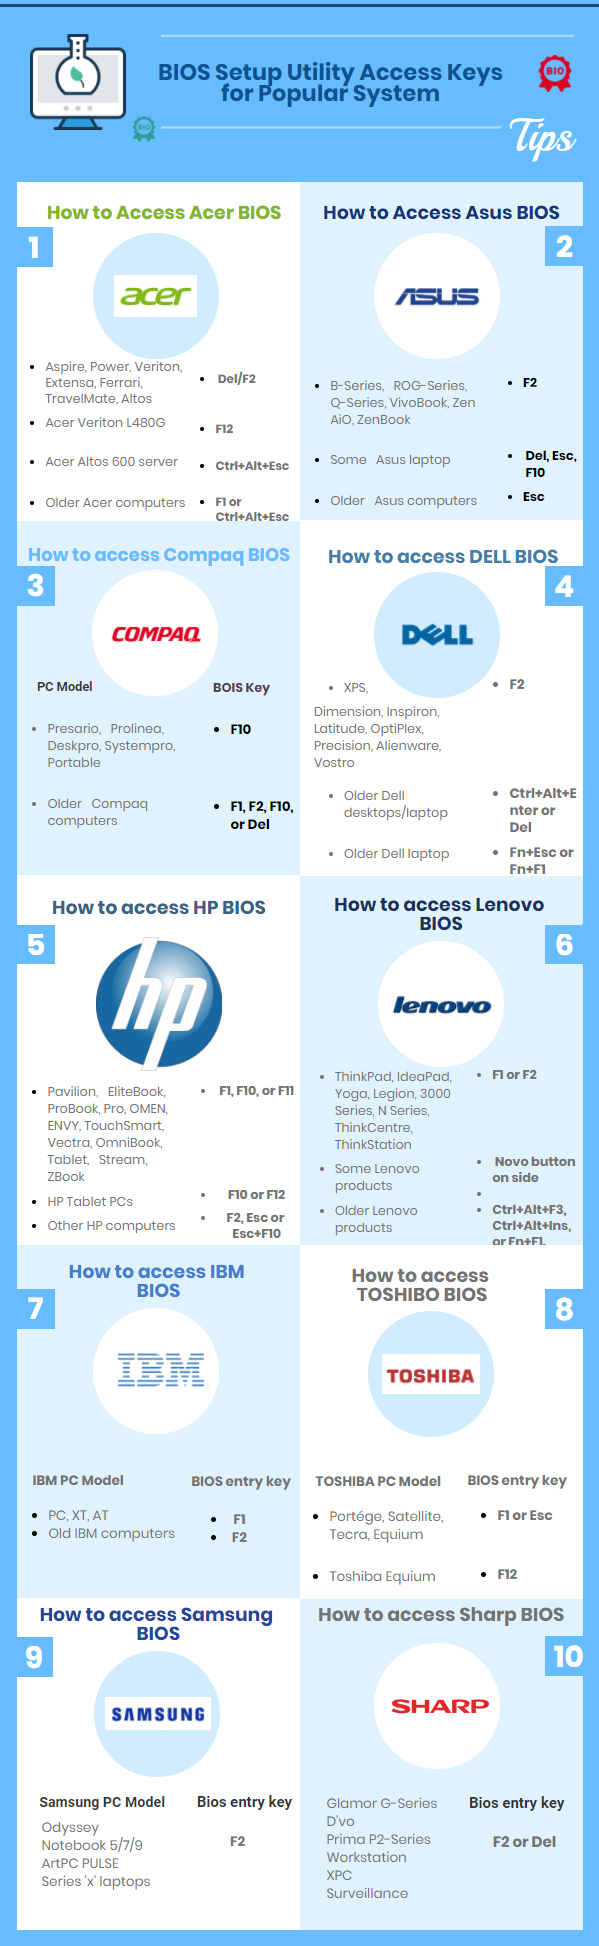

BIOS Setup Utility Access Keys for Major Manufacturers
How to find your BIOS manufacturer? An easy method is to open a system information tool and look for BIOS information there. Just follow these steps below;
How to find out what BIOS version your Motherboard is running
An easy way to check the BIOS version and System Manufacturer that running on your computer’s motherboard is via a program called Microsoft System Information. Here is how:
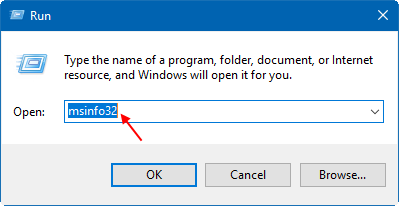
Step 1: Press Win+R to open the Run box.
Step 2: Type in msinfo32, and then hit Enter.
Step 3: System Information will appear on the screen. On the right pane of System Summary, under the item column. You’ll know who made your motherboard and what model it is. Those values in the BaseBoard Manufacturer, BaseBoard Model, and BaseBoard Name items.
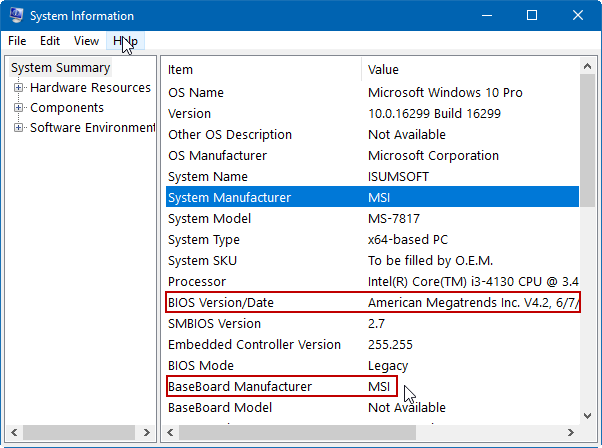
To find what your BIOS version it is, locate the entry titled BIOS Version/Date.
Note: But please know that it doesn’t matter at all if your PC is running Windows 10, Windows 8, Windows 7, (Windows whatever), Linux, Unix, or no operating system at all – any instructions for entering the BIOS setup utility will be the same.

