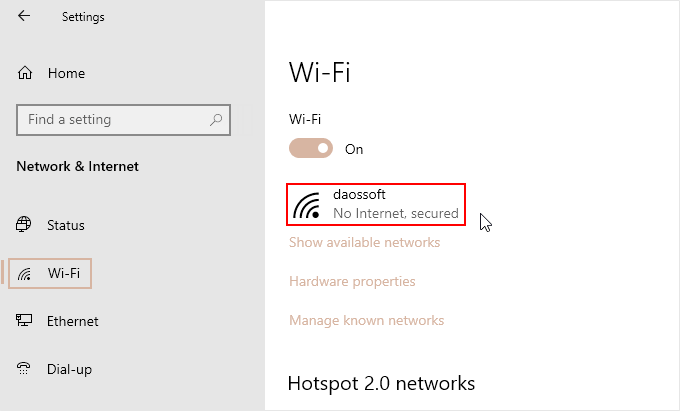
WiFi is connected but it shows that “No Internet, secured“? If your network isn’t working as it should, when your wireless signal is strong, all the indicators seem to say that everything is ok, but you can’t connect to the internet. The reason for the failure may be related to your router, IP address, default gateway address or DNS server address. Below are some steps to walkthrough if you’re having this common problem.
What to do when there is no internet access
- Check your network cable
- Reboot your device
- Forgot WiFi Network and Reconnect it
- Make sure you have a proper IP address
- Configure a static IP address & try a different DNS server
- Check the MAC (Media Access Control) Address Filtering
1. Check your network cable
Make sure the network cable is connected to the WAN port of the router, and the wired computer needs to be connected to the LAN port, as shown below:

If the network cable connection is correct, but the WAN port indicator is not lit, check the WAN port wiring for poor contact, etc. Try replacing the network cable connected to the WAN port.
2. Reboot your devices
If your computer or phone is connected to a Wi-Fi network but you can’t get online, try to use your Wi-Fi network on other devices. If you can’t get online using your other devices, there might be a service outage. To solve it, you can restart your device and your modern and router if possible.
- Restart Windows PC
- Restart iPhone/iPad
- Reboot your router and modem

3. Forgot WiFi Network and Reconnect it
Make sure your Wi-Fi device isn’t trying to reach a network next door. If you’re having issues with wireless networks, forgetting it and then reconnect to the Internet again will often solve the issue. This can also prevent from experiencing network conflicts.
- Open the Settings > Network & Internet.
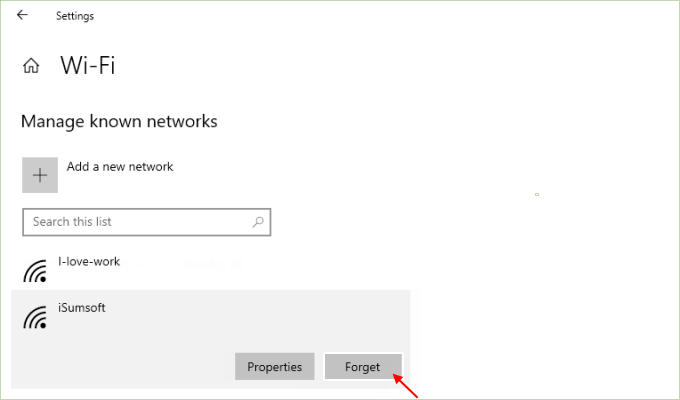
- Select Wi-Fi in the left-hand pane. There you will see a link “Manage known networks“. Click on it.
- You’ll see a complete list of all the Wi-Fi networks you’ve ever connected to. Just click the network you want to forget.
- Click Forget from the popup menu.
4. Make sure you have a proper IP address
If your device is set up to use a static IP address but the router isn’t allowing that IP address on the network, something that can happen if you mix a static IP address with the DHCP network.
The easiest way to fix this issue is to leave DHCP enabled on the router and remove the static address from the device or configure the IP address in an individual device.
For example, in Windows, you can do this in Control Panel by going into the network adapter’s properties and selecting Obtain an IP address automatically instead of the manual assignment option.
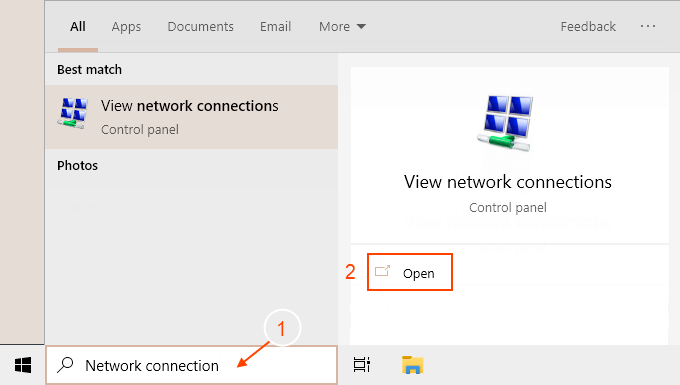
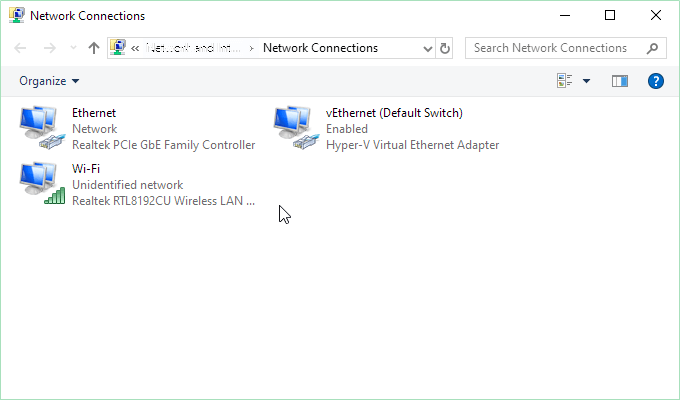
Step 1: Go to open the Network Connections windows, you’ll see all the connections to the computer.
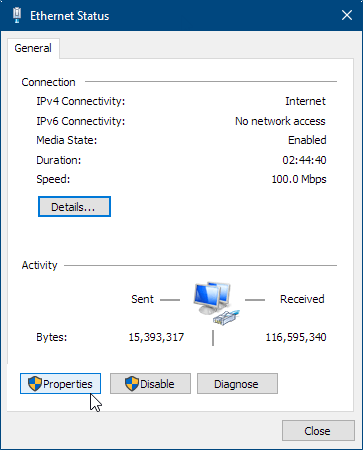
Step 2: Double-click the network connection that you want to change the IP address and DNS servers for.
Step 3: In the Status window, select Properties.
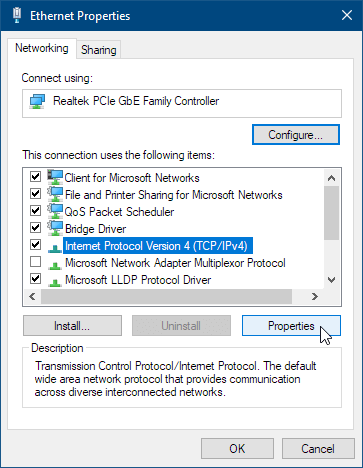
Step 4: In the Properties window, select Internet Protocol Version 4 (TCP/IPv4) or select Internet Protocol Version 6 (TCP/IPv6) to change the IPv6 DNS server settings.
Step 5: Select Properties.
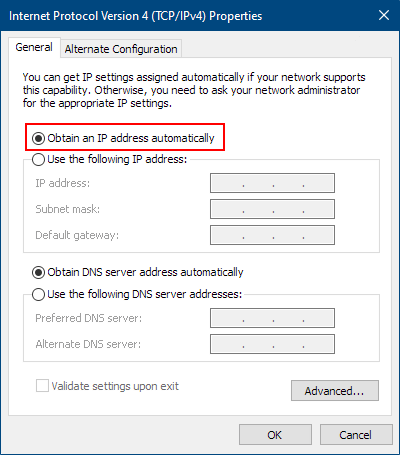
Step 6: In the Internet Protocol Properties window, choose to Obtain an IP address automatically.
5. Configure a static IP address & try a different DNS server
If you accidentally configure the IP address, default gateway, DNS server settings incorrect, it may cause no Internet problems. Therefore, configuring the IP address to use a static IP and then changing the DNS server can help solve the problem.
- Configure IP address and change the DNS servers in Windows 10 Settings
- Configure IP address and change the DNS servers on iPhone/iPad
- Configure IP address and change the DNS servers on Mac
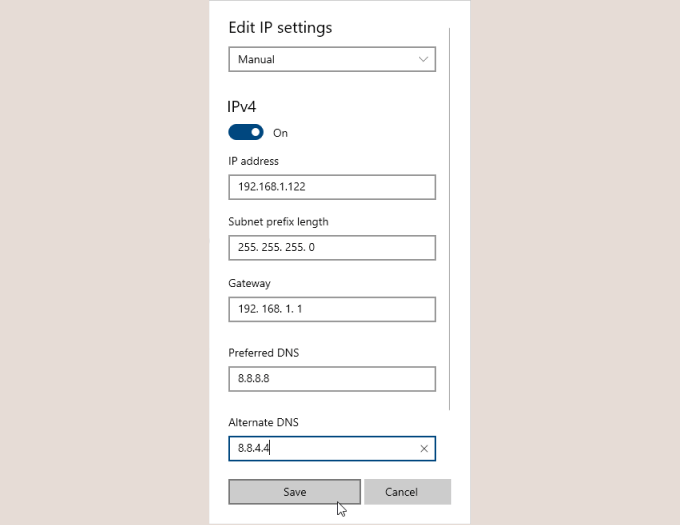
Change the IP settings and DNS server on the Settings app
Step 1: Open Windows 10 Settings, and click on the Network & Internet icon.
Step 2: Click on Wi-Fi or Ethernet on the left side, and click on the connection which you want to edit the DNS address for.
Step 3: Go to the IP settings section, select the Manualin the Edit IP settings drop menu.

Step 4: Turn on IPv4 and enter the related information you want to use.
- IP Address: 192. 168. 1. X (X ranges from 2~254)
- Subnet Mast: 255. 255. 255. 0
- Default Gateway: 192. 168. 1. 1
- Preferred DNS: 8.8.8.8
- Alternate DNS: 8.8.4.4
Step 5: When finished, click on Save.
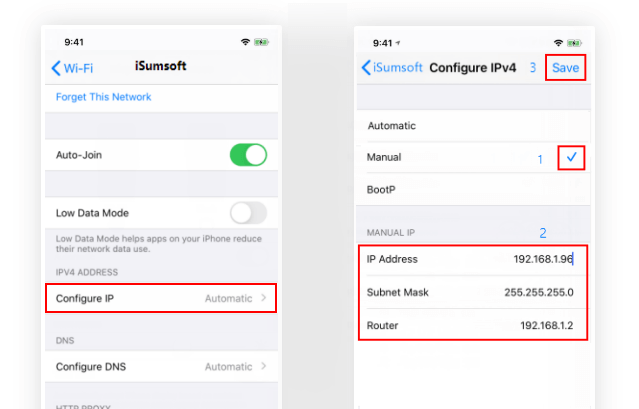
Change the IP address settings and the DNS servers on the iPhone/iPad
By default, DNS is automatically configured on all Wi-Fi networks. However, sometimes changing it to OpenDNS or Google DNS can help solve Internet problems.
You should also try to do this in this situation. To do this, follow these steps:
Step 1: Open the Settings app on your phone, go to Wi-Fi.
Step 2: Tap on the Wi-Fi network that will cause you trouble.
Step 3: Tap the “Configure IP” and select “Manual”.
Step 4: Enter IP Address, Subnet Mask and Router, then tap Save.
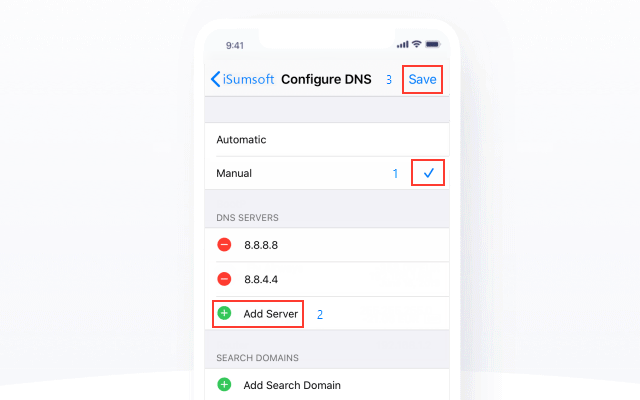
Step 5: Tap the “Configure DNS” and select “Manual”.
Step 6: Tap on Add Server under the DNS server, then enter Google DNS first, which is 8.8.8.8, then enter 8.8.4.4 by clicking Add Server. Alternatively, you can use the OpenDNS value: 208.67.222.123, 208.67.220.123.
Change the IP address settings and the DNS servers on Mac
To find out the correct IP address and DNS servers by checking with your ISP or network administrator.
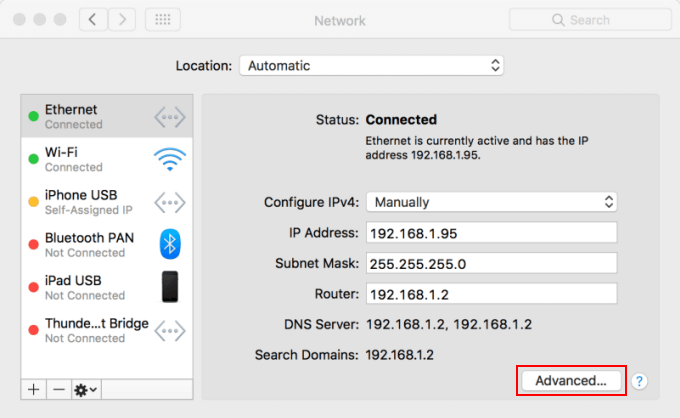
Step 1: On your Mac, choose Apple menu >System Preferences, then click Network.
Step 2: In the list at the left, select the network connection service you want to use (such as Wi-Fi or Ethernet), then click Advanced.
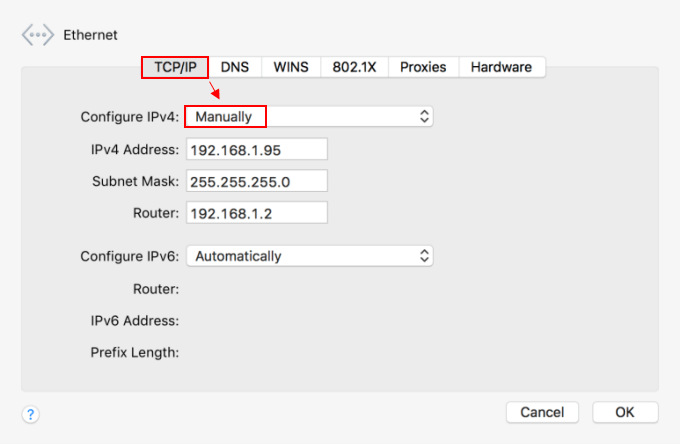
Step 3: Click TCP/IP, then select “Manually” at the right box of the Configure IPv4. Enter the related information that you want to use. When you’re finished, click OK.
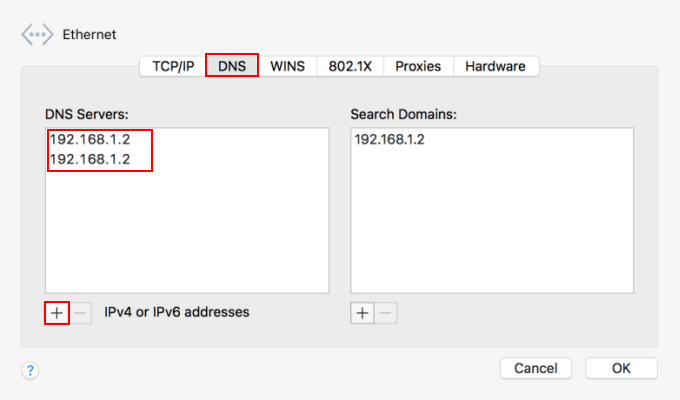
Step 4: Click DNS, then click the Add button at the bottom of the DNS Servers list. Enter the IPv4 or IPv6 address for the DNS server. Click the Add button at the bottom of the Search Domain list, then enter the search domain—for example, apple.com.
Step 5: When you’re finished, click OK.
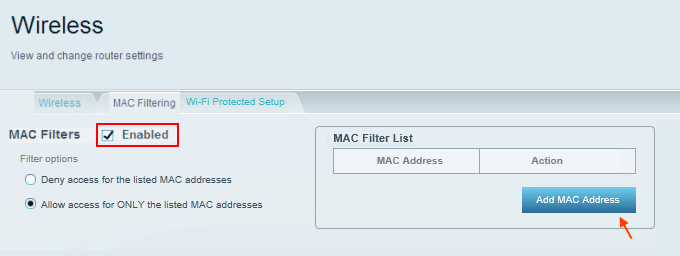
6. Check the MAC (Media Access Control) Address Filtering
Typically, a router allows any device to connect as long as it knows the appropriate password. With MAC address filtering, the router will first compare the device’s MAC address with the approved MAC address list and allow it to enter the Wi-Fi network only if the device’s MAC address is specifically approved.
If your router has MAC address filtering, you may not be able to access the Internet. If the device does not have a specific MAC address, this setting will prevent the device from connecting to the router.
The easiest way to resolve this issue is to add your MAC address to the list of approved MAC addresses.