We’ll show you how to use Mac’s internal encryption program to encrypt a USB flash drive without losing data. The Mac has built-in great encryption. You can encrypt an external hard drive on Mac without erasing using the Disk Utility or Finder options. Click the link below to get a step-by-step guide on how to do that:
How to encrypt a USB/external hard drive in Finder option
Finder uses XTS-AES encryption, allowing you to encrypt USB disks without erasing data. The contents of the disk will be encrypted, and without the password, no one can access them. Its function is similar to BitLocker To Go on the Windows operating system. This tool encrypts the data on the removable drive to provide higher data security.
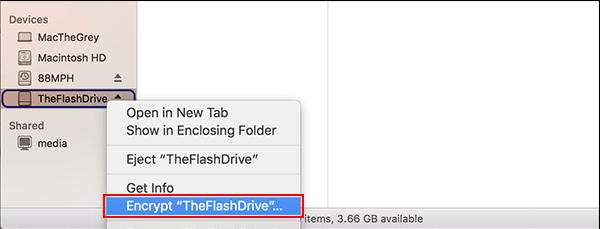
Connect the USB flash drive to your Mac and find its disk icon on the desktop or Finder sidebar, then right-click and select Encrypt “[USB stick name]” from the context menu.
Note: If you do not see the “Encryption” option in the drop-down menu, your USB flash drive has not been formatted using the GUID partition map. To resolve this issue, you need to erase and encrypt the USB drive in Disk Utility.
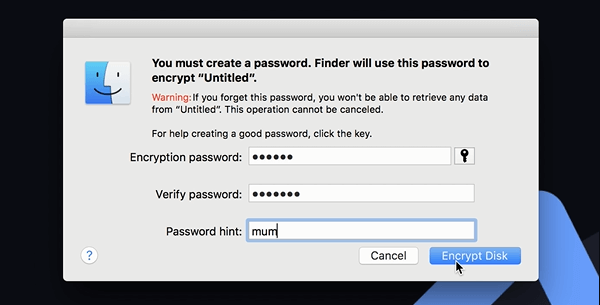
Enter your password, verify it, add a meaningful password hit if needed, and then click Encrypt Disk to start the encryption process.
You may have to wait several minutes for the contents of your disk to be encrypted, depending on the size of your drive and its speed.
How to encrypt external hard drive on Mac without erasing in Disk Utility
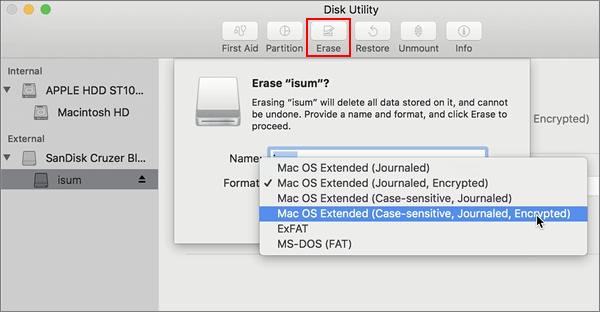
To encrypt and protect a USB disk with a password using Disk Utility, you must first erase the disk. If the volume contains files that you want to save, be sure to copy them to another volume or to the desktop on your Mac. You can simply copy the encryption process back to it after the encryption process is complete.
- After the USB flash drive is empty, open “Disk Utility“.
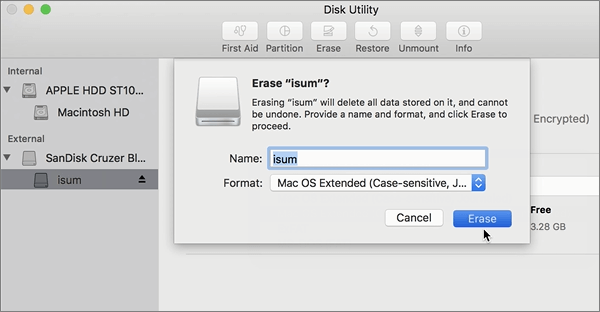
2. In the Disk Utility application, choose your flash drive from the list and then go to the “Erase” tab.
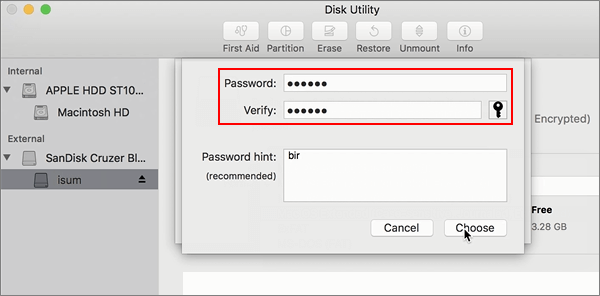
3. Click the Format pop-up menu and choose either Mac OS Extended (Journaled, Encrypted) or (Case-sensitive, Journaled, Encrypted).
4. Enter a password and verify it when prompted. Then click the “Choose” button.
5. Click Erase to delete all the data on the drive.
6. After the encryption process completed, you’ll be able to access the contents of the USB flash drive as usual.
How to unlock the password-protected USB disk on Mac
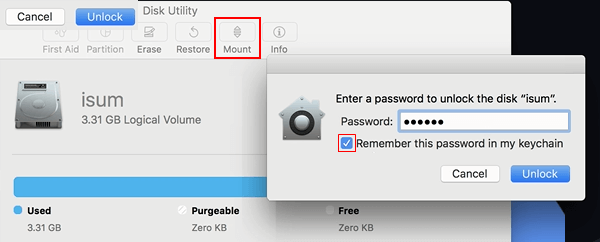
Next time you plug a password-protected USB into your Mac, go to open Disk Utility, select your disk and then click Mount on the menu bar. A small window will appear where you will be asked to provide a password, enter the password to unlock it.
Note that the prompt includes an option for macOS to remember this password in my keychain. Check the box, and whenever you connect the USB stick to your Mac again you won’t be prompted to enter the password and you’ll have automatic access to it, just like any other drive.
To change the password for your disk or partition, select it in the sidebar, then choose “File” > “Change Password”.
Decrypt the USB disk and turn off encryption protection
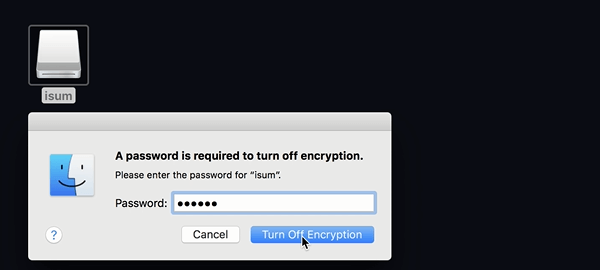
If you ever want to decrypt the USB flash drive in the future, right-click its disk icon on the Desktop or Finder, select Decrypt “[USB stick name]” from the contextual menu, and then enter the password to turn off encryption protection.
See the video tutorial:

