
If you are facing the “Windows Update Service not running” error, and you restart your computer several times and click “Check for updates” again, but you will still get the same issue, that’s probably there may have some bugs in Windows Update, but don’t worry, Windows Update service is not running is a very common problem. In this guide, we’ll discuss how to resolve this problem.

Here are four ways to fix the “Windows Update cannot currently check for updates, because the service is not running. You may need to restart your computer.” issue. By following one of these approaches, you will be able to implement it.
- Way 1: Manually Start the Windows Update Service
- Way 2: Delete the SoftwareDistribution folder
- Way 3: Re-register Windows Update DLL Files
- Way 4: Run the Windows Update troubleshooter
Way 1: Manually Start the Windows Update Service
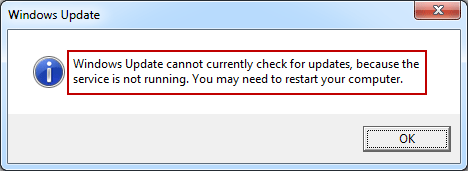
You received an error saying “Windows Update cannot currently check for updates, because the service is not running. You may need to restart your computer.”, possibly because Windows update service is disabled. You can choose to restart the services by setting the Startup type as Automatic. Follow the below-stated guidelines for accomplishing the process properly.
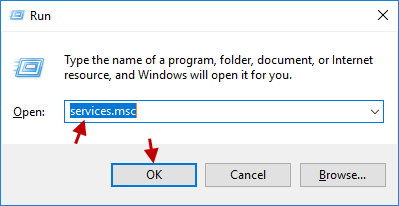
Step 1: Open Services window in Windows 10.
Launch Run dialog box by pressing Windows logo+R keys on your keyboard. Type services.msc and click OK button.

Step 2: Locate and double-click Windows Update in the Services snap-in window.

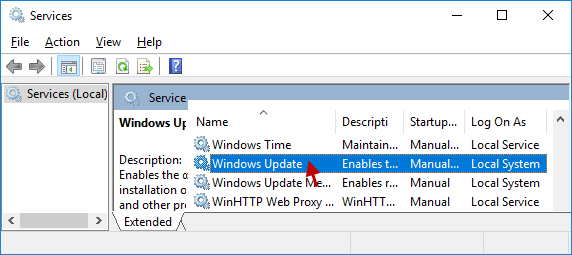
Step 3: From the new pop-up dialog, set the Startup type as Automatic and click Start button. Then click OK to close the window.

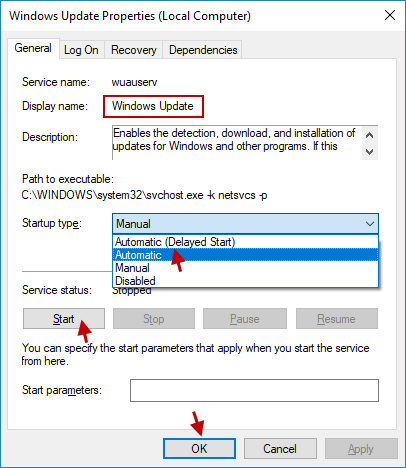
Restart your PC. And then check if you have resolved your problem by doing so. If that doesn’t work out, move on to the next method.
Way 2: Delete the SoftwareDistribution folder
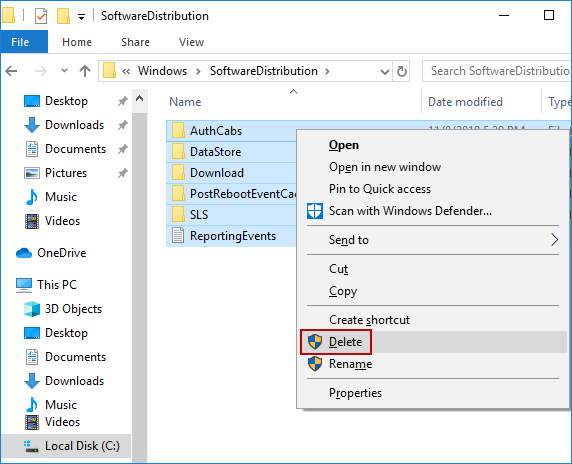
When you get an error “Windows Update cannot currently check for updates, because the service is not running. You may need to restart your computer.”, there may be a corruption problem with the temporary files for Windows updates in the SoftwareDistribution folder. To fix this problem easily, you need to delete all the contents of the folder. If you find some files missing after deletion, it means that the deleted files are the damaged files, and the others will not be affected. To do this:
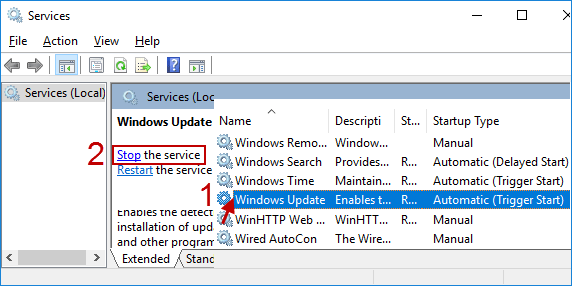
Step 1: Go to the Services snap-in window.
Step 2: In the new dialog, stop the Windows Update service by clicking Windows Update and then click Stop the service.

Step 3: Open File Explorer in Windows 10. (Press Windows logo+E keys simultaneously)
Step 4: Look for the folder named like C:\Windows\SoftwareDistribution and delete all the files and folders there.

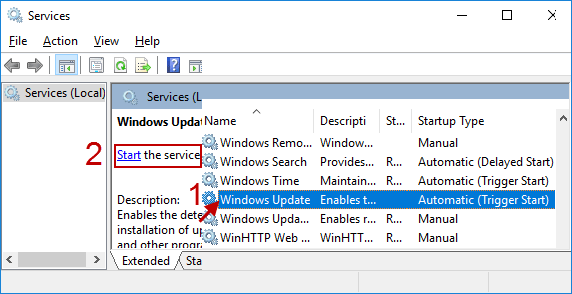
Step 5: Return to the Services snap-in window. And then click Windows Update and click Start the service.

Step 6: Go back to the File Explorer window, you will see that the some of Windows distribution folders are missing/deleting. They are all temporarily updated folders that have been corrupted.


Restart your computer. Then run the Windows Update to see if this fixes your issue.
Way 3: Re-register Windows Update DLL Files
Windows has a Command Prompt that can resolve a number of errors, including the current one. Here, it makes a big difference. So, when you encounter any problems running Windows Update, you can use it to re-register the Windows update.dll file, which will help fix the problem. All in all, it is a good method and worth considering. Please follow it properly:
Step 1: Open Command Prompt as Administrator in Windows 10.
Step 2: Type the following commands in sequence at the administrative command prompt, press Enter after each command, and after each command is executed, the registration will be succeeded.
- regsvr32 wuapi.dll
- regsvr32 wuaueng.dll
- regsvr32 wups.dll
- regsvr32 wups2.dll
- regsvr32 wuwebv.dll
- regsvr32 wucltux.dll

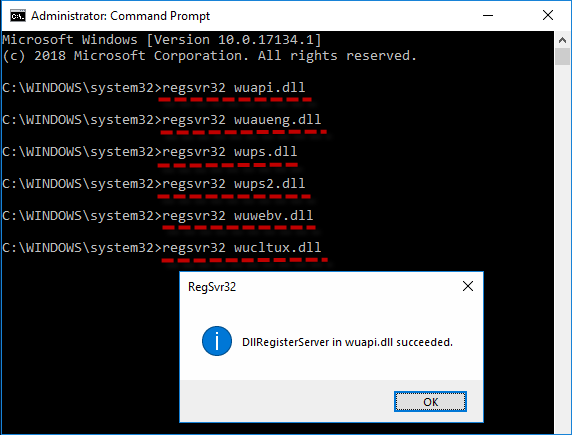
Step 3: After executing all of these commands, exit the command prompt. Restart your PC and check if this makes an available effect.
Way 4: Run the Windows Update troubleshooter
If you see an error “Windows Update cannot currently check for updates, because the service is not running. You may need to restart your computer.”, you can run the troubleshooter, it is a built-in Windows program that helps you detect and resolve problems in Windows Update. Hopefully, this detailed troubleshooting guide below will help resolve this problem. Let’s see how it works.
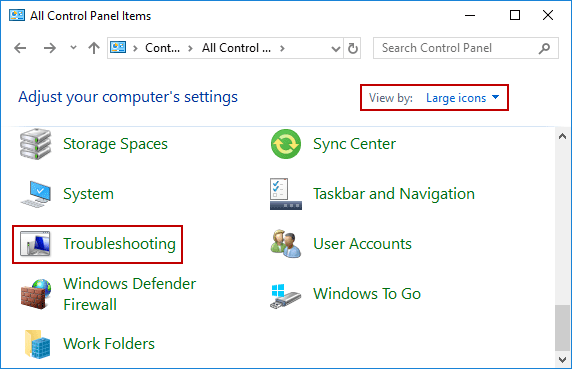
Step 1: Open Control Panel in Windows 10. In Control Panel, set the View by as Large icons, find and choose Troubleshooting.

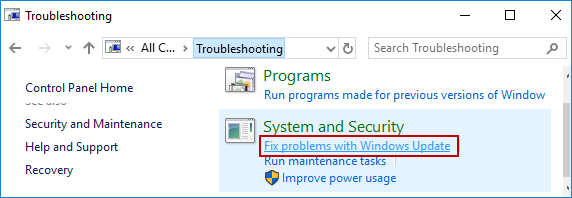
Step 2: Under System and Security section, click Fix problems with Windows Update.

Step 3: Click Advanced from the Windows Update troubleshooting panel.


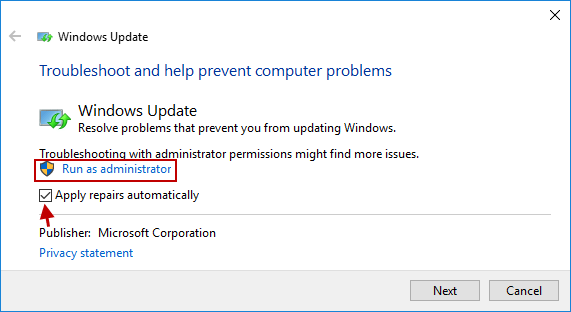
Step 4: Tick the option which says “Apply repairs automatically“. Then choose Run as administrator to run the troubleshooter.

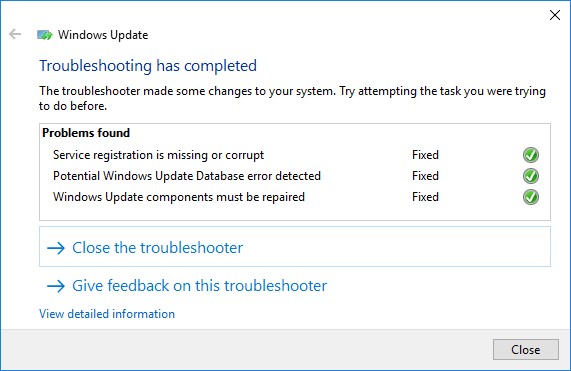
Step 5: Follow the instructions on the screen to complete the troubleshooting process. When the troubleshooting is complete, your problem will be fixed.

Conclusion
The methods outlined in this article have proven useful in fixing “Windows Update Service Not Running” problem on thousands of PC, so I hope this will also work for you and help you solve the problem.
See this video for details: 4 Ways to Fix Windows Update Service Not Running on Windows 10/7 issue