
Recently, some users have happened to enter system's test mode after upgrading to Windows 11. It is upset that there is a watermark on the bottom right corner of screen.
Incompatible drivers or applications may result in entering test mode. It is a special system mode that allows developers to install and run drivers or applications without digital signature for development or test. Unsigned applications, however, increase the security risk to the system and reduce its stability if you don't disable test mode.
Therefore, this article will illustrate how to disable test mode in Windows 11 with two practical methods.

Note: If you access test mode, you can see a watermark displays on desktop.

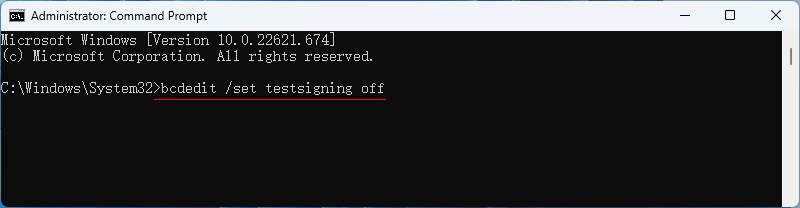
Step 1: Click Search icon on taskbar and input "cmd" in search box. Choose Command Prompt from search results, and then select Run as administrator on the right, entering CMD panel.

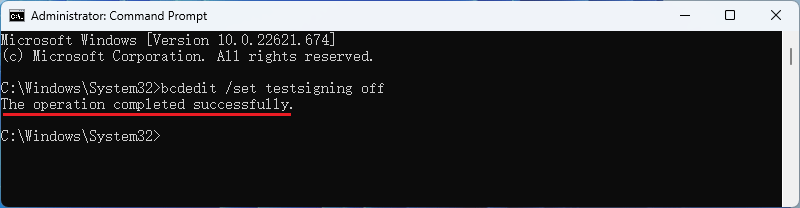
Step 2: Type "bcdedit /set testsigning off/" command and then hit Enter key.
Step 3: This operation has been finished if you get the following message.
Step 4: Click Restart button to reboot your computer and you have exited the test mode when you enter system again.

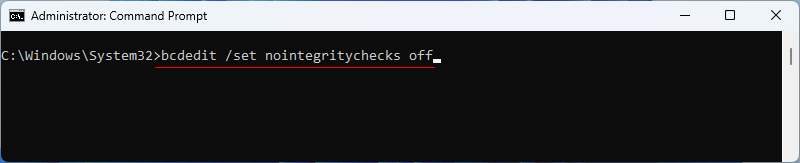
Step 1: As in Step 1 of Solution 1, run Command Prompt as administrator.
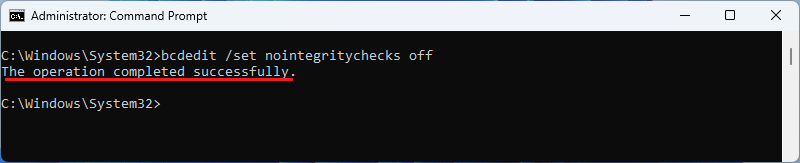
Step 2: Input "bcdedit /set nointegritychecks off", and then press Enter key.
Step 3: Wait for a while and you will see the information "This operation is complete successfully".
Step 4: Reboot your computer to disable Windows 11 system test mode completely, and watermark disappears from screen.
 Perfectly Solved: Win
+ L Shortcut not Working
Perfectly Solved: Win
+ L Shortcut not Working
 How to
Create an Administrator Account in Windows 8/8.1
How to
Create an Administrator Account in Windows 8/8.1
 Fix:
Windows 10 Won't Let Me Enter Password at Login Screen
Fix:
Windows 10 Won't Let Me Enter Password at Login Screen
 Cannot
Remember Windows 10 Password, How to Access the PC
Cannot
Remember Windows 10 Password, How to Access the PC
 How
to Add Sign-in Options for User Account on Windows 10
How
to Add Sign-in Options for User Account on Windows 10
