
Many users complain that Windows 10 is very slow to play games and the screen is stutter when playing games. In fact, as long as your computer's hardware conditions are not so bad, some proper optimization of Windows 10 system can greatly improve gaming performance. Now, in this post, we will introduce some useful tips to help you optimize Windows 10 for gaming. These tips are applicable to all brands of desktops and laptops, such as HP, Dell, Lenovo, Acer, etc.
Some features and settings on Windows 10 will significantly affect gaming performance. Now we will guide you correctly on how to handle these features and settings to optimize your Windows 10 for better gaming performance.
When it comes to playing computer games, the graphics card plays a very important role, because it directly determines the quality of the picture. If the graphics card is not so good or the graphics driver is out of date, the game screen will be stutter. Therefore, in order to optimize Windows 10 for gaming, it is necessary to update your graphics card driver to the latest version.
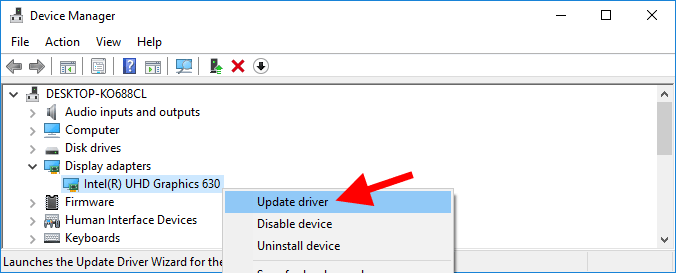
Step 1: Right click the Windows icon at the far left of the taskbar, and then select Device Manager from the menu.
Step 2: In the Device Manager, expand Display adapters and you can see your graphics card model. Right click on the graphics card and select Update driver. Then follow the on-screen prompts to complete the driver update.
Of course, you can also go to the official website of your graphics card maker to get the latest version of the graphics driver, and then install it on your Windows 10. For more details, refer to the following two links.
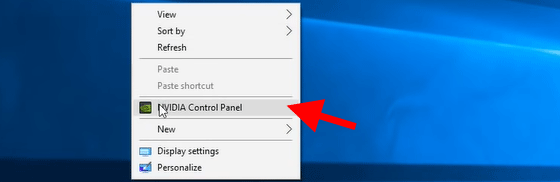
As for how to optimize Windows 10 for gaming, in addition to keeping the graphics driver update to date, you can also configure graphics card settings for best gaming performance. If you are using AMD graphics card, see How to Configure AMD Settings to Optimize Gaming Experience. If you are using NVIDIA graphics card, follow these steps.
Step 1: Right click your Windows 10's desktop and select NVIDIA Control Panel from the menu.
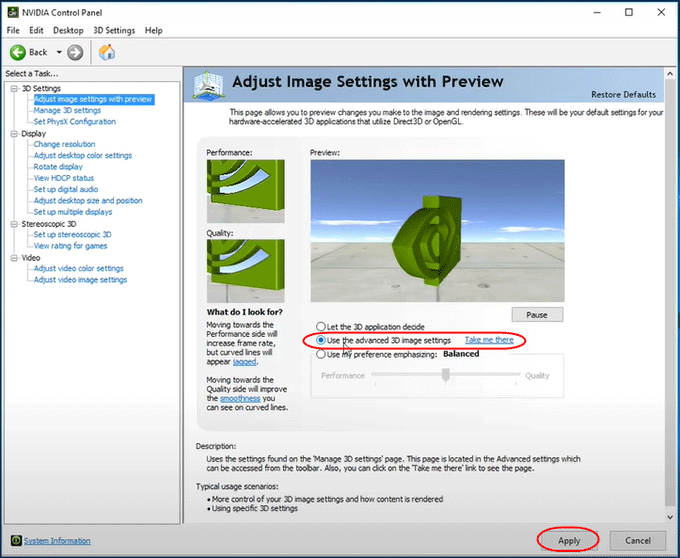
Step 2: After NVIDIA Control Panel opens, expand 3D Settings and select Adjust image settings with preview on the left side. On the right side, select Use the advanced 3D image settings and click Apply.
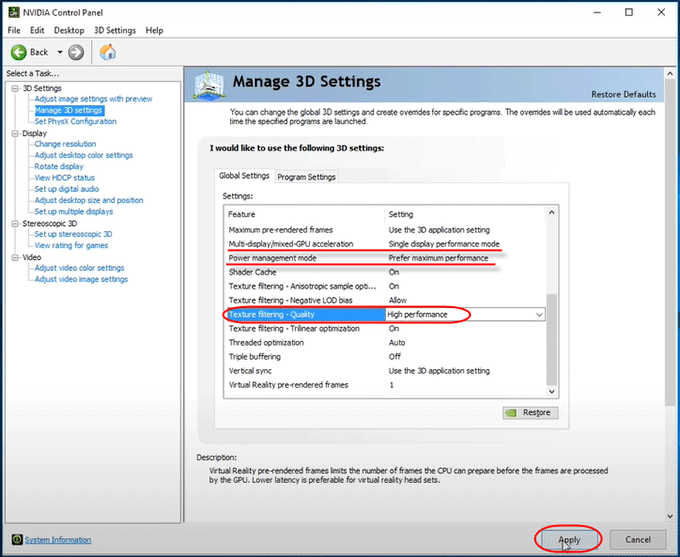
Step 3: Select Manage 3D settings on the left side. On the right side, under the Global Settings tab, click Multi-display/mixed-GPU acceleration and set it to Single display performance mode. Click Power management mode and set it to Prefer maximum performance. Click Texture filtering – Quality and set it to High performance. After the changes, click Apply.
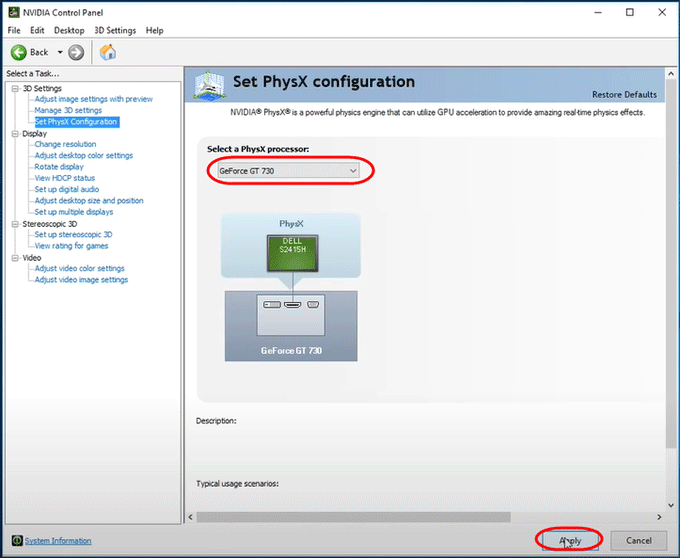
Step 4: Select Set PhysX Configuration on the left side. On the right side, choose GeForce GT 730 from the drop-down menu under Select a PhysX processor, and then click Apply.
Maybe many people haven't heard of the Nagle's Algorithm. It is an algorithm built in Windows to improve the bandwidth utilization rate. However, many times, Nagle causes loading delays when playing online games, which is the culprit of poor gaming experience. Therefore, in order to optimize Windows 10 for gaming, it's recommended that you disable the Nagle's algorithm. Follow the steps below.
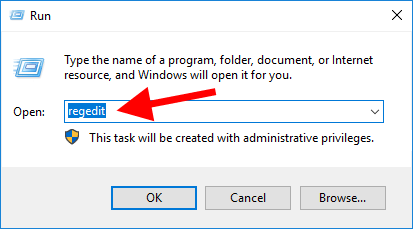
Step 1: Bring up the Run dialog by pressing Win + R, then type regedit and click OK to open Registry Editor in Windows 10.
Step 2: In the Registry Editor, navigate to the path Computer\HKEY_LOCAL_MACHINE\SYSTEM\CurrentControlSet\Services\Tcpip\Parameters\Interfaces. Under the Interfaces key, you can see a few subfolders which are named after numbers and letters. Click on these subfolders in turn to find the folder that contains the DhcpIPAddress whose value data matches the IP address of your computer.
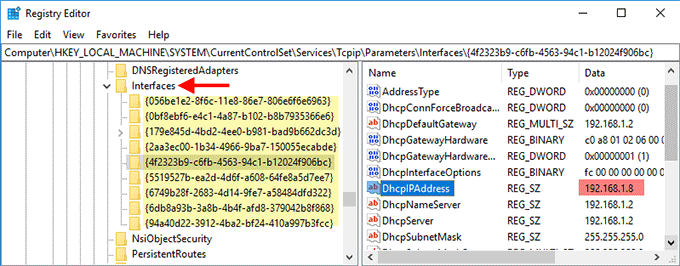
Tips: If you don't know what your IP address is, go to Control Panel > Network and Internet > Network and Sharing Center > Ethernet > Details > IPv4 Address to check the IP address of your Windows 10 computer.
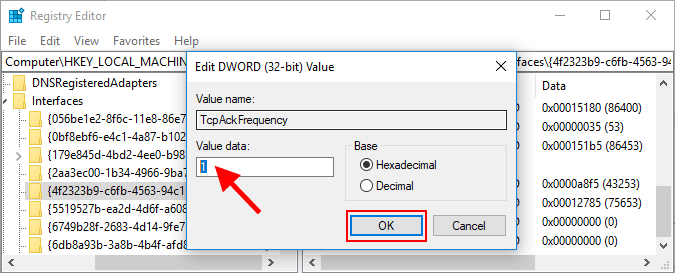
Step 3: Right click on the folder and select New > DWORD (32-bit) Value. You can then see the newly created value on the right-side pane. Rename the new value TcpAckFrequency. Create another new DWORD (32-bit) Value and rename it TCPNoDelay.
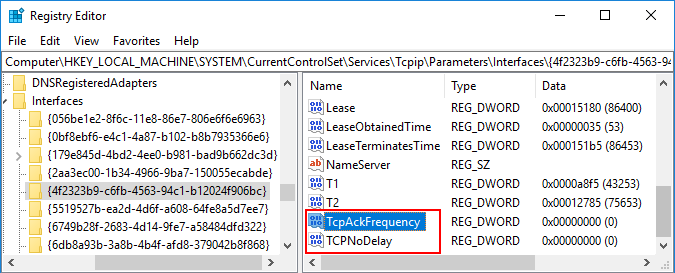
Step 4: Double click on each of the two newly created values and change both of their value data to 1.
Step 5: Restart Windows 10 for the changes to take effect. The Nagle's Algorithm is now disabled and gaming performance should be improved.
There is some other stuff on Windows 10 that will significantly affect gaming performance, such as registry garbage, background startup processes, and unnecessary system services. Registry garbage can sometimes make Windows 10 system less stable. Some unnecessary system services running in the background consume CPU and memory, affecting gaming performance.
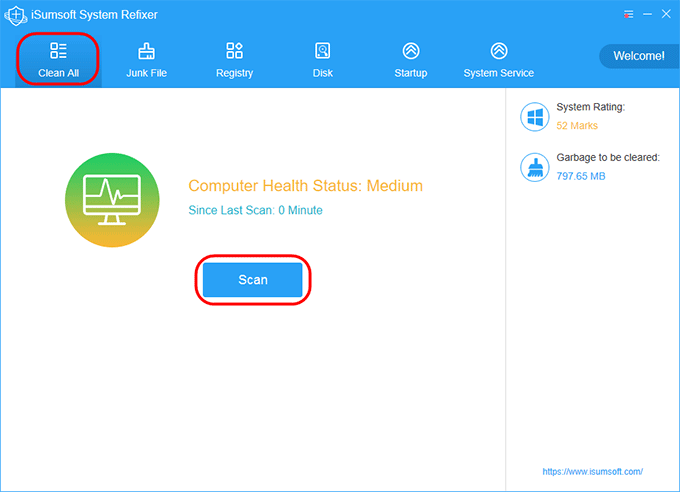
Therefore, in order to optimize Windows 10 for gaming, clean up the registry and disable unnecessary services. Since these tasks are difficult to complete manually, you need the help of a professional Windows 10 optimization tool like iSumsoft System Refixer. Now, install and run this tool on your Windows 10 for free, and then follow these steps to optimize your Windows 10 for better gaming performance.
Step 1: Select the Clean All option and then click Scan. When the scan is complete, click the Clean button in the upper right to clean out all system junk files on your Windows 10, including invalid registry junk. This makes your Windows 10 system cleaner and more stable.
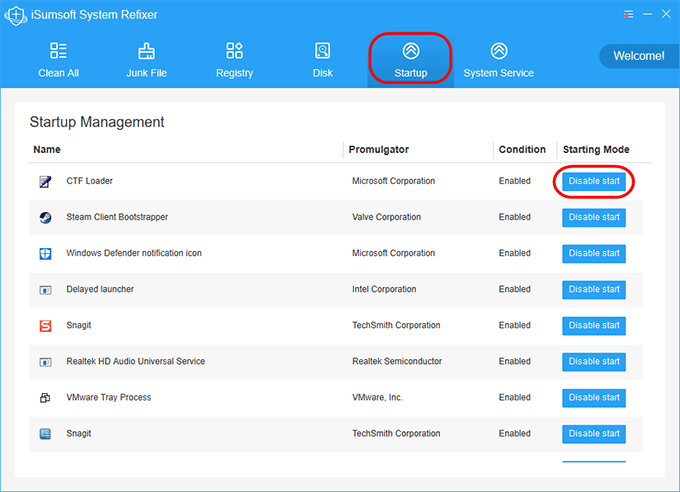
Step 2: Go to the Startup option. Here you can see all startup applications, which will automatically run in the background every time you boot Windows 10. Disable all unnecessary startup processes to reduce the CPU and memory usage and improve gaming performance.
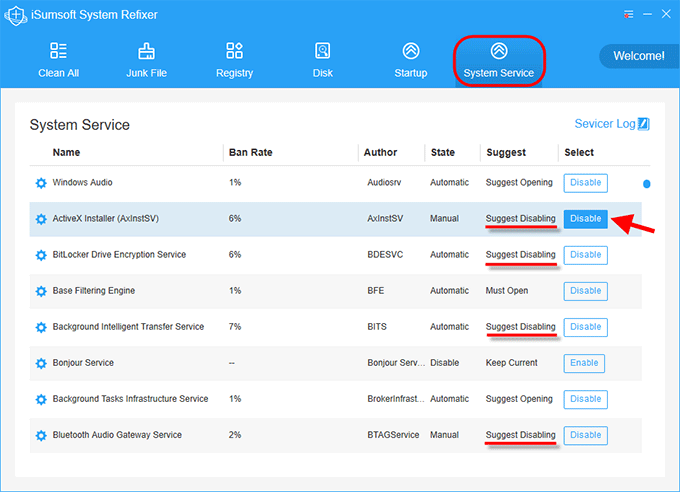
Step 3: Go to the System Service option and you can see a list of all system services on your Windows 10. Here, you can easily disable or enable each service. Disable the services that iSumsoft System Refixer suggests you disable. This will further reduce CPU and memory usage of your computer so that you can get a better gaming performance. Please note that disabling system services at will can cause problems with Windows 10.
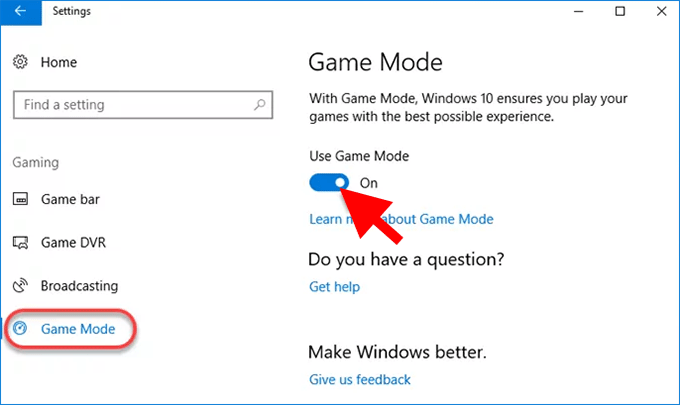
Windows 10 comes with Game Mode, which helps create a better environment for the game to run. When Game Mode is turned on, Windows 10 allocates more CPU and GPU resources to the game and suspends unrelated processes to provide you the best possible gaming performance. Therefore, in order to optimize Windows 10 for gaming, make sure Game Mode is enabled.
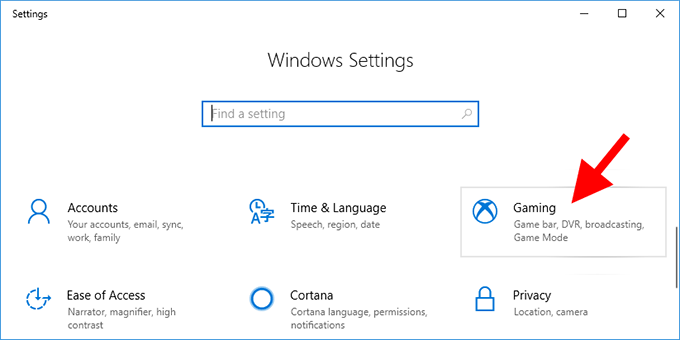
Step 1: Open Settings by pressing Win + I, and then select Gaming in the Settings page.
Step 2: Select Game Mode on the left side pane, and then switch the button under Use Game Mode to On.
Windows 10's Game DVR feature can slow your gaming performance by automatically recording video in the background. If you don't care about recording your gameplay, disable Game DVR for better gaming performance.
Step 1: Similarly, open Settings and then choose Gaming.
Step 2: Select Game DVR on the left side. On the right side, make sure the toggle button under ‘Record in the background while I'm playing a game' is in the Off position.

By default, automatic updates are enabled on Windows 10. As a result, Windows 10 often automatically installs updates and restarts your computer without notifying you in advance. However, if the restart occurs in the middle of your playing games, it will definitely make you irritated. To avoid this and optimize your Windows 10 for gaming, you can disable automatic updates, or set your active hours using the following steps.
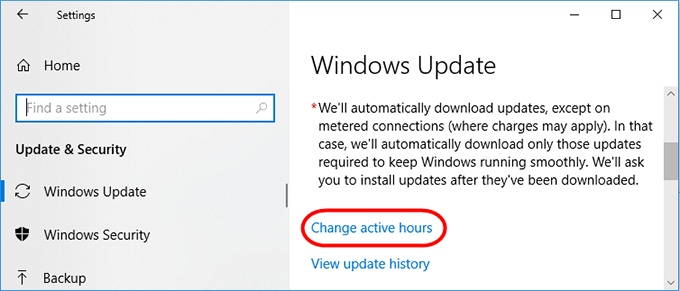
Step 1: Open Settings and then choose Update & Security.
Step 2: On the Windows Update page, click Change active hours.
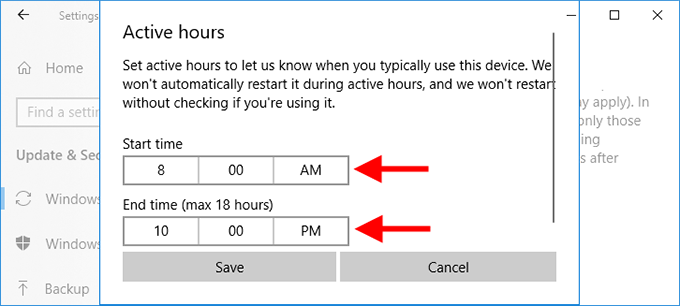
Step 3: Set the active hours according to your gaming time or when you typically use your computer, so that Windows 10 won't automatically restart during your active hours. For example, if you usually play games during the day, you can set the active hours from 8:00 AM to 10:00 PM. This way, you can get a better gaming experience on your Windows 10 without being affected by the sudden automatic restart of the computer.
Those are our seven suggestions on how to optimize Windows 10 system for gaming. Of course, there are some other tips that might help improve gaming experience or performance, such as turning off the Windows Defender or any other anti-virus software. But the effect may not be obvious. It is also worth mentioning that upgrading laptop's hard drive to SSD will not significantly improve gaming performance, but will only accelerate the loading or startup speed of the game.
 How to Fix HP Laptop Slow Startup on Windows 10
 How to Unlock HP Laptop Forgot Password Windows 10
 How to Restore HP Laptop to Factory Settings without Password
 3 Tricks to Make Windows 10 PC Boot Faster
 How to Remove All Junk Files from Windows 10 Computer
 Acer Laptop Running Slow? 8 Fixes to Speed Up Acer Laptop