
BIOS or UEFI passwords are stored at the hardware level. If you forget your BIOS or UEFI password, you may not be able to operate your computer or change BIOS settings until you clear the forgotten password. If you wish to recover, reset, or remove a lost or forgotten BIOS from your Dell computer, you have the following options:
Step 1: Restart the computer and tap F2 key during POST to enter System Setup (BIOS). This should prompt for BIOS password. Type the password that you might have set on your computer and press Enter key once.
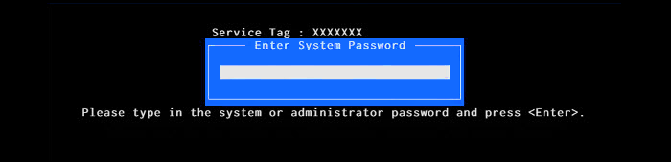
Step 2: If unsuccessful, you will prompted with the message 'Invalid Password'. Press Enter key to try again. On three unsuccessful attempts, you will be prompted with the message 'Invalid Password. HDD is Locked'.
Step 3: Make a note of the Service Tag and the Hard-drive S/N mentioned on top of the screen.
Step 4: Contact Dell for Password release code.
Click here to open the Dell Support contact website. Enter your system Service Tag information, and then you will get the master password to clear BIOS password.
Note: The Service Tag will be documented on a small sticker on the bottom, back, or side of your Dell PC. The Service Tag is a 7 digit identifier that is unique to your Dell. The Service Tag is different from the 10 digit Express Service Code.
Step 5: Clearing Password.
Once Dell Support has provided the master password, you will enter this at the prompt and then press Ctrl + Enter to complete the process. The master hard drive password will automatically clear the hard drive password.
Note: If the computer responds with the message Invalid Password, press the Enter key and continue to enter the same password three more times. After the fourth attempt the BIOS should accept the master password, clear the password, and allow access to the hard drive.
All full tower desktop computers use a 3 volt lithium battery, which also used on wrist watches and other small electronic devices. The CMOS battery keeps the time and date, even if the computer is off and unplugged. A CMOS battery usually lasts two to three years. When you remove and replace the CMOS battery, your BIOS will reset. What's more, the BIOS password will be removed.
Here's how to do it on a Dell Latitude laptop:
Step 1: Turn off your PC's power supply and remove all connections.
Step 2: Make sure you're properly grounded to prevent damage to your computer.
Step 3: Open the computer case and lift the battery away from the laptop body.
Step 4: Remove two M2 x 3mm Phillips #0 screws from the base cover.
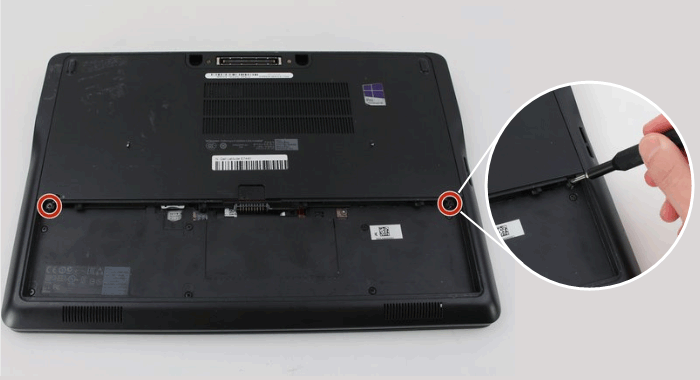
Step 5: Slide the base cover down slightly and remove it.
Step 6: Locate the CMOS battery and remove the CMOS battery. On most motherboards, the battery holder lays flat on the board itself and has a small metal tab.
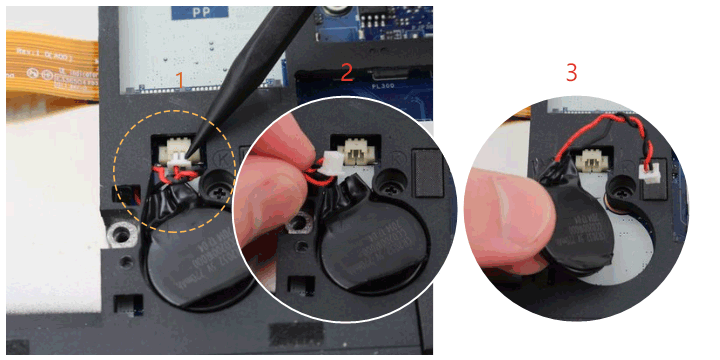
Step 5: After removing the battery, wait several minutes (at least five minutes), then reattach the battery to your motherboard and turn the computer back on.
Alternatively, you may want to replace it with a new battery, rather than simply reinserting the old one. To install the battery, press it on the battery holder keeping the positive (flat) side facing you.
Step 1: Turn off the computer. Unplug the power cable and remove all connections.
Step 2: With your computer still turned off and unplugged, remove your computer's cover.
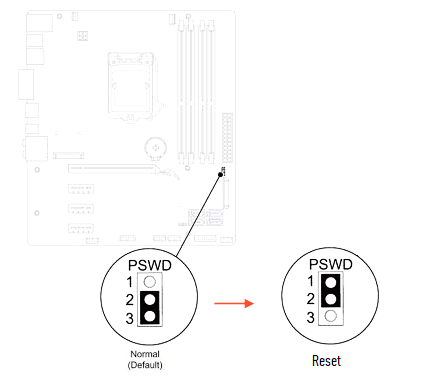
Step 3: Locate the password jumper on the motherboard, look for the letters PWD, PSWD or PSWDCLR.
Step 4: Choose an option to remove password jumper:
If there are 2 metals pins under the jumper
1. Remove the jumper from the pins, replace the computer cover, reconnect the power cable and monitor and turn on the computer.
2. After the Windows logon screen appears, turn off the computer.
3. Again, disconnect the power cable and monitor.
4. Press and hold the power button for 10 seconds to release static electricity from the system.
5. Remove your computer cover.
6. Replace the jumper in its original position covering the 2 pins. This will re-enable password feature.
7. Replace the computer cover.
8. Reconnect the power cable and other connections and turn on the computer.
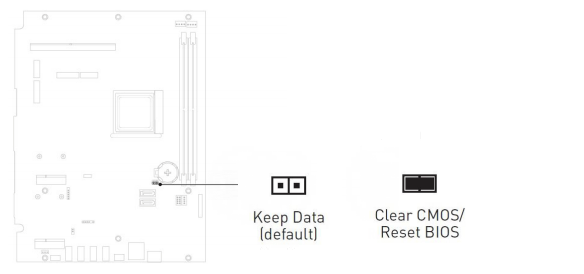
If there are 3 pins under the jumper
 How to Boot My Computer (ASUS) from USB in UEFI BIOS
 How to Boot My Computer Lenovo from USB in UEFI BIOS
 How to Boot (Dell) Windows 10 from External Hard Drive or USB
 How to Update BIOS in Windows 10 - Acer ASUS Dell HP Lenovo
 How to Reset or Remove BIOS Password on HP NoteBook
 How to Enable Virtualization (Hypervisor) in BIOS/UEFI