
How can I transfer my music from iPhone to computer? As an iPhone user, you may be confused about how to enjoy your favorite music on more devices such as PC or Mac. As a common and easy way, iTunes may be your first choice to sync music. While iTunes only supports transferring purchased music to computer. If you want to transfer both your purchased and non-purchased music, you may need some other ways to make it. In this article, you can learn on how to transfer music from iPhone with iTunes if you just want to transfer the purchased music on your iPhone. In addition, you can get some ways on how to transfer songs from iPhone to computer without iTunes if you want to transfer all of your songs from your phone to computer.

As an official backup tool, iTunes offers various files backups, which is widely used by iPhone users. Thus, when you have purchased music in your phone and want to sync them to your computer, you can move purchased music to your PC using iTunes. While how about those non-purchases? Is there any easy way to transfer all music from your phone to computer? Certainly, way 3 can meet your needs. However, if you prefer to transfer purchased songs rather than copy all songs in your iPhone, you can use iTunes and follow the steps below.
Step 1: Download and install the latest version of iTunes on your PC. After installation, connect your iPhone to your computer and check if your iPhone has trusted your PC.
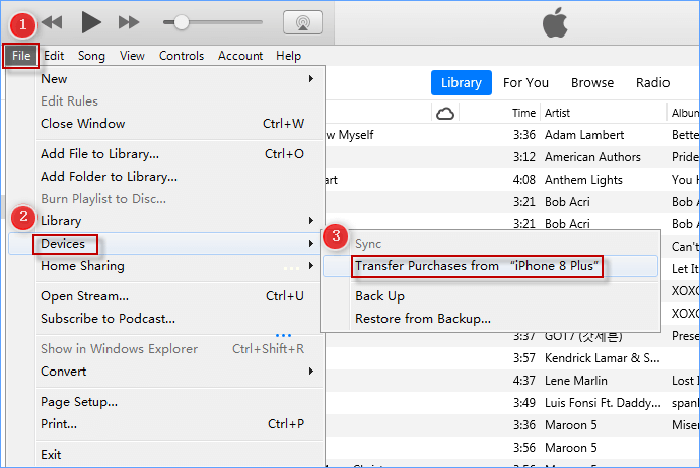
Step 2: Launch iTunes and click "File" on the top left corner of the window. Next, expand Devices section and choose Transfer Purchases from "(your device name)".
Step 3: Wait until the purchased music is transferred to iTunes Library successfully. Next, click on Recently Added on the left side and you will find the transferred music from your iPhone. Finally, select the music and click on the Download button.
(Note: During the process, if you are requested to authorize your computer to play the purchased music, you can follow this way: Click "Account" on the upper left menu > choose "Authorizations" > "Authorize This Computer". )
Inside iTunes app, you can check and download your purchased music by logging in account on iTunes without connecting your iPhone to your PC. The steps are as follows.
Step 1: Launch iTunes first. Click on Account on the top left of the menu tab and sign in your account with your Apple ID and password.
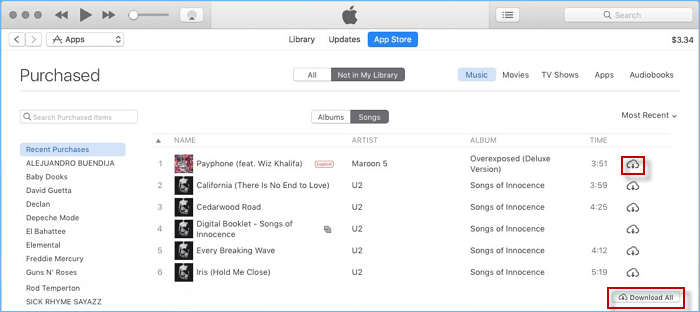
Step 2: Enter "Account" > "Purchased" > "Music" and choose "Not in My Library" on the top middle tap. You can check the purchased music in your account and click the download button to download the music to your PC.
Certainly, iTunes is a good way to back up files from iPhone to Computer. However, when it comes to transferring songs, iTunes only supports to transfer your purchased songs to your computer. So, how to transfer songs from iPhone to computer without iTunes? Here are other 3 ways for you.
iSumsoft BackupTo is a backup software designed for iPhone users to backup, restore, and transfer iPhone data more easily. With iSumsoft BackupTo, you can back up your files together or separately, decide where to save your backups and encrypt your backup with password. Moreover, you can not only transfer your files from iPhone to PC, but also transfer your files from iPhone to another iPhone. If you want to transfer your music from phone to PC, you can have a try on this easy way. Here are the steps on how to transfer music from iPhone without iTunes using iSumsoft BackupTo.
Step 1: Download iSumsoft BackupTo and install it on your PC. Next, connect your device to PC using a USB cable.
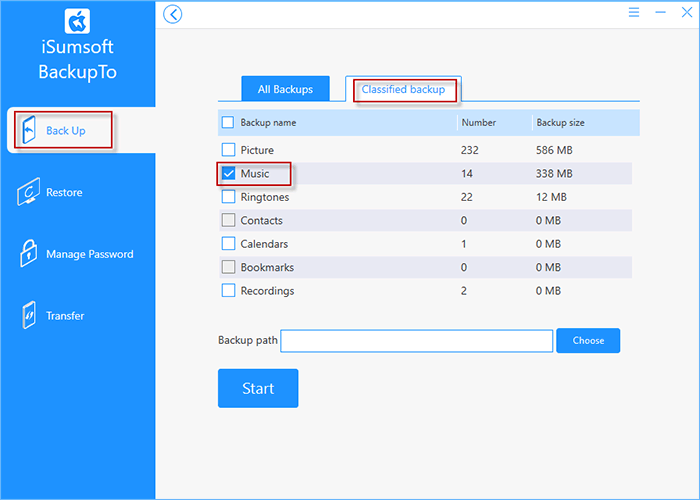
DownloadStep 2: Launch iSumsoft BackupTo and choose "Back Up". Enter "Classified backup" and you are able to select "Music" backup.
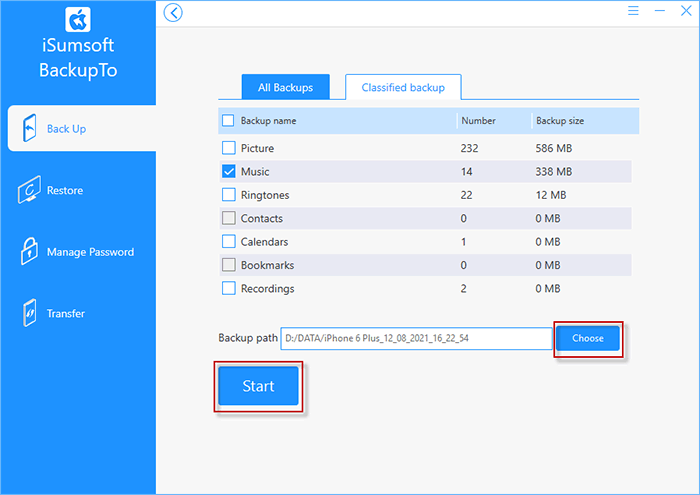
Step 3: After choosing music backup, you can click on "Choose" to select a suitable location to save your music. Next, click on "Start" to transfer your music to PC. After finished, you can find your music and play them directly on your PC.
Dropbox can also be one of your good choices to transfer your music to computer. As a home to save your files online, Dropbox can help you back up all your files to the cloud and allow you to automatically sync files to your Windows or Mac computer so you can access them offline. While Dropbox offers 2 GB storage for free, you have to pay extra fee to get more space if your files takes up more than 2G. Here come the steps on how to transfer songs from iPhone to computer without iTunes via Dropbox.
Step 1: Download and install Dropbox on iPhone > Log in account > Click on "+"icon > Tap on the Create and Upload file option. Then you can search the music you want to transfer to computer and click on "Upload" to transfer music to Dropbox.
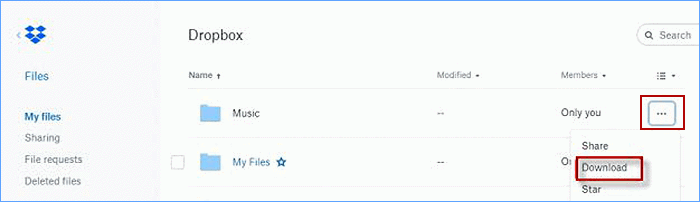
Step 2: Enter dropbox.com and log in to your account on your computer. You can find the Music files in your Dropbox. Click on "…"icon and download the transferred music to your computer.
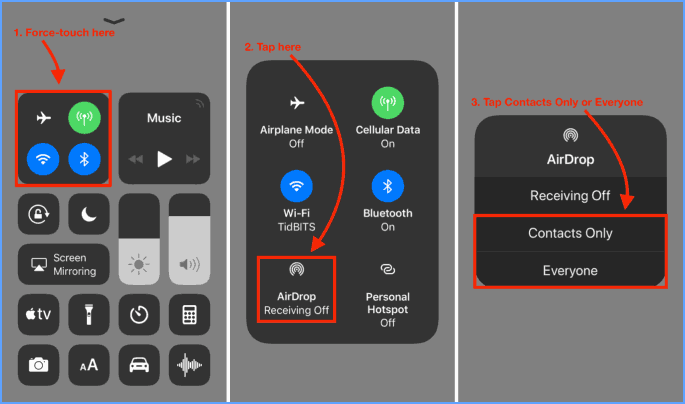
Step 1: Pull up your iPhone screen to find AirDrop in the Control Center and turn it on. On your Mac, Open AirDrop from Finder as well. To connect your iPhone and Mac, set your iPhone and Mac in a state of Contacts Only or Everyone after turning them on.
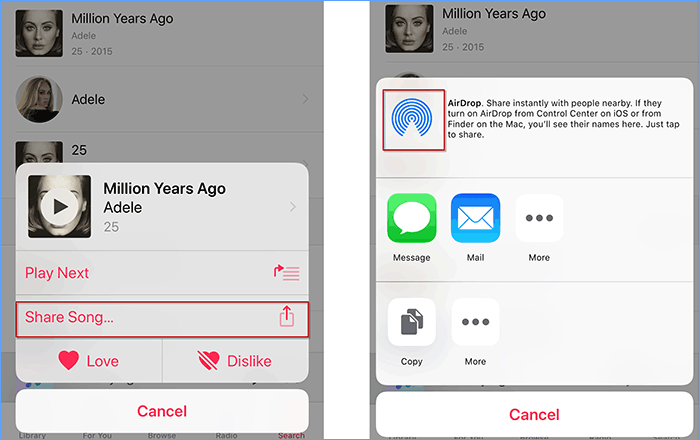
Step 2: Open your Music app > Choose the music you want to transfer > Tap on "..." icon > Touch Share Song > Tap on AirDrop. Then your iPhone will search for target device with AirDrop on, find your Mac name and touch it. When your Mac receives the request of transferring music from your iPhone, just tap on Accept on your Mac.
 How to to Lock and Password Protect Music on Windows & USB
 5 Ways to Transfer Photos from iPhone to USB Drive
 4 Methods to Copy Voice Memos from iPhone to Computer
 3 Ways to Transfer Everything from Old iPhone to New iPhone
 Transfer Text Messages from iPhone to Computer without iTunes
 How to Find iTunes Backup Files on Mac or Windows
 How to Fix iTunes Cannot Read the Contents of the iPhone
 5 Ways to Fix iPhone Not Showing up in Windows Explorer