
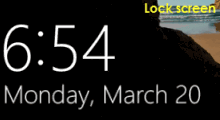
Every time Windows 10 starts, restarts, locks, signs out a user account, or wakes up from Sleep, it displays the lock screen. In order to sign in to your account, you have to first click your mouse button or swipe up to dismiss the lock screen and go to the login screen. Some people do not like the lock screen and wonder if they can remove it from Windows 10. The answer is Yes. Now in this page, we will show you how to skip or disable the lock screen in Windows 10. There are three options for your choices.
After Windows 10 starts or restarts, if you hope it can quickly and automatically sign in to your user account without requiring you to first dismiss the lock screen wallpaper, simply do as follows.
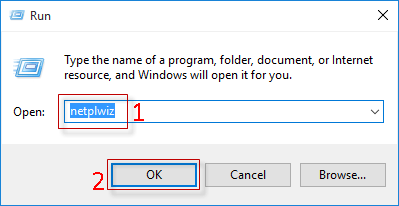
Step 1: Open the Run dialog box by using Win + R, type in netplwiz and then click OK.
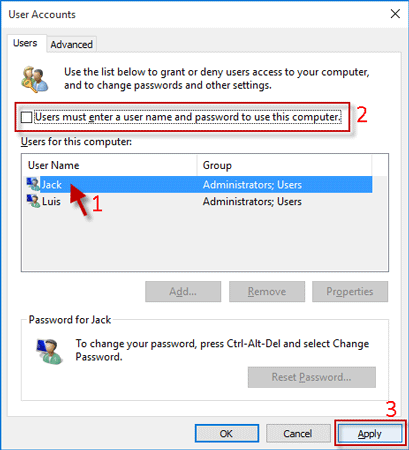
Step 2: After the "User Accounts" dialog opens, with the "Users" tab selected, click your user, uncheck the "User must enter a user name and password to use this computer" checkbox, and then click Apply button.
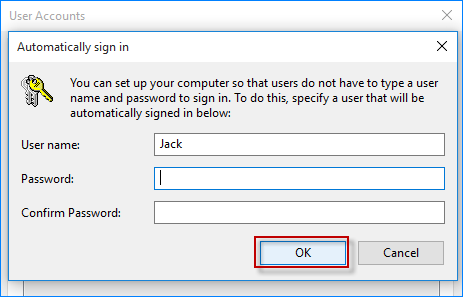
Step 3: After the "Automatically sign in" dialog opens, type the password if you have set a password for the user account, and click OK. If the user has no password, you just need to leave the Password fields blank and click OK.
Step 4: Now restart Windows 10 and check if Windows 10 will skip the lock screen and automatically sign in to your user account.
This way, the lock screen is disabled only after Windows 10 starts or restarts. It will still appear when Windows 10 locks, signs out or wakes up from Sleep. Note that this way will also bypass the password and login screen if you have set a password for your user account.
If you just want to remove/disable the lock screen when you lock Windows 10, signs out a user account, or wakes up your computer from sleep, follow the steps.
Step 1: Open the File Explorer.
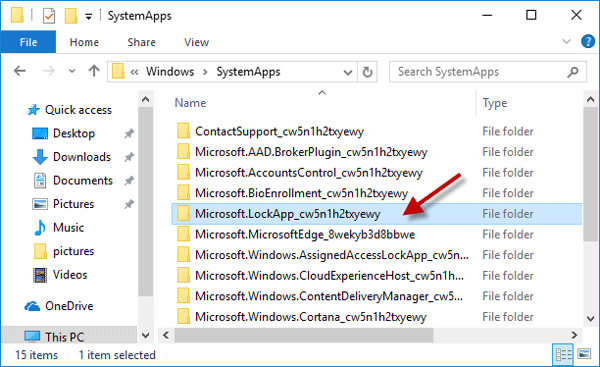
Step 2: Navigate to C:\Windows\SystemApps, and locate the "Microsoft.LockApp_cw5n1h2txyewy" folder.
Step 3: Rename the "Microsoft.LockApp_cw5n1h2txyewy" folder to something like "Microsoft.LockApp_cw5n1h2txyewy.backup" (without the quotes). That's it.
This way, Windows 10 will not display the lock screen any more, when you lock Windows 10, signs out, or wakes up your computer from Sleep, but the lock screen still appears every time Windows 10 starts or restarts. If you want to enable the lock screen, just need to rename the "Microsoft.LockApp_cw5n1h2txyewy.backup" folder back to "Microsoft.LockApp_cw5n1h2txyewy".
If you don't want to see the lock screen at any time, you can completely disable it by Group Policy setting.
Step 1: Open the Local Group Policy Editor by searching gpedit.msc in Start menu search.
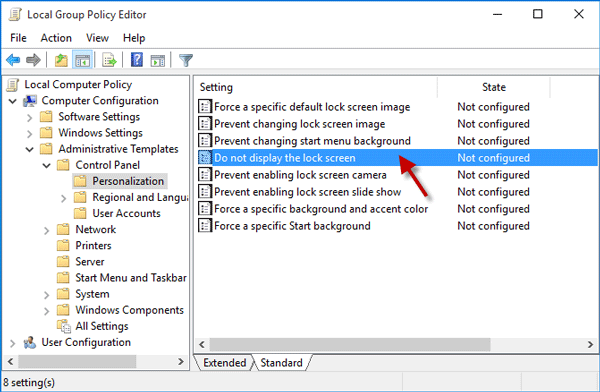
Step 2: On the left-side pane, expand "Computer Configuration", expand "Administrative Templates", expand "Control Panel", and then click the "Personalization" folder. With the Personalization selected, locate the "Do not display the lock screen" policy on the right-side pane, and then double-click on this policy to configure it.
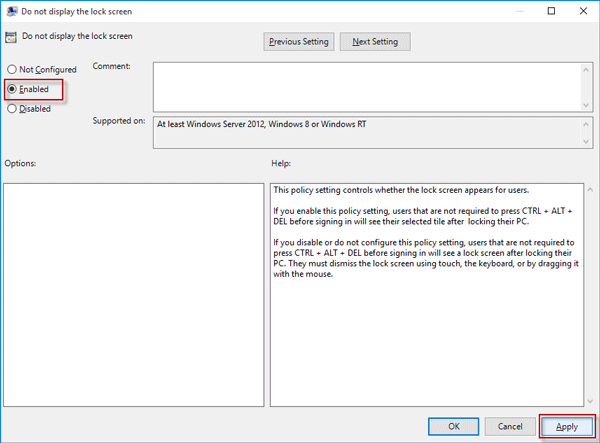
Step 3: Select Enabled, and click Apply followed by OK. That's it. Now the lock screen is completely disabled. Windows 10 will not display the lock screen anymore.
Step 4: Restart or lock Windows 10 to check if the changes take effect.
If you want to enable the lock screen, just need to set the "Do not display the lock screen" policy to "Not Configured".
 How to Enable or Disable Cortana on Windows 10 Lock Screen
 4 Ways to Lock Windows 10 PC
 How to Take Screenshots of Lock Screen in Windows 10
 How to Reset Windows 10 Password from Login Screen
 Sign-in Options Missing from Windows 10 Login Screen